svt raptor t - stanbridgesinstrucciones de montaje y de servicio istruzioni per il montaggio e...
TRANSCRIPT
Made in China, Huizhou.
Montage- und Betriebsanleitung
Assembly and operating instructions
Instructions de montage et d’utilisation
Instrucciones de montaje y de servicio
Istruzioni per il montaggio e l’uso
Montage- en gebruiksaanwijzing
Instruções de montagem e modo de utilização
Monterings- och bruksanvisning
Asennus- ja käyttöohje
Instrukcja montażu i obsługi
Szerelési és használati utasítás
Navodila za montažo in uporabo
Návod k montáži a obsluze
Montajse- og bruksanvisning
Monterings- og driftsvejledning
Οδηγίες συναρμολόγησης και λειτουργίας
Fo
rd
F-1
50
Fo
rd
F-1
50
Fo
rd
F-1
50
Fo
rd
F-1
50
Fo
rd
F-1
50
Fo
rd
F-1
50
Fo
rd
F-1
50
Fo
rd
F-1
50
Fo
rd
F-1
50
Fo
rd
F-1
50
Fo
rd
F-1
50
S
VT
Ra
pto
r T
S
VT
Ra
pto
r T
S
VT
Ra
pto
r T
S
VT
Ra
pto
r T
S
VT
Ra
pto
r T
S
VT
Ra
pto
r T
S
VT
Ra
pto
r T
S
VT
Ra
pto
r T
S
VT
Ra
pto
r T
S
VT
Ra
pto
r T
S
VT
Ra
pto
r T
S
VT
Ra
pto
r T
S
VT
Ra
pto
r T
S
VT
Ra
pto
r T
S
VT
Ra
pto
r T
S
VT
Ra
pto
r T
# 160
001
# 160
006
# 160
007
# 160
008
2
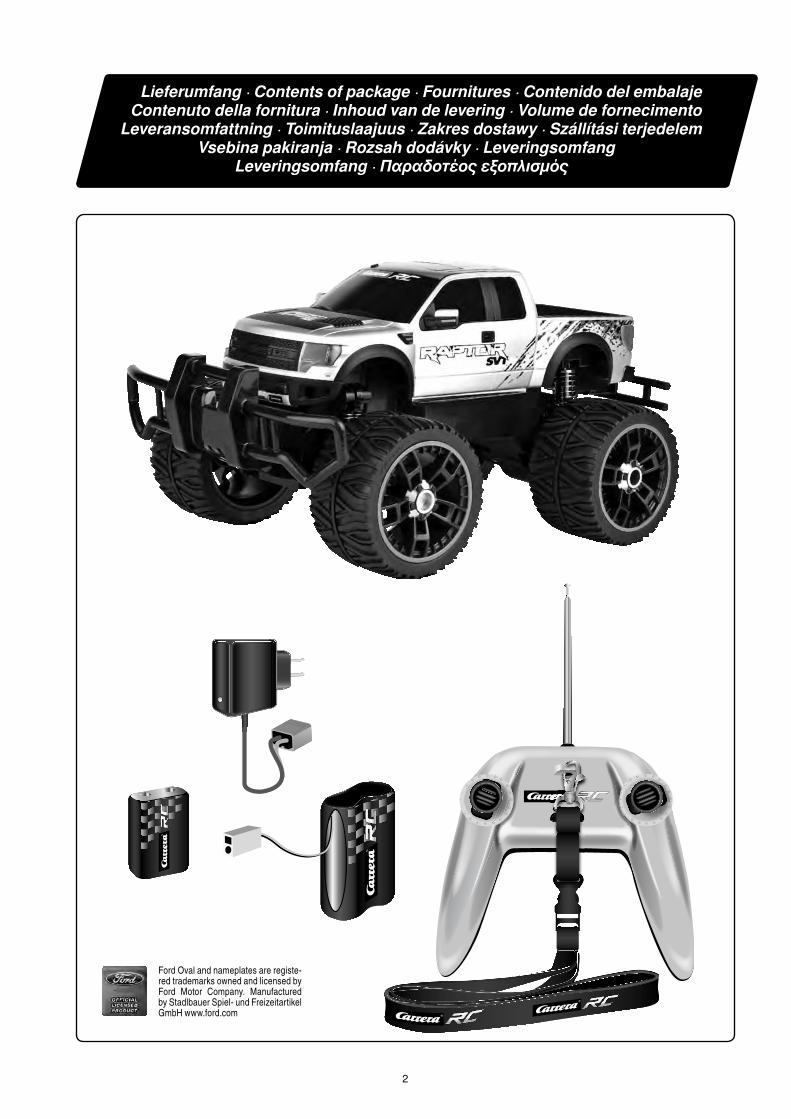
Lieferumfang · Contents of package · Fournitures · Contenido del embalaje Contenuto della fornitura · Inhoud van de levering · Volume de fornecimento
Leveransomfattning · Toimituslaajuus · Zakres dostawy · Szállítási terjedelem Vsebina pakiranja · Rozsah dodávky · Leveringsomfang
Leveringsomfang · Παραδοτέος εξοπλισμός
Ford Oval and nameplates are registe-red trademarks owned and licensed by Ford Motor Company. Manufactured by Stadlbauer Spiel- und Freizeitartikel GmbH www.ford.com
8
Dear customer
Congratulations on purchasing a Carrera RC model car, manufactured in accordance with the latest technology. As it is our constant endeavour to develop and improve our products, we reserve the right to make modifications, either of a technical nature or with respect to features, materials, and design, at any time, and without prior notice. For this reason, no claims will be accepted for any slight deviations in your product from the data and illustrations contained in these instructions. These operating and assembly instructions are an integral part of the product. Non-observance of these operating instructions and the safety instructions they contain will render the guaran-tee null and void. These instructions are to be kept for future reference and in the event that the product is passed on to a third party.
Guarantee conditions
A Carrera product is built to high technical standards and is to be treated with care. Please ensure that you observe all the instructions contained in this guide. All compo-nents have been subjected to careful inspection (technical modifications and altera-tions to the model for the purpose of product improvement are reserved).
Should any faults nevertheless occur, guarantee is assumed within the scope of the following conditions:The guarantee covers demonstrable material or manufacturing defects that existed at the time that the Carrera product was purchased. The guarantee period is 24 months beginning with the date of purchase. The guarantee does not extend to wearing parts, damage caused by improper treatment or use, or unauthorised intervention. Repair may only be performed by Stadlbauer Marketing + Vertrieb GmbH itself or by a com-pany it has authorised to do so. Within the scope of this guarantee, either the product as a whole or only the defective components will be replaced or equivalent substitu-tion performed, as deemed appropriate by Stadlbauer Marketing + Vertrieb GmbH The guarantee does not cover transport, packaging or travel costs or any damage for which the buyer is responsible. These costs are to be covered by the buyer. Guarantee claims will only be accepted from the original purchaser of the Carrera product.
Guarantee claims can only be accepted when:• The card has been filled in properly and sent in together with the defective Carrera product and the purchase receipt/invoice/cash-register receipt. • No unauthorised alterations have been made by the buyer to the guarantee card.• The toy has been treated in accordance with the operating instructions and subjected to its intended use. • The damage/faulty operation is not due to acts of God or normal wear and tear. Guarantee cards cannot be replaced.
Note for EU countries: Reference is hereby made to the seller’s statutory guarantee obligation, to the extent that this guarantee obligation is not restricted by the product guarantee.
Declaration of conformity
Stadlbauer Marketing + Vertrieb GmbH hereby declares that this model including the controller conforms with the fundamental requirements of the following EC directives: EC Directives 2009/48 and 2004/108/EC regarding electromagnetic compatibility and the other relevant regulations of Directive 1999/5/EC (R&TTE).The original declaration of conformity can be requested from carrerarc.com.
Warning!
This toy contains small parts small parts which can be swallowed and is therefore not suitable for children under the age of 36 months. Caution: danger of pinching during operation! Remove all packaging materials and wire fastenings before handing the toy over to the child. Please retain the packaging and address for information and in the event of any questions.
This symbol, showing refuse bins with a cross through them, denotes that empty bat-teries, rechargeable batteries, button cells, rechargeable battery packs, equipment batteries, disused electrical equipment, etc. should not be disposed of in domestic refuse, as they are harmful to the environment and health. Please help to preserve environment and health and talk to your children about the correct disposal of used batteries and disused electrical equipment. Batteries and disused electrical equip-ment should be handed in to the usual collection points where they can be properly recycled. Do not mix dissimilar battery types or employ new and used batteries together. Empty batteries should be removed from the product. Do not attempt to recharge non-rechargeable batteries. Rechargeable batteries should only be charged under adult super vision. Exhausted batteries are to be removed from the toy. Rechargeable batteries should be removed from the product before charging. Supply terminal are not to be short-circuited. Only use the batteries recommended or equiva-lent types. If in regular use the charger must be examined for damage to the cord, plug, covers and all other parts. If any signs of damage are found the charger may only be used again after repair work has been completed.
Requirement for FCC Part 15
Warning: Changes or modifications not expressly approved by the party responsible for compliance could void the user’s authority to operate the equipment.Note: This equipment has been tested and found to comply with the limits for a Class B digital device, pursuant to Part 15 of the FCC Rules. These limits are designed to provide reasonable protection against harmful interference in a residential installa-tion. This equipment generates, uses and can radiate radio frequency energy and, if not installed and used in accordance with the instructions, may cause harmful interfer-ence to radio communications.However, there is no guarantee that interference will not occur in a particular installa-tion. If this equipment does cause harmful interference to radio or tele vision reception, which can be determined by turning the equipment off and on, the user is encouraged to try to correct the interference by one or more of the following measures:• Reorient or relocate the receiving antenna.• Increase the separation between the equipment and receiver,• Connect the equipment into an outlet on a circuit different from that to which the receiver is connected.• Consult the dealer or an experienced radio/TV technician for help.
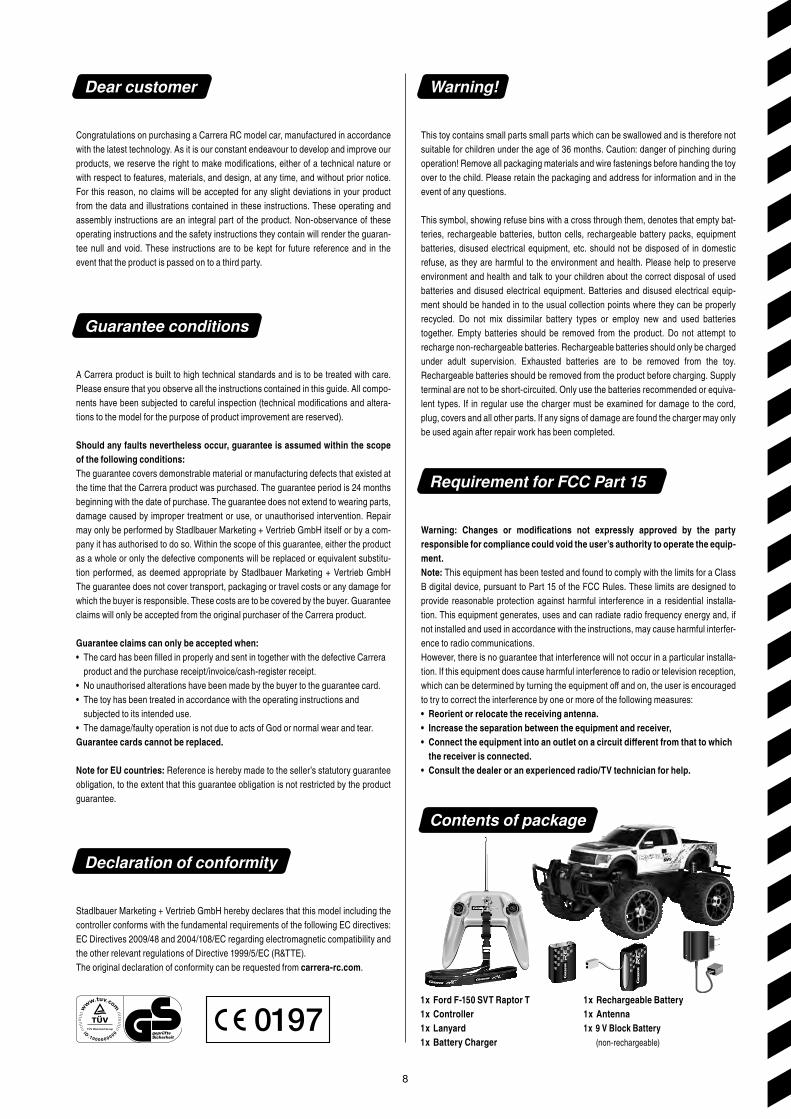
Contents of package
1 x Rechargeable Battery1 x Antenna1 x 9 V Block Battery (non-rechargeable)
1 x Ford F150 SVT Raptor T1 x Controller1 x Lanyard1 x Battery Charger
1
2
3
4
7 1
11
10
12
13
10
> 1
5cm
8
9
6
5
999
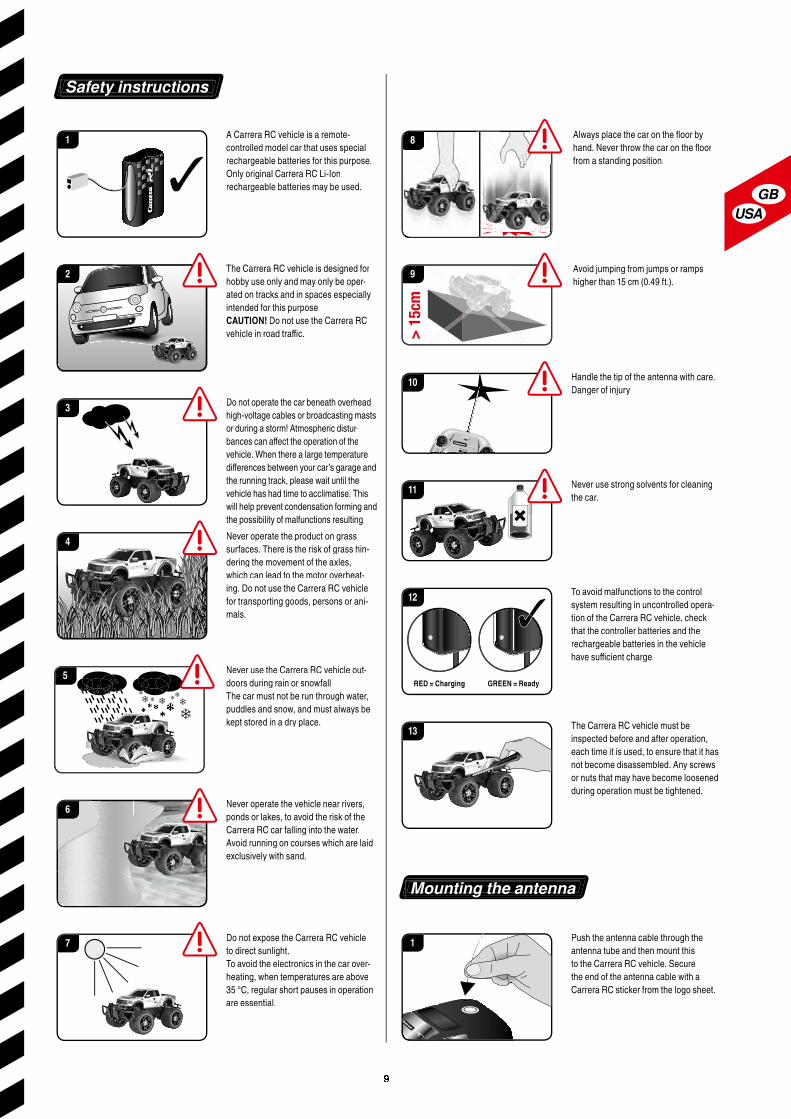
GREEN = ReadyRED = Charging
Avoid jumping from jumps or ramps higher than 15 cm (0.49 ft.).
Always place the car on the floor by hand. Never throw the car on the floor from a standing position.
A Carrera RC vehicle is a remote-controlled model car that uses special rechargeable batteries for this purpose.Only original Carrera RC Li-Ion rechargeable batteries may be used.
Push the antenna cable through the antenna tube and then mount this to the Carrera RC vehicle. Secure the end of the antenna cable with a Carrera RC sticker from the logo sheet.
Handle the tip of the antenna with care. Danger of injury!
The Carrera RC vehicle is designed for hobby use only and may only be oper-ated on tracks and in spaces especially intended for this purpose.CAUTION! Do not use the Carrera RC vehicle in road traffic.
Never use strong solvents for cleaning the car.
Do not operate the car beneath overhead high-voltage cables or broadcasting masts or during a storm! Atmospheric distur-bances can affect the operation of the vehicle. When there a large temperature differences between your car’s garage and the running track, please wait until the vehicle has had time to acclimatise. This will help prevent condensation forming and the possibility of malfunctions resulting.
To avoid malfunctions to the control system resulting in uncontrolled opera-tion of the Carrera RC vehicle, check that the controller batteries and the rechargeable batteries in the vehicle have sufficient charge.
Never operate the product on grass surfaces. There is the risk of grass hin-dering the movement of the axles, which can lead to the motor overheat-ing. Do not use the Carrera RC vehicle for transporting goods, persons or ani-mals.
The Carrera RC vehicle must be inspected before and after operation, each time it is used, to ensure that it has not become disassembled. Any screws or nuts that may have become loosened during operation must be tightened.
Never use the Carrera RC vehicle out-doors during rain or snowfall.The car must not be run through water, puddles and snow, and must always be kept stored in a dry place.
Never operate the vehicle near rivers, ponds or lakes, to avoid the risk of the Carrera RC car falling into the water.Avoid running on courses which are laid exclusively with sand.
Do not expose the Carrera RC vehicle to direct sunlight.To avoid the electronics in the car over-heating, when temperatures are above 35 °C, regular short pauses in operation are essential.
Mounting the antenna
Safety instructions
10
1 1
2
3
4
5
1
2
1
2
2
21km/h1
Aufladen des Akkus
Einsetzen des Akkus
Einsetzen des 9 V-Blocks
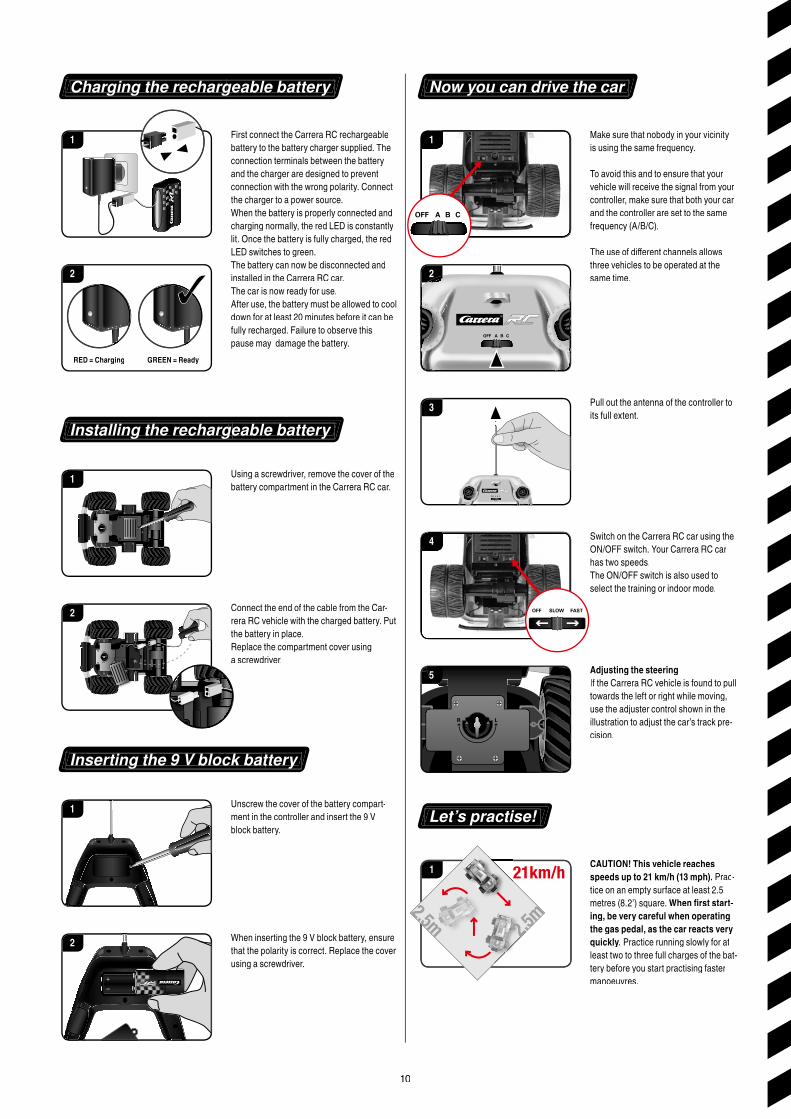
CAUTION! This vehicle reaches speeds up to 21 km/h (13 mph). Prac-tice on an empty surface at least 2.5 metres (8.2’) square. When first starting, be very careful when operating the gas pedal, as the car reacts very quickly. Practice running slowly for at least two to three full charges of the bat-tery before you start practising faster manoeuvres.
GREEN = ReadyRED = Charging
Aufladen des AkkusAufladen des AkkusCharging the rechargeable battery Now you can drive the car
Einsetzen des AkkusEinsetzen des AkkusInstalling the rechargeable battery
Einsetzen des 9 V-BlocksEinsetzen des 9 V-BlocksInserting the 9 V block battery
Let’s practise!
Adjusting the steeringIf the Carrera RC vehicle is found to pull towards the left or right while moving, use the adjuster control shown in the illustration to adjust the car’s track pre-cision.
Using a screwdriver, remove the cover of the battery compartment in the Carrera RC car.
Connect the end of the cable from the Car-rera RC vehicle with the charged battery. Put the battery in place.Replace the compartment cover using a screwdriver.
Unscrew the cover of the battery compart-ment in the controller and insert the 9 V block battery.
When inserting the 9 V block battery, ensure that the polarity is correct. Replace the cover using a screwdriver.
First connect the Carrera RC rechargeable battery to the battery charger supplied. The connection terminals between the battery and the charger are designed to prevent connection with the wrong polarity. Connect the charger to a power source. When the battery is properly connected and charging normally, the red LED is constantly lit. Once the battery is fully charged, the red LED switches to green. The battery can now be disconnected and installed in the Carrera RC car. The car is now ready for use.After use, the battery must be allowed to cool down for at least 20 minutes before it can be fully recharged. Failure to observe this pause may damage the battery.
Make sure that nobody in your vicinity is using the same frequency.
To avoid this and to ensure that your vehicle will receive the signal from your controller, make sure that both your car and the controller are set to the same frequency (A/B/C).
The use of different channels allows three vehicles to be operated at the same time.
Pull out the antenna of the controller to its full extent.
Switch on the Carrera RC car using the ON/OFF switch. Your Carrera RC car has two speeds.The ON/OFF switch is also used to select the training or indoor mode.
1
2
3
4
2
1
11
High Speed Turbo ButtonController functions
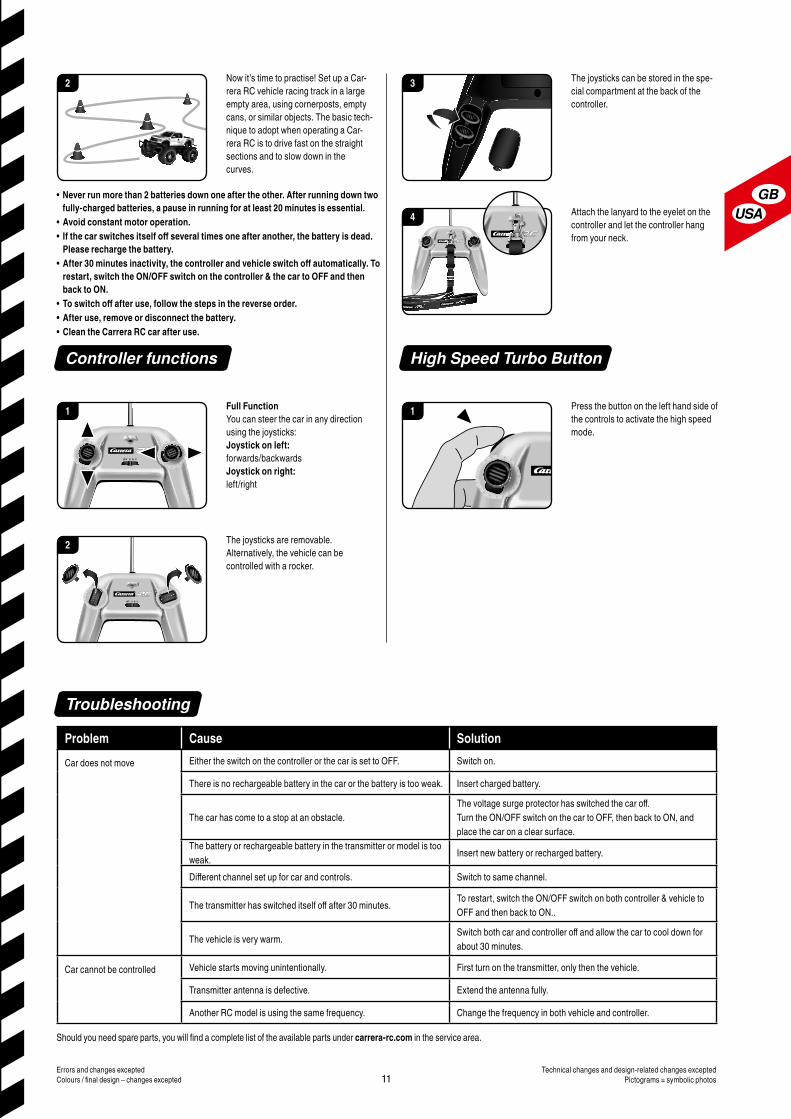
Attach the lanyard to the eyelet on the controller and let the controller hang from your neck.
Full FunctionYou can steer the car in any direction using the joysticks:Joystick on left: forwards/backwardsJoystick on right: left/right
Press the button on the left hand side of the controls to activate the high speed mode.
The joysticks are removable. Alternatively, the vehicle can be controlled with a rocker.
The joysticks can be stored in the spe-cial compartment at the back of the controller.
Troubleshooting
Now it’s time to practise! Set up a Car-rera RC vehicle racing track in a large empty area, using cornerposts, empty cans, or similar objects. The basic tech-nique to adopt when operating a Car-rera RC is to drive fast on the straight sections and to slow down in the curves.
• Never run more than 2 batteries down one after the other. After running down two fullycharged batteries, a pause in running for at least 20 minutes is essential.
• Avoid constant motor operation.• If the car switches itself off several times one after another, the battery is dead.
Please recharge the battery.• After 30 minutes inactivity, the controller and vehicle switch off automatically. To
restart, switch the ON/OFF switch on the controller & the car to OFF and then back to ON.
• To switch off after use, follow the steps in the reverse order.• After use, remove or disconnect the battery.• Clean the Carrera RC car after use.
Errors and changes exceptedColours / final design – changes excepted
Technical changes and design-related changes exceptedPictograms = symbolic photos
Should you need spare parts, you will find a complete list of the available parts under carrerarc.com in the service area.
Problem Cause Solution
Car does not move Either the switch on the controller or the car is set to OFF. Switch on.
There is no rechargeable battery in the car or the battery is too weak. Insert charged battery.
The car has come to a stop at an obstacle. The voltage surge protector has switched the car off.Turn the ON/OFF switch on the car to OFF, then back to ON, and place the car on a clear surface.
The battery or rechargeable battery in the transmitter or model is too weak.
Insert new battery or recharged battery.
Different channel set up for car and controls. Switch to same channel.
The transmitter has switched itself off after 30 minutes. To restart, switch the ON/OFF switch on both controller & vehicle to OFF and then back to ON..
The vehicle is very warm.Switch both car and controller off and allow the car to cool down for about 30 minutes.
Car cannot be controlled Vehicle starts moving unintentionally. First turn on the transmitter, only then the vehicle.
Transmitter antenna is defective. Extend the antenna fully.
Another RC model is using the same frequency. Change the frequency in both vehicle and controller.

Stadlbauer Marketing + Vertrieb GmbH · Rennbahn Allee 1 · 5412 Puch / Salzburg · Austria