manual de instrucciones licuadora
TRANSCRIPT

Manual de Instrucciones LICUADORA
LEA TODAS LAS INSTRUCCIONES ANTES DE USAR ESTE APARATO
MODELOS/ MODELS
BLSTCAG4551R, BLSTCAG4551B, BLSTCAG4551W, BLSTCAP4551R, BLSTCAP4551B, BLSTCAP4551W, BLSTSOG4661R, BLSTSOG4661B, BLSTSOG4661W, BLSTSOP4661R, BLSTSOP4661B, BLSTSOP4661W, BLSTMEG4771R, BLSTMEG4771B, BLSTMEG4771W, BLSTMEP4771R, BLSTMEP4771B, BLSTMEP4771W
Instruction Manual BLENDER
READ ALL INSTRUCTIONS BEFORE USING APPLIANCE
Angry Beavers_18ESM2 (LA).indd 1 7/12/18 9:27 AM
Españo l - 1
PRECAUC IONES IMPORTANTESCuando utilice aparatos eléctricos, debe seguir siempre ciertas medidas de seguridad básicas, incluyendo las siguientes: • LEA Y GUARDE TODAS LAS INSTRUCCIONES. • Es necesario la supervisión cercana si utiliza el aparato cerca de niños o de
personas incapacitadas. • Desenchufe el cordón de la toma de corriente cuando no esté utilizando el aparato,
antes de poner o quitar piezas y antes de limpiarlo. • Evite el contacto con las partes en movimiento. • NO opere ningún aparato que tenga el cordón o el enchufe dañado, si no funciona
correctamente, se ha dejado caer o está dañado de cualquier otra forma. Lleve el aparato al Centro de Servicio Autorizado de Electrodomésticos Oster® más cercano para su revisión, reparación o ajuste eléctrico o mecánico.
• El uso de aditamentos, incluyendo contenedores para enlatado y/o tarros ordinarios y partes del proceso de ensamblado no recomendados por fabricante pueden causar lesiones a las personas.
• Mantenga las manos y utensilios fuera del vaso mientras está licuando, para evitar la posibilidad de lesiones personales severas y/o daño a la licuadora. Si es necesario limpiar las paredes de la licuadora, apague y desenchufe la licuadora y utilice una espátula de goma para limpiarla.
• Las cuchillas son muy filosas, tenga cuidado al manipularlas. • Para evitar lesiones, nunca coloque las cuchillas de la unidad en la base sin que el
vaso esté debidamente colocado. • Ajuste con firmeza la parte inferior enroscable al vaso. Si las cuchillas en movimiento
son expuestas accidentalmente, pueden causar daños. • Siempre opere la licuadora con la tapa correctamente colocada. • Asegúrese de que el voltaje de la toma de corriente corresponde al voltaje de su
aparato. • Siempre sostenga el vaso mientras funciona la licuadora. Si el contenedor gira
mientras el motor se encuentra encendido, apáguelo inmediatamente y apriete el vaso de la licuadora en la parte inferior enroscable. NO deje de atender la licuadora mientras está funcionando.
• Tenga cuidado cuando vierta líquido caliente en el procesador de alimentos o licuadora, ya que puede ser expulsado del artefacto debido a un escape repentino de vapor. Cuando licúe líquidos calientes, retire la copa de alimentación. NO llene el recipiente por encima del nivel de 4 tazas. En modelos de 6 tazas, NO llene el recipiente por encima del nivel de 5 tazas. Siempre comience a licuar utilizando la velocidad mínima. Mantenga las manos y la piel lejos de la abertura a fin de evitar posibles quemaduras.
• Para protegerse del peligro de descarga eléctrica, no coloque la base de la licuadora en agua o en otro líquido. NO permita que el cordón cuelgue de la mesa o del mostrador. NO permita que el cordón toque superficies calientes.
• Este artefacto eléctrico no está destinado para ser usado por personas (incluyendo niños) cuyas capacidades físicas, sensoriales o mentales estén disminuidas, o carezcan de experiencia y conocimiento, a menos que una persona responsable por su seguridad les haya supervisado o instruido en el uso de este electrodoméstico. Los niños deberán estar bajo supervisión para cerciorarse de que NO jueguen con el artefacto eléctrico.
• Este artefacto ha sido diseñado para uso doméstico o en aplicaciones similares tales como: áreas de cocina del personal de tiendas, oficinas y otros ambientes de trabajo,
Angry Beavers_18ESM2 (LA).indd 1 7/12/18 9:27 AM
Españo l -2
granjas, clientes de hoteles, moteles y otros ambientes de tipo residencial, así como en ambientes de hospederías.
• Este artefacto no ha sido diseñado para funcionar mediante un temporizador externo ni un sistema de control remoto. NO UTILICE el aparato en exteriores.
No licúe líquidos hirviendo en la licuadora. Para reducir el riesgo de lesiones:• No deje la cuchilla sobre una superficie ni permita que quede expuesta.• Ensamble la cuchilla en el vaso antes de colocarlo en la base. Si necesita retirar restos de comida, apague la licuadora “ ” y use únicamente una espátula de goma para raspar el vaso.Al licuar líquidos calientes, tenga cuidado con el vapor. Saque la copa de alimentación de la tapa para que salga el vapor. El tiempo máximo de operación continua es de 3 minutos.
ADVERTENCIA: • Las cuchillas de la licuadora son filosas. MANÉJELAS CON CUIDADO.• ¡La cuchilla es FILOSA! Retire CON CUIDADO la cuchilla de la parte inferior del
vaso girando la base roscada en sentido contrario a las agujas del reloj.• Al vaciar el tazón, si necesita retirar restos de comida TENGA CUIDADO con las
cuchillas, apague la licuadora y use únicamente una espátula de goma para raspar el vaso.
• La tapa del vaso, la copa de acceso y la cuchilla son aptas para usar en el lavaplatos automático, utilice la rejilla superior del lavaplatos. También puede lavar las piezas, incluyendo el tazón, con agua tibia y detergente. Enjuague y séquelas bien.
ESTA UNIDAD ESTÁ DISEÑADA SÓLO PARA USO DOMÉSTICO.El rango máximo de potencia marcado en la unidad está basado según el aditamento que necesita más potencia. Otros aditamentos recomendados podrían necesitar menos potencia.
CONSERVE ESTAS INSTRUCC IONES
INSTRUCCIONES ESPECIALES PARA EL CABLE1. Se proporciona un cable de alimentación corto para disminuir el peligro de que una
persona o una mascota se enrede o tropiece con un cable largo.2. Se puede comprar y utilizar una extensión si se emplean las debidas precauciones.3. Si se usa una extensión, la potencia nominal indicada en la misma debe ser igual
o mayor a la de la unidad. El cable alargado resultante debe colocarse de manera que no cuelgue del mostrador o de la mesa, donde los niños podrían halarla o podría ocasionar tropiezos accidentales.
Angry Beavers_18ESM2 (LA).indd 2 7/12/18 9:27 AM
Españo l -3
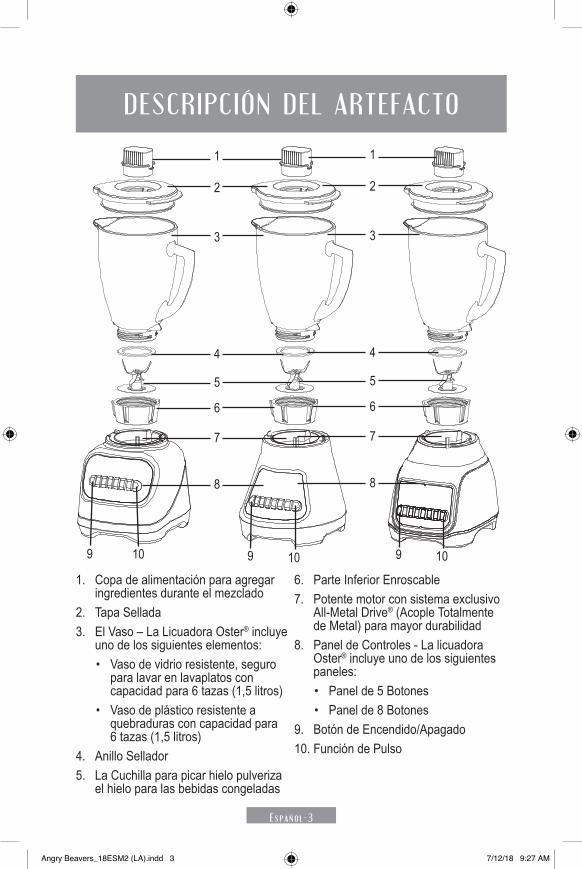
1. Copa de alimentación para agregar ingredientes durante el mezclado
2. Tapa Sellada3. El Vaso – La Licuadora Oster® incluye
uno de los siguientes elementos:• Vaso de vidrio resistente, seguro
para lavar en lavaplatos con capacidad para 6 tazas (1,5 litros)
• Vaso de plástico resistente a quebraduras con capacidad para 6 tazas (1,5 litros)
4. Anillo Sellador 5. La Cuchilla para picar hielo pulveriza
el hielo para las bebidas congeladas
6. Parte Inferior Enroscable 7. Potente motor con sistema exclusivo
All‑Metal Drive® (Acople Totalmente de Metal) para mayor durabilidad
8. Panel de Controles ‑ La licuadora Oster® incluye uno de los siguientes paneles:• Panel de 5 Botones• Panel de 8 Botones
9. Botón de Encendido/Apagado10. Función de Pulso
DESCR IPC IÓN DEL ARTEFACTO
1
2
4
3
7
6
5
8
9 10 109
1
2
4
3
7
6
5
8
109
Angry Beavers_18ESM2 (LA).indd 3 7/12/18 9:27 AM

Españo l -4
ENSAMBLANDO SU L ICUADORA
1. Invierta el vaso para que la abertura pequeña quede hacia arriba.2. Coloque el anillo sellador sobre la abertura del vaso.3. Invierta la cuchilla del agitador y coloque en la boca del vaso.4. Apriete la parte inferior enroscable al vaso.
AJUSTANDO EL VASOa. Para ajustar la parte inferior enroscable del vaso, coloque el vaso ensamblando
con cuidado en el anillo de la base del motor con el asa y el tope del vaso enfrente del freno derecho.
b. Usando el asa del vaso, gire hacia la izquierda hasta donde sea posible. Esto asegurará que el fondo del vaso esté correctamente ajustado.
c. Para operar la licuadora, coloque el vaso ensamblado en el anillo de la base del motor con el tope del vaso contra el lado plano del freno de la base del motor. Si el tope del vaso no queda colocado contra el lado plano del freno derecho, remuévalo y colóquelo contra el lado plano del freno izquierdo. Asiente el vaso firmemente y opere.
d. Para remover el vaso, levántelo en forma vertical. (Si no es fácilmente removido, mueva delicadamente de lado a lado y levante, no lo gire). Si el fondo del vaso no puede ser liberado con la mano, coloque el vaso ensamblado en el anillo de la base del motor con el asa enfrente del freno de lado izquierdo. Usando el asa, gire el vaso a la derecha hasta que la parte inferior del vaso se libere. No intente colocar el vaso o removerlo de la base del motor mientras el motor está funcionando.
¡SIEMPRE SOSTENGA EL VASO CON UNA MANO MIENTRAS PONE LA LICUADORA EN FUNCIONAMIENTO!
Angry Beavers_18ESM2 (LA).indd 4 7/12/18 9:27 AM

Españo l -5
CÓMO FUNC IONA SU L ICUADORA OSTER®
Su Licuadora OSTER® es un aparato electrodoméstico de múltiples velocidades, que opera en un amplio rango de velocidades de la más lenta hasta la más rápida. Este rango de velocidades hace la preparación de los alimentos fácil, interesante y rápida. Además, su Licuadora OSTER® tiene dos distintos métodos de operación:1. CONTINUO para licuar, mezclar y picar finamente.2. CICLO DE CONTROL DEL LICUADO, usado para moler piezas picadas de alimentos,
tales como vegetales picados, nueces o quesos. Hay varias maneras diferentes de operar el dispositivo de CICLO DE CONTROL DEL LICUADO, pero todas se relacionan con accionar intermitentemente el motor de encendido a apagado. Durante la posición de encendido del ciclo, los alimentos son molidos y removidos fuera del camino de las cuchillas. Durante la posición de apagado del ciclo, los alimentos regresan sobre las cuchillas para hacer el procesamiento más uniforme.
NOTA: Un ciclo consiste en operar la licuadora por aproximadamente 2 segundos y después permitir un alto total de la cuchilla.
SELECC IONANDO LA VELOC IDAD
FUNCIÓN DE PULSO ( )1. Presione el botón de PULSO ( ) y mantenga en esa posición durante el tiempo deseado. 2. Libere PULSO y espere a que la Cuchilla se detenga. Repita el ciclo según lo deseado.
NOTA: un ciclo consiste en hacer funcionar la cuchilla durante aproximadamente dos segundos y dejar que se detenga por completo.
FUNCIÓN PARA TRITURAR HIELO ( )1. Oprima el botón de la función para triturar hielo ( ) y manténgalo apretado por el
tiempo deseado. 2. Suelte el botón y espere a que las cuchillas se detengan.
Repita el ciclo según lo desee.NOTA: Un ciclo consiste en operar la licuadora por aproximadamente 2 segundos y después permitir un alto total de la cuchilla.
TABLA DE VELOCIDADESEn la tabla de abajo usted encontrará una aplicación típica por velocidad que lo guiará en el uso de su licuadora. (Siga la tabla que corresponda con el modelo/ número de velocidades de su licuadora).
6 VELOCIDADES + PULSO
6 VELOCIDADES + PULSO
VELOCIDAD 1 2 3 4 5 6
FUNCIÓN SOPAS SALSAS CREMAS JUGOS MALTEADAS SMOOTHIES PULSO/TRITURAR HIELO
Angry Beavers_18ESM2 (LA).indd 5 7/12/18 9:27 AM

Españo l -6
6 VELOCIDADES + PULSO
VELOCIDAD 1 2 3 4 5 6
FUNCIÓN SOPAS SALSAS CREMAS JUGOS MALTEADAS SMOOTHIES PULSO/TRITURAR HIELO
RECOMENDAC IONES PARA EL L ICUADO1. Coloque primero los líquidos en el vaso, a menos que la receta indique lo contrario.2. Para picar hielo: Pique 6 cubos de hielo o aproximadamente 2
tazas de hielo a la vez.3. No retire la tapa con el artefacto en funcionamiento. Retire la
copa de alimentación para agregar ingredientes más pequeños.4. Corte todas las frutas y vegetales firmes, carnes cocidas,
pescado y mariscos en trozos de no más de 1/2 pulg. (1,8 cm) a 1 pulg. (2,5 cm). Corte todo tipo de quesos en trozos de no más de 1/2 pulg. (1,8 cm).
5. Esta licuadora no hace puré de papas, no bate claras de huevo ni sustituye lácteos para untar, no mezcla masas duras ni pica carne cruda.
Tenga cuidado si líquido caliente se vierte dentro del procesador de alimentos o licuadora, ya que este puede expulsarse fuera del aparato debido a un vapor repentino.
CU IDADO Y L IMP IEZAIMPORTANTE: DESENCHUFE ANTES DE LIMPIAR LA BASE Y NO SUMERJA LA LICUADORA EN AGUA NI EN NINGÚN OTRO LÍQUIDO. Use una esponja suave y húmeda con detergente suave para limpiar el exterior de la base de la licuadora. Todas las partes, con excepción de la base de la licuadora, pueden lavarse en lavaplatos. El anillo sellador y la parte inferior enroscable pueden ser separados para su limpieza. Sostenga el anillo sellador con ambas manos y presione hacia abajo sobre la parte inferior enroscable con ambos pulgares. El anillo sellador y la parte inferior enroscable SÓLO pueden lavarse en el estante superior del lavaplatos. También puede lavar las partes en agua jabonosa tibia.
GUARDANDO SU ARTEFACTODespués de la limpieza, vuelva a ensamblar el vaso con la cuchilla, el anillo sellador, y la parte inferior enroscable. Guarde la licuadora con la tapa entreabierta para evitar malos olores en el recipiente.
3 VELOCIDADES + PULSO
VELOCIDAD 1 2 3
FUNCIÓN SOPAS SALSAS JUGOS PULSO/TRITURAR HIELO
3 VELOCIDADES + PULSO
Angry Beavers_18ESM2 (LA).indd 6 7/12/18 9:27 AM
Eng l i sh - 1
IMPORTANT SAFEGUARDSWhen using electrical appliances, basic safety precautions should always be followed including the following: • READ ALL INSTRUCTIONS AND SAVE THEM FOR REFERENCE. • Close supervision is necessary when this appliance is used near children, or disabled
individuals. • Unplug blender cord from electrical outlet when appliance is not in use, before adding
or removing parts, and before cleaning.• Avoid contact with moving parts.• DO NOT operate this or any appliance with a damaged cord or plug, or after the
appliance malfunctions, is dropped or has been damaged in any manner. Bring this appliance to the nearest Authorized Oster® Service Center for safety check, repair or adjustment.
• The use of attachments not recommended by manufacturer, including canning jars and/or regular jars, and food processing parts, may cause personal injury.
• Keep hands and utensils out of jar while blending, to avoid risk of severe personal injuries and/or damaging blender. If scraping is necessary, turn the power off, unplug your appliance, and use a rubber spatula to clean.
• Blender blades are sharp. Handle carefully.• To reduce risk of injuries, never allow blades to sit in appliance’s base if jar is not
properly placed.• Be sure threaded bottom cap is securely tightened to blender jar. If blades are
accidently exposed during operation, they may cause damage.• Always securely place lid on jar before operating blender.• Make sure voltage of electrical outlet matches that of your appliance.• Always hold blender jar while using blender. Should jar rotate while motor is running,
turn power off immediately, remove jar and tighten jar’s threaded bottom cap. NEVER leave blender unattended while it is running.
• Be careful when adding hot liquids to food processor or blender, as hot liquids may pop out of appliance due to a sudden steam burst. Remove filler cap from lid when blending hot liquids. DO NOT fill jar beyond 4‑cup mark. In 6‑cup models, DO NOT fill jar beyond 5‑cup mark. Always start operating blender at the lowest speed setting. Keep hands and skin away from jar opening to avoid risk of burning.
• To protect against electrical shock, do not place blender base in water or other liquids. DO NOT allow cord to hang over edge of table or countertop. DO NOT allow cord to touch hot surfaces.
• This electrical appliance is not intended for use by persons (including children) with reduced physical, sensory or mental capabilities, or lack of experience and knowledge, unless they have been given supervision or instruction concerning the use of the appliance by a person responsible for their safety.
• Children should be supervised to ensure that they DO NOT play with appliance.• This appliance is intended to be used in household and similar applications such as
staff kitchen areas in shops, offices and other working environments, farmhouses, guests at hotels, motels, bed and breakfasts, and other residential environments.
Angry Beavers_18ESM2 (LA).indd 1 7/12/18 9:27 AM
Eng l i sh -2
• This appliance is not intended to be operated by means of an external timer or separate remote‑control system. DO NOT use outdoors.
Do not blend boiling liquids in blender. To reduce risk of injury:• Do not leave blade sitting out or exposed.• Always properly assemble blade into jar before placing jar onto motor base.If scraping is necessary, turn power off “ ” and use only a rubber spatula to scrape jar.When blending hot liquids beware of steam. Remove filler cap from lid to allow steam to escape.Maximum continuous operation time is 3 minutes.
WARNING: • Blender blades are sharp. HANDLE CAREFULLY.• Blades are SHARP! CAREFULLY remove blade assembly from bottom of jar by
turning threaded bottom cap counterclockwise.• If food remains after emptying jar, BE CAREFUL with blade assembly. Turn blender
off and use only a rubber spatula to scrape jar.• Jar lid, filler cap, and blade assembly are dishwasher safe. Place parts in top rack.
Some parts, including jar, may be hand washed with warm water and detergent. Rinse and dry well.
THIS PRODUCT IS FOR HOUSEHOLD USE ONLY.The maximum rating marked on product is based on attachment that draws greatest load. Other attachments may draw less power.
SAVE THESE INSTRUCT IONS
SPECIAL INSTRUCTIONS FOR POWER CORD1. A short power‑supply cord is provided to reduce risk resulting from a person or pet
becoming entangled in or tripping over a longer cord. 2. An extension cord may be purchased and used if care is exercised in its use.3. If an extension cord is used, electrical rating of cord must be at least equal or
greater than electrical rating of appliance. Extension cord should be arranged so that it will not drape over countertop or tabletop where it can be pulled on by children or tripped over unintentionally.
Angry Beavers_18ESM2 (LA).indd 2 7/12/18 9:27 AM

Eng l i sh -3
1. Filler cap to add ingredients while blending
2. Spill‑proof lid3. Jar – Your Oster® blender includes
one of the following:• Durable dishwasher‑safe glass jar
with 6‑cup capacity• Shatter‑resistant plastic jar with
6‑cup capacity4. Leak‑proof sealing ring5. Ice‑crushing blade pulverizes ice for
smooth frozen drinks
6. Threaded bottom cap7. Powerful motor with exclusive All‑
Metal Drive® system for increased durability
8. Control Panel – Your Oster® blender includes one of the following:• 5‑Button Panel• 8‑Button Panel
9. On/Off Button10. Pulse Button
APPL IANCE DESCR IPT ION
1
2
4
3
7
6
5
8
9 10 109
1
2
4
3
7
6
5
8
109
Angry Beavers_18ESM2 (LA).indd 3 7/12/18 9:27 AM

Eng l i sh -4
ASSEMBL ING YOUR BLENDER
1. Turn your jar upside down so smaller opening is facing up.2. Place sealing ring over small jar opening.3. Turn blade assembly upside down and place it over small jar opening.4. Tighten jar’s threaded bottom cap.
ADJUSTING THE JARa. To adjust jar positioning, carefully place assembled jar into motor base, with
handle and jar stopper in front of right break.b. Using jar handle, turn jar to the left as much as possible. This will ensure bottom
of jar is properly adjusted.c. To operate blender, place assembled jar into motor base with jar stopper against
flat side of motor base break. If jar stopper is not against flat side of the right break, lift jar and replace stopper against flat side of the left break. Put jar firmly in place and operate blender.
d. To remove jar, lift it straight up. (If jar cannot be removed easily, gently twist it from side to side and lift it up; do not turn.) If bottom of jar cannot be released by hand, place assembled jar into motor base, with jar handle in front of the left side break. Using handle, turn jar to the right until bottom of jar is released. Do not attempt to place or remove jar from motor base while motor is running.
ALWAYS HOLD JAR WITH ONE HAND WHILE POWERING ON YOUR BLENDER!
Angry Beavers_18ESM2 (LA).indd 4 7/12/18 9:27 AM

Eng l i sh -5
HOW DOES YOUR OSTER® BLENDER WORK
Your OSTER® blender is a multiple‑speed electrical appliance that operates at a wide range of speeds—from lowest to highest. This speed range makes food preparation interesting, quick, and easy.In addition, your OSTER® blender has two different operation modes:1. CONTINOUS to blend, mix, and finely chop.2. BLEND CONTROL CYCLE, used to grind chopped food, such as chopped vegetables,
nuts or cheese. There are different ways to operate the BLEND CONTROL CYCLE, but they are all related to activating blender motor at intervals, alternating between on and off. During “on” position of cycle, food is ground and moved away from blades. During “off” position of cycle, food is replaced over blades to smooth out processing.
NOTE: One cycle includes operating blender for about 2 seconds and then allowing blades to come to a complete stop.
SPEED SELECT ION
PULSE FUNCTION ( )1. Press and hold PULSE ( ) button for desired length of time. 2. Release PULSE button and allow blades to stop. Repeat cycle as needed.
NOTE: One cycle includes operating blender for about 2 seconds and then allowing blades to come to a complete stop.
ICE-CRUSHING FUNCTION ( )1. Press and hold ice‑crushing function ( ) for desired length of time.2. Release button and allow blades to stop.
Repeat cycle as needed.NOTE: One cycle includes operating blender for about 2 seconds and then allowing blades to come to a complete stop.
SPEED CHARTIn the chart below, you will find a typical application, which will serve as a guide to use your blender. (Follow chart matching model/number of speeds of your blender.)
6 SPEEDS + PULSE
6 SPEEDS + PULSE
SPEED 1 2 3 4 5 6
FUNCTION SOUPS SAUCES CREAMS JUICES MILKSHAKES SMOOTHIES PULSE/ ICE‑CRUSHING
Angry Beavers_18ESM2 (LA).indd 5 7/12/18 9:27 AM

Eng l i sh -6
BLEND ING T IPS1. Always place liquids in jar first, unless recipe indicates otherwise.2. To crush ice: Crush 6 ice cubes or about 2 cups of ice at a time.3. Do not remove lid while appliance is running. Remove filler cap
to add smaller ingredients.4. Cut all firm fruits and vegetables, cooked meats, fish and
seafood into pieces of no more than 1/2 in. to 1 in. Cut all types of cheeses into pieces of no more than 1/2 in.
5. This blender does not puree, does not whisk egg whites or egg substitutes for spreads, does not knead dough, and does not cut raw meats.
Be careful when pouring hot liquids into food processor or blender, as hot liquids may pop out of appliance due to a sudden burst of steam.
CARE AND MA INTENANCEPLEASE NOTE: UNPLUG MOTOR BASE BEFORE CLEANING. NEVER IMMERSE BLENDER IN WATER OR ANY OTHER LIQUID. Wash blender’s outside surface with a damp, soft sponge using mild soap. All parts, except motor base, may be washed in dishwasher. Pull apart sealing ring and threaded bottom cap to clean. Hold sealing ring with both hands and pull down over threaded bottom cap using both your thumbs. Sealing ring and threaded bottom cap may be washed in dishwasher top rack ONLY. You may also wash all parts with warm soapy water.
STOR ING YOUR APPL IANCEAfter cleaning, reassemble jar with blade, sealing ring and threaded bottom cap.Store blender leaving a gap between lid and jar to prevent container odors.
3 SPEEDS + PULSE
SPEED 1 2 3
FUNCTION SOUPS SAUCES JUICES PULSE/ ICE‑CRUSHING
3 SPEEDS + PULSE
Angry Beavers_18ESM2 (LA).indd 6 7/12/18 9:27 AM

Angry Beavers_18ESM2 (LA).indd 7 7/12/18 9:27 AM

Angry Beavers_18ESM2 (LA).indd 8 7/12/18 9:27 AM

La siguiente información es para México solamente.The following information is for Mexico only.
LICUADORA OSTER® MODELOS: BLSTCAG4551R‑013, BLSTCAG4551B‑013, BLSTCAG4551W‑013, BLSTCAP4551R‑013, BLSTCAP4551B‑013, BLSTCAP4551W‑013, BLSTSOG4661R‑013, BLSTSOG4661B‑013, BLSTSOG4661W‑013, BLSTSOP4661R‑013, BLSTSOP4661B‑013, BLSTSOP4661W‑013, BLSTMEG4771R‑013, BLSTMEG4771B‑013, BLSTMEG4771W‑013, BLSTMEP4771R‑013, BLSTMEP4771B‑013, BLSTMEP4771W‑013, LEA EL INSTRUCTIVO ANTES DE USAR EL APARATOLA SIGUIENTE INFORMACIÓN ES PARA MÉXICO:IMPORTADOR: NEWELL BRANDS DE MÉXICO S.A. DE C.V.AVE. JUÁREZ Nº 40‑201, COLONIA EX HACIENDA SANTA MÓNICA,TLALNEPANTLA 54050, ESTADO DE MÉXICOTEL: 5366‑0800RFC SME570928G90PAÍS DE ORIGEN: MÉXICOPAÍS DE PROCEDENCIA: MÉXICO, E.U.A.
CONTENIDO: 1 PIEZACARACTERÍSTICAS ELÉCTRICAS
60 Hz 127 V 450 W
© 2018 Sunbeam Products, Inc. Todos los derechos reservados. Garantía limitada de un año – por favor consulte los detalles en el inserto.
© 2018 Sunbeam Products, Inc. All rights reserved.One year limited warranty. Please see details in the insert.
www.oster.com
Impreso en EE.UU.Printed USA
P.N. 31160916 GCDS‑OST310518‑LD
Angry Beavers_18ESM2 (LA).indd 9 7/12/18 9:27 AM