user’s guide -...
TRANSCRIPT
User’s guideModel
HLC
www.teka.com
ES Guía de Uso
PT Guia de Utilização
EN User’s guide
FR Guide d’Utilisation
DE Bedienanleitun
www.teka.com
2 Guía de Uso
EspañoL
Por favor, antes de utilizar su horno por primera vez, lea atentamente las instrucciones de instalación y mantenimiento incluidas en su horno.
Dependiendo del modelo, los accesorios incluidos en su horno pueden variar respecto a los mostrados en las imágenes.
poRTUGUÊs
Antes de utilizar o forno pela primeira vez, leia atentamente as instruções de instalação e manutenção fornecidas juntamente com o forno.
Dependendo do modelo, os acessórios incluídos no forno podem variar em relação às imagens apresentadas.
ENGLIsH
Before using your oven for the first time, please carefully read the installation and maintenance instructions that come with it.
Depending on the model, the accessories included in your oven may vary from those shown in the pictures.
FRaNÇaIs
Avant la première utilisation de votre four, veuillez lire attentivement les instructions d’installation et d’entretien fournies avec votre four.
Selon les modèles, il est possible que les accessoires fournis avec votre four soient différents de ceux indiqués sur les images.
DEUTsCH
Bevor Sie den Backofen zum ersten Mal verwenden, lesen Sie bitte die zu Ihrem Backofen gehörenden Einbau- und Wartungsanweisungen aufmerksam durch.
Je nach Modell können die Zubehörteile Ihres Backofens von den auf den Abbildungen dargestellten Teilen abweichen.

3Guía de Uso
Español
Descripción del horno1 Frente de mandos
2 Bloqueo de puerta (solo para modelos pirolíticos)
3 Resistencia de grill
4 Soporte bandejas
5 Parrilla
6 Bandeja
7 Bisagra
8 Cristal interior
9 Salida de aire de refrigeración
10 Fijación al mueble
11 Lámpara
12 Panel trasero
13 Turbina
14 Junta de horno
15 Puerta
1
10
13
14
15
5
6
7
3
2
4
9
11
8
12
Frontal de mandos
1 Selector de funciones
2 Reloj electrónico
3 Selector de temperaturas
1 2 3Modelo HLC
1 Selector de funciones
2 Reloj electrónico / Temperatura seleccionada
3 Selector de temperaturas
1 2 3Modelos pirolíticos HLC p
4 Guía de Uso
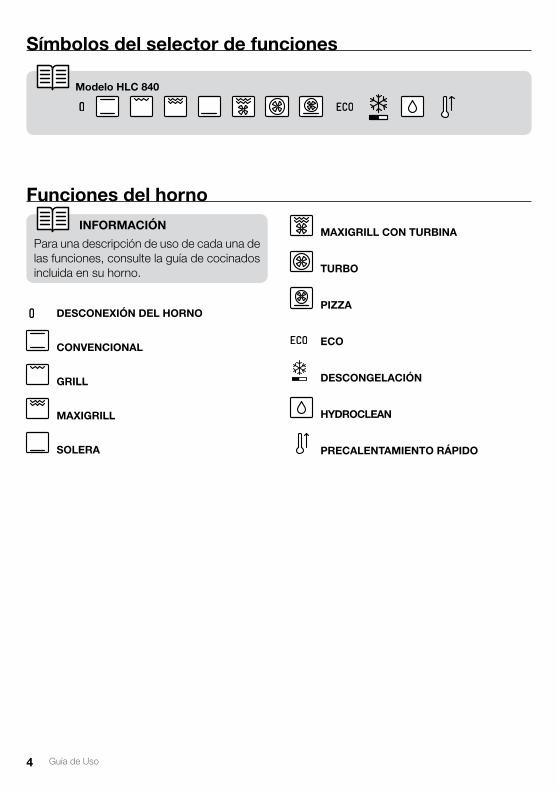
símbolos del selector de funciones
Modelo HLC 840
Funciones del horno
DEsCoNExIóN DEL HoRNo
CoNVENCIoNaL
GRILL
MaxIGRILL
soLERa
MaxIGRILL CoN TURBINa
TURBo
pIZZa
ECo
DEsCoNGELaCIóN
HYDRoCLEaN
pRECaLENTaMIENTo RÁpIDo
INFoRMaCIóN
Para una descripción de uso de cada una de las funciones, consulte la guía de cocinados incluida en su horno.
5Guía de Uso
Español
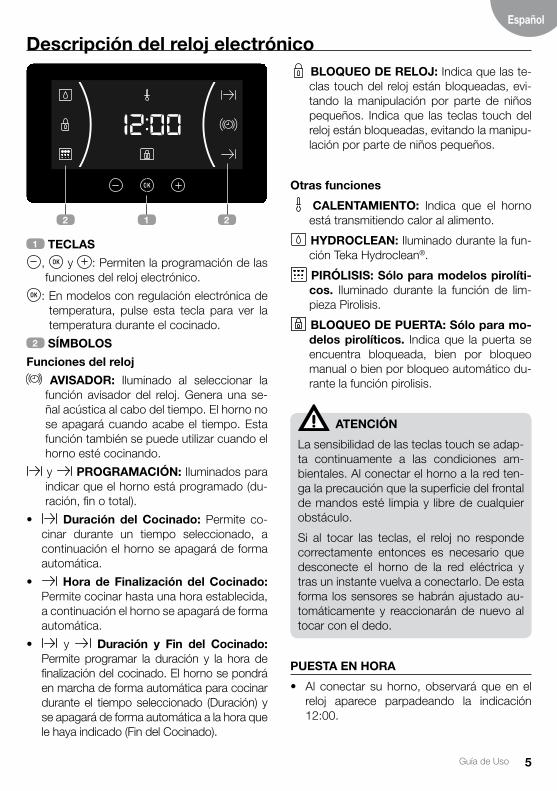
Descripción del reloj electrónico
1 TECLas
, y : Permiten la programación de las funciones del reloj electrónico.
: En modelos con regulación electrónica de temperatura, pulse esta tecla para ver la temperatura durante el cocinado.
2 sÍMBoLos
Funciones del reloj
aVIsaDoR: Iluminado al seleccionar la función avisador del reloj. Genera una se-ñal acústica al cabo del tiempo. El horno no se apagará cuando acabe el tiempo. Esta función también se puede utilizar cuando el horno esté cocinando.
y pRoGRaMaCIóN: Iluminados para indicar que el horno está programado (du-ración, fin o total).
• Duración del Cocinado: Permite co-cinar durante un tiempo seleccionado, a continuación el horno se apagará de forma automática.
• Hora de Finalización del Cocinado: Permite cocinar hasta una hora establecida, a continuación el horno se apagará de forma automática.
• y Duración y Fin del Cocinado: Permite programar la duración y la hora de finalización del cocinado. El horno se pondrá en marcha de forma automática para cocinar durante el tiempo seleccionado (Duración) y se apagará de forma automática a la hora que le haya indicado (Fin del Cocinado).
BLoQUEo DE RELoJ: Indica que las te-clas touch del reloj están bloqueadas, evi-tando la manipulación por parte de niños pequeños. Indica que las teclas touch del reloj están bloqueadas, evitando la manipu-lación por parte de niños pequeños.
otras funciones
CaLENTaMIENTo: Indica que el horno está transmitiendo calor al alimento.
HYDRoCLEaN: Iluminado durante la fun-ción Teka Hydroclean®.
pIRóLIsIs: sólo para modelos pirolíti-cos. Iluminado durante la función de lim-pieza Pirolisis.
BLoQUEo DE pUERTa: sólo para mo-delos pirolíticos. Indica que la puerta se encuentra bloqueada, bien por bloqueo manual o bien por bloqueo automático du-rante la función pirolisis.
aTENCIóN
La sensibilidad de las teclas touch se adap-ta continuamente a las condiciones am-bientales. Al conectar el horno a la red ten-ga la precaución que la superficie del frontal de mandos esté limpia y libre de cualquier obstáculo.
Si al tocar las teclas, el reloj no responde correctamente entonces es necesario que desconecte el horno de la red eléctrica y tras un instante vuelva a conectarlo. De esta forma los sensores se habrán ajustado au-tomáticamente y reaccionarán de nuevo al tocar con el dedo.
pUEsTa EN HoRa
• Al conectar su horno, observará que en el reloj aparece parpadeando la indicación 12:00.
2 1 2
6 Guía de Uso
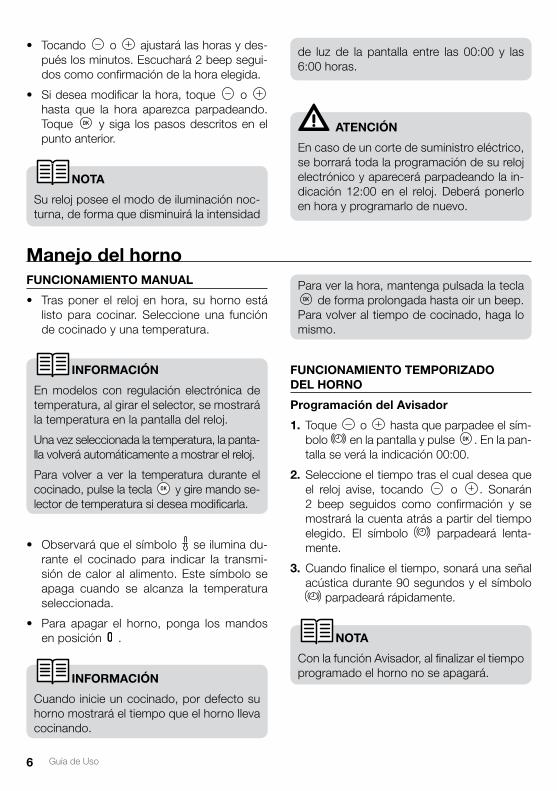
• Tocando o ajustará las horas y des-pués los minutos. Escuchará 2 beep segui-dos como confirmación de la hora elegida.
• Si desea modificar la hora, toque o hasta que la hora aparezca parpadeando. Toque y siga los pasos descritos en el punto anterior.
NoTa
Su reloj posee el modo de iluminación noc-turna, de forma que disminuirá la intensidad
de luz de la pantalla entre las 00:00 y las 6:00 horas.
aTENCIóN
En caso de un corte de suministro eléctrico, se borrará toda la programación de su reloj electrónico y aparecerá parpadeando la in-dicación 12:00 en el reloj. Deberá ponerlo en hora y programarlo de nuevo.
Manejo del hornoFUNCIoNaMIENTo MaNUaL
• Tras poner el reloj en hora, su horno está listo para cocinar. Seleccione una función de cocinado y una temperatura.
INFoRMaCIóN
En modelos con regulación electrónica de temperatura, al girar el selector, se mostrará la temperatura en la pantalla del reloj.
Una vez seleccionada la temperatura, la panta-lla volverá automáticamente a mostrar el reloj.
Para volver a ver la temperatura durante el cocinado, pulse la tecla y gire mando se-lector de temperatura si desea modificarla.
• Observará que el símbolo se ilumina du-rante el cocinado para indicar la transmi-sión de calor al alimento. Este símbolo se apaga cuando se alcanza la temperatura seleccionada.
• Para apagar el horno, ponga los mandos en posición .
INFoRMaCIóN
Cuando inicie un cocinado, por defecto su horno mostrará el tiempo que el horno lleva cocinando.
Para ver la hora, mantenga pulsada la tecla de forma prolongada hasta oir un beep.
Para volver al tiempo de cocinado, haga lo mismo.
FUNCIoNaMIENTo TEMpoRIZaDo DEL HoRNo
programación del avisador
1. Toque o hasta que parpadee el sím-bolo en la pantalla y pulse . En la pan-talla se verá la indicación 00:00.
2. Seleccione el tiempo tras el cual desea que el reloj avise, tocando o . Sonarán 2 beep seguidos como confirmación y se mostrará la cuenta atrás a partir del tiempo elegido. El símbolo parpadeará lenta-mente.
3. Cuando finalice el tiempo, sonará una señal acústica durante 90 segundos y el símbolo
parpadeará rápidamente.
NoTa
Con la función Avisador, al finalizar el tiempo programado el horno no se apagará.
7Guía de Uso
Español
4. Toque cualquier tecla para detener la señal acústica, en ese momento el símbolo se apagará.
Si desea modificar el tiempo del avisador, reali-ce los pasos mostrados nuevamente. Al acce-der al temporizador, aparecerá el tiempo res-tante actual el cual podrá modificar.
NoTa
Con la función Avisador, el tiempo restante se mostrará en la pantalla de forma perma-nente. Con esta función programada, no es posible visualizar la hora ni el tiempo total de cocinado programado.
programación de la Duración del Cocinado
1. Toque o hasta que parpadee el sím-bolo en la pantalla y pulse . En la pan-talla se verá la hora prevista de finalización.
2. Ajuste el tiempo tras el cual desea que el reloj avise, tocando o . Sonarán 2 beep seguidos como confirmación y se mostrará la cuenta atrás a partir del tiempo elegido. El símbolo parpadeará lenta-mente.
3. Seleccione una función y una temperatu-ra de cocinado mediante los mandos del horno.
4. Transcurrida la duración del cocinado, el horno se desconectará, sonará una señal acústica y el símbolo parpadeará rápi-damente.
5. Toque cualquier tecla para detener la señal acústica y apagar el símbolo , encen-diéndose el horno de nuevo.
6. Ponga los mandos en posición para apa-gar el horno.
En cualquier momento usted puede modificar el tiempo restante de cocinado, tocando o
hasta que el símbolo parpadee rápida-mente. A continuación toque para modificar el tiempo.
NoTa
Con la función Duración de cocinado, el tiempo restante se mostrará en la pantalla de forma permanente. Con esta función programada, no es posible visualizar la hora actual en la pantalla.
programación de la Hora de Finalización del Cocinado
1. Toque el touch o hasta que parpa-dee el símbolo en la pantalla y pulse . En la pantalla se verá la hora actual.
2. Seleccione el tiempo tras el cual desea que el reloj avise, tocando o . Sonarán 2 beep seguidos como confirmación y se mos-trará la cuenta atrás a partir del tiempo elegi-do. El símbolo parpadeará lentamente.
3. Seleccione una función y una temperatura de cocinado.
4. Alcanzada la hora de finalización programa-da, el horno se desconectará, sonará una señal acústica y el símbolo parpadeará rápidamente.
5. Toque cualquier sensor para detener la se-ñal acústica y apagar el símbolo , encen-diéndose el horno de nuevo.
6. Ponga los mandos en posición para apa-gar el horno.
En cualquier momento usted puede modificar el tiempo restante de cocinado, tocando o
hasta que el símbolo parpadee rápida-mente. A continuación toque para modificar el tiempo.
programación de la Duración y Fin del Cocinado
1. Toque o hasta que parpadee el sím-bolo en la pantalla y pulse . En la pan-talla se verá la indicación 00:00.
2. Seleccione la duración del cocinado, to-cando o . Posteriormente sonarán 2 beep seguidos, se mostrará el tiempo res-
8 Guía de Uso
tante de cocinado en la pantalla y el símbolo parpadeará lentamente.
3. Toque o hasta que parpadee el sím-bolo en la pantalla y pulse . En la pan-talla se verá la indicación 00:00.
4. Seleccione la hora de finalización del cocina-do, tocando o . Posteriormente so-narán 2 beep seguidos, se mostrará la hora actual en la pantalla.
5. Seleccione una función y una temperatura de cocinado. El horno permanecerá desco-nectado y con los símbolos y ilumi-nados. Su horno está programado.
6. Cuando se alcance la hora de comienzo del cocinado, el horno se pondrá en marcha y se realizará el cocinado durante el tiempo seleccionado.
7. Durante el cocinado se mostrará el tiempo restante de cocinado y el símbolo par-padeará lentamente.
8. Alcanzada la hora de finalización que se había programado, el horno se desconec-tará, sonará una señal acústica y el símbo-lo parpadeará rápidamente.
9. Toque cualquier sensor para detener la se-ñal acústica y apagar el símbolo , en-cendiéndose el horno de nuevo.
10. Ponga los mandos en posición para apagar el horno.
En cualquier momento usted puede modificar el tiempo restante de cocinado, tocando o
hasta que el símbolo parpadee rápida-mente. A continuación toque para modificar el tiempo.
Funciones de seguridadBLoQUEo DE sEGURIDaD paRa NIños
Esta función se puede seleccionar en cual-quier momento durante el uso del horno.
Para activar la función, toque a la vez las te-clas y de forma prolongada hasta que escuche 1 beep sonoro y el símbolo apa-rezca en la pantalla. El reloj está bloqueado.
Si el horno está apagado y activa la seguridad niños, el horno no cocinará aunque seleccione una función de cocinado.
Si mientras cocina con el horno, activa esta función, sólo bloqueará la manipulación del reloj electrónico.
Para desactivar la función, toque a la vez las teclas y de forma prolongada hasta que escuche 1 beep sonoro.
BLoQUEo MaNUaL DE pUERTa
Disponible sólo en modelos pirolíticos.
Esta función permite bloquear la puerta del horno.
IMpoRTaNTE
Esta función sólo será seleccionable cuan-do el horno se encuentre con el mando de funciones en la posición de reposo .
Para activar/desactivar el bloqueo de puerta, siga estos pasos:
1. Toque o hasta que parpadee el sím-bolo en la pantalla.
Se mostrará el estado actual del bloqueo de puerta: “On” si está activo y “Off” si está desactivado.
2. Toque , y el bloqueo cambiará al estado contrario al actual en ese momento: Si la puerta está desbloqueada, se bloqueará y viceversa.
3. Una vez que la puerta se haya bloqueado/desbloquedado, en la pantalla se mostrará el nuevo estado del bloqueo de puerta.
En el caso de que el bloqueo esté activo, el símbolo se iluminará fijo en la pantalla.

9Guía de Uso
Español
Función Teka Hydroclean®
Esta función facilita la limpieza de la grasa y los restos de suciedad que han quedado adheri-dos en las paredes del horno.
Para una mayor facilidad de limpieza, evite que se acumule la suciedad. Limpie el horno con frecuencia.
pRoGRaMaR La FUNCIóN TEKa HYDRoCLEaN®
aTENCIóN
No vierta agua en el interior del horno ca-liente, puede dañar el esmalte de su horno.
Realice siempre el ciclo con el horno frío. Si lo hace con el horno demasiado caliente, el resul-tado puede verse afectado además de dañar el esmalte.
Retire previamente las bandejas y todos los accesorios del interior del horno, incluidos los soportes para bandejas o guías telescópicas. siga para ello las instrucciones que apa-recen en el libro de instalación y manteni-miento que se entrega con su horno.
1. Con el horno frío, coloque una bayeta exten-dida sobre el suelo del horno.
INFoRMaCIóN
Para un mejor resultado añada una cucha-radita de detergente suave para vajilla en el vaso de agua antes de verterlo sobre la bayeta.
3. Gire el selector de funciones a la posición .
4. A continuación se oirá una señal sonora como confirmación de que la función Teka Hydroclean® se ha puesto en marcha, el símbolo parpadeará lentamente y en la pantalla se visualizará el tiempo restante para que finalice la función.
IMpoRTaNTE
La duración de esta función no se puede modificar. Para finalizar antes de tiempo, gire el selector de funciones a la posición .
5. Alcanzada la hora de finalización, el horno se desconectará, sonará una señal acústica y el símbolo parpadeará rápidamente.
IMpoRTaNTE
No abra la puerta del horno hasta que no finalice la función Hydroclean®.
La fase de enfriamiento es necesaria para el correcto funcionamiento de la función.
6. Toque con el dedo cualquier tecla para dete-ner la señal acústica y apagar el símbolo .
7. Ponga el selector de funciones en posición .
8. El horno está listo para retirar los restos de suciedad y agua sobrante con la bayeta.
La función Hydroclean® se realiza a baja tem-peratura. No obstante, los tiempos de enfria-miento pueden variar según la temperatura ambiente.
2. Vierta lentamente 200 ml de agua en la parte inferior de la cavidad del horno.
10 Guía de Uso
Función de autolimpieza por pirólisisFunción disponible en el modelo HLC 840 P.
aTENCIóN
Antes de realizar el ciclo de limpieza por pi-rólisis, lea atentamente las instrucciones de seguridad que encontrará al inicio del libro de Instalación y Mantenimiento.
Esta función le permite realizar un ciclo de lim-pieza por pirólisis, durante el cual, debido a las altas temperaturas que se alcanzan en el inte-rior del horno se produce un proceso de carbo-nización de las grasas acumuladas.
En general, se recomienda realizar una pirólisis cada 4-5 cocinados y utilizar el programa más adecuado al nivel de suciedad de su horno. A mayor suciedad, elija un programa de mayor duración.
Durante la pirólisis la iluminación interior del horno permanecerá apagada.
pRoGRaMaR La FUNCIóN pIRóLIsIs
IMpoRTaNTE
Antes de realizar la pirólisis es imprescindi-ble retirar todos los accesorios y vajilla del horno, incluyendo los soportes de bandejas y/o guías telescópicas. Siga para ello las ins-trucciones que aparecen en el libro de insta-lación y mantenimiento que se entrega con su horno.
aTENCIóN
Retire del interior cualquier derrame o resto exccesivo de suciedad, ya que durante la pi-rolisis podrían inflamarsee corriendo peligro de incendio.
1. Gire el mando selector de funciones de co-cinado, a la posición Pirolisis: .
2. Tras unos segundos, en la pantalla del reloj se iluminaré el símbolo y se leerá la indi-cación P2 (programa 2 de pirolisis).
3. En ese instante puede modificar el programa de pirolisis a P1, P2, P3 con las teclas o
:
p1: Pirólisis suave. Duración 1 hora. p2: Pirólisis normal. Duración 1 hora y 30 min. p3: Pirólisis intensiva. Duración 2 horas.
4. Una vez seleccionado el programa deseado, pulse . Inmediatamente después, se acti-vará el bloqueo automático de puerta.
5. Cuando la puerta esté bloqueada, se ilumi-nará el símbolo en la pantalla del reloj y se mostrará el tiempo restante para la finaliza-ción de la pirólisis.
IMpoRTaNTE
Llegado a este punto, el horno está progra-mado y realizando el ciclo de limpieza pirolí-tica. Durante la realización de este ciclo, no podrá seleccionar ninguna de las funciones del reloj del horno, salvo la función seguri-dad de niños.
Tampoco intente abrir la puerta del horno ya que podría interrumpir el proceso de limpieza.
aTENCIóN
Asegúrese antes de tocar directamente la superficie interior del horno, de que la tem-peratura es adecuada.
Si tras realizar la función Hydroclean® re-quiere de una limpieza con más profundidad, utilice detergentes neutros y esponjas no abrasivas.
11Guía de Uso
Español
6. Cuando finaliza la limpieza pirolítica, escu-chará una señal acústica, el símbolo par-padeará y verá 0:00 en la pantalla del reloj.
7. Pulse cualquier tecla del reloj para detener la señal acústica.
8. Ponga el selector de funciones en posición.
9. El proceso de calentamiento del horno ha finalizado, sin embargo el horno está ex-cesivamente caliente y no puede ser uti-lizado.
Hasta que el horno no se enfríe la refrigeración continua funcionando y el símbolo perma-nece iluminado.
IMpoRTaNTE
Debido a las altas temperaturas en el interior del horno, el tiempo de enfriamiento puede variar en función de la temperatura ambiente.
10. Una vez que su horno se haya enfriado el símbolo se apagará.
11. Abra la puerta del horno y pase un paño húmedo por el interior de la cavidad, reti-rando la ceniza producida durante el ciclo de limpieza. En zonas de difícil acceso del interior del horno será necesario limpiar con algún estropajo de fibra no metálica.
12. Una vez limpio el interior del horno, no ol-vide instalar de nuevo los soportes y sus accesorios.
13. El horno ya está preparado para un nuevo cocinado.
2. En función de la temperatura del interior del horno pueden darse estas dos situaciones:
a) Temperatura del interior peligrosa: En este caso, la puerta permanecerá blo-queada hasta que la temperatura llegue a valores seguros.
b) Temperatura del interior segura: Si la temperatura del interior del horno es se-gura, el desbloqueo se realizará inmedia-tamente.
3. Una vez que la puerta está desbloqueada y pueda abrirse, se mostrará de nuevo la hora en la pantalla del reloj.
IMpoRTaNTE
Si detecta alguna incidencia en la progra-mación y manejo de esta función consulte la guía de instalación y mantenimiento incluida en su horno.
CaNCELaCIóN DE La pIRóLIsIs
La pirolisis es una función automática y como tal, sólo puede accionarse mediante la pro-gramación del reloj. Para cancelar una pirolisis en curso es necesario desprogramar el horno, siguiendo estas instrucciones:
1. Ponga en posición el mando selector de funciones.
En la pantalla del reloj se mostrará
12 Guia de Utilização
1 2 3
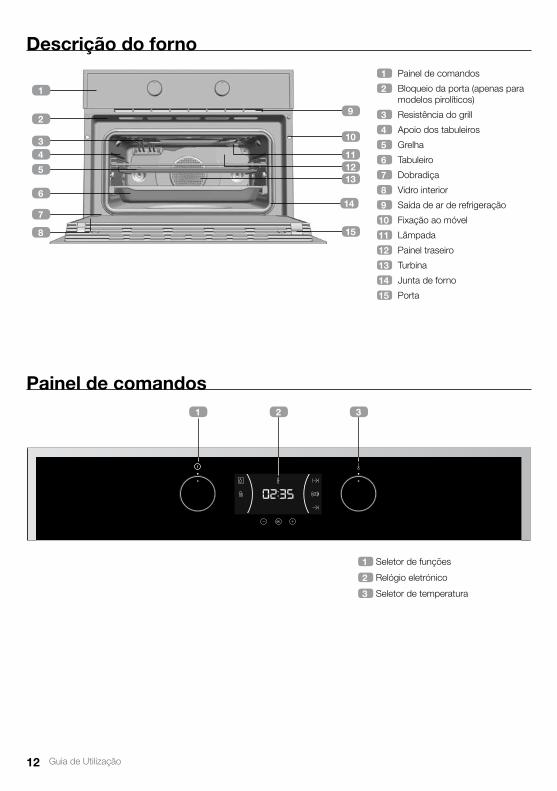
Descrição do forno1 Painel de comandos
2 Bloqueio da porta (apenas para modelos pirolíticos)
3 Resistência do grill
4 Apoio dos tabuleiros
5 Grelha
6 Tabuleiro
7 Dobradiça
8 Vidro interior
9 Saída de ar de refrigeração
10 Fixação ao móvel
11 Lâmpada
12 Painel traseiro
13 Turbina
14 Junta de forno
15 Porta
painel de comandos
1 Seletor de funções
2 Relógio eletrónico
3 Seletor de temperatura
1
10
13
14
15
5
6
7
3
2
4
9
11
8
12
13Guia de Utilização
Português
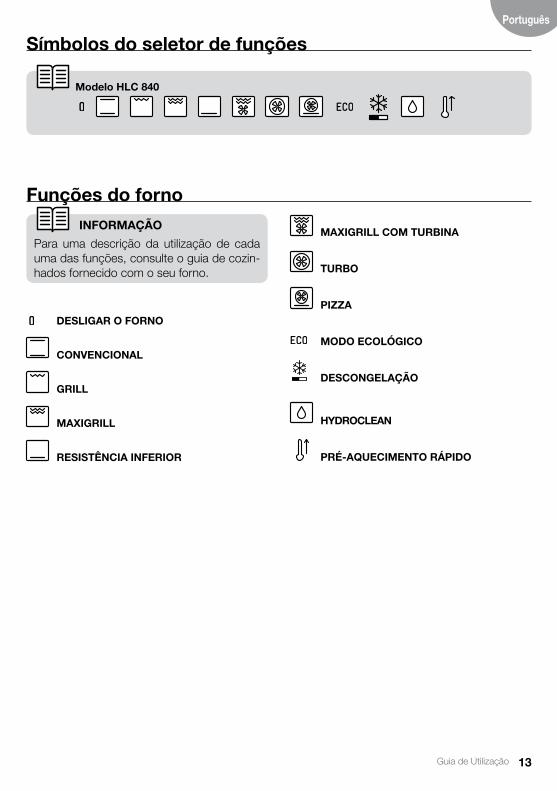
símbolos do seletor de funções
Modelo HLC 840
Funções do forno
INFoRMaÇÃo
Para uma descrição da utilização de cada uma das funções, consulte o guia de cozin-hados fornecido com o seu forno.
DEsLIGaR o FoRNo
CoNVENCIoNaL
GRILL
MaxIGRILL
REsIsTÊNCIa INFERIoR
MaxIGRILL CoM TURBINa
TURBo
pIZZa
MoDo ECoLóGICo
DEsCoNGELaÇÃo
HYDRoCLEaN
pRÉ-aQUECIMENTo RÁpIDo

14 Guia de Utilização
Descrição do relógio eletrónico
1 TECLas
, y : Permitem a programação das funções do relógio electrónico.
2 sÍMBoLos
Funções do relógio
aVIsaDoR: Ilumina-se quando é selecio-nada a função de avisador do relógio. Gera um sinal acústico no final do tempo pro-gramado. O forno não se desligará quan-do termina o tempo. Esta função também pode ser utilizada quando o forno estiver a cozinhar.
y pRoGRaMaÇÃo: Iluminam-se para indicar que o forno está programado (dura-ção, fim ou total).
• Duração do cozinhado: Permite co-zinhar durante um tempo selecionado e a seguir o forno desligar-se-á de forma auto-mática.
• Hora de finalização do cozinhado: Permite cozinhar até uma hora estabelecida e a seguir o forno desligar-se-á de forma au-tomática.
• e Duração e finalização do cozi-nhado: Permite programar a duração e a hora de finalização do cozinhado. O forno ligar-se-á de forma automática para cozi-nhar durante o tempo selecionado (Dura-ção) e desligar-se-á automaticamente na hora indicada (Finalização do cozinhado).
BLoQUEIo Do RELóGIo: Indica que as teclas touch do relógio estão bloqueadas, evitando a sua manipulação por parte de crianças pequenas. Indica que as teclas touch do relógio estão bloqueadas, evitan-do a sua manipulação por parte de crianças pequenas.
outras funções
aQUECIMENTo: Indica que o forno está a transmitir calor ao alimento.
HYDRoCLEaN: Ilumina-se durante a fun-ção Teka Hydroclean®.
pIRóLIsE: apenas para modelos pirolí-ticos. Ilumina-se durante a função de lim-peza por pirólise.
BLoQUEIo Da poRTa: apenas para modelos pirolíticos. Indica que a porta se encontra bloqueada, quer por bloqueio manual ou automático durante a função de pirólise.
aTENÇÃo
A sensibilidade das teclas touch adapta-se continuamente às condições ambientais. Ao ligar o forno à corrente, é necessário ter o cuidado de garantir que a superfície do vidro da parte da frente dos comandos está limpa e livre de qualquer obstáculo.
Se, ao tocar nas teclas, o relógio não res-ponder corretamente, é necessário desligar o forno da rede elétrica e voltar a ligá-lo al-gum tempo depois. Desta forma os senso-res ajustar-se-ão automaticamente e reagi-rão novamente ao tocar com o dedo.
aCERTaR a HoRa
• Ao ligar o forno, observará que no relógio aparece a piscar a indicação 12:00.
2 1 2
15Guia de Utilização
Português
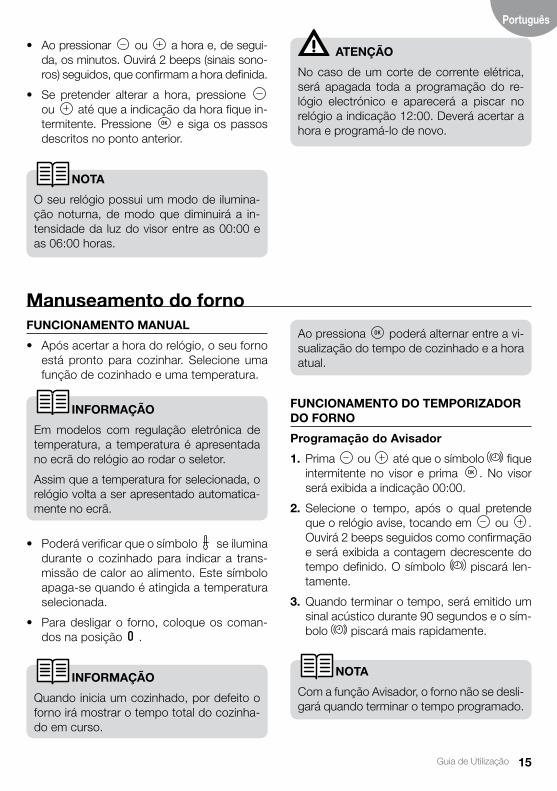
• Ao pressionar ou a hora e, de segui-da, os minutos. Ouvirá 2 beeps (sinais sono-ros) seguidos, que confirmam a hora definida.
• Se pretender alterar a hora, pressione ou até que a indicação da hora fique in-termitente. Pressione e siga os passos descritos no ponto anterior.
NoTa
O seu relógio possui um modo de ilumina-ção noturna, de modo que diminuirá a in-tensidade da luz do visor entre as 00:00 e as 06:00 horas.
aTENÇÃo
No caso de um corte de corrente elétrica, será apagada toda a programação do re-lógio electrónico e aparecerá a piscar no relógio a indicação 12:00. Deverá acertar a hora e programá-lo de novo.
Manuseamento do fornoFUNCIoNaMENTo MaNUaL
• Após acertar a hora do relógio, o seu forno está pronto para cozinhar. Selecione uma função de cozinhado e uma temperatura.
INFoRMaÇÃo
Em modelos com regulação eletrónica de temperatura, a temperatura é apresentada no ecrã do relógio ao rodar o seletor.
Assim que a temperatura for selecionada, o relógio volta a ser apresentado automatica-mente no ecrã.
• Poderá verificar que o símbolo se ilumina durante o cozinhado para indicar a trans-missão de calor ao alimento. Este símbolo apaga-se quando é atingida a temperatura selecionada.
• Para desligar o forno, coloque os coman-dos na posição .
INFoRMaÇÃo
Quando inicia um cozinhado, por defeito o forno irá mostrar o tempo total do cozinha-do em curso.
Ao pressiona poderá alternar entre a vi-sualização do tempo de cozinhado e a hora atual.
FUNCIoNaMENTo Do TEMpoRIZaDoR Do FoRNo
programação do avisador
1. Prima ou até que o símbolo fique intermitente no visor e prima . No visor será exibida a indicação 00:00.
2. Selecione o tempo, após o qual pretende que o relógio avise, tocando em ou . Ouvirá 2 beeps seguidos como confirmação e será exibida a contagem decrescente do tempo definido. O símbolo piscará len-tamente.
3. Quando terminar o tempo, será emitido um sinal acústico durante 90 segundos e o sím-bolo piscará mais rapidamente.
NoTa
Com a função Avisador, o forno não se desli-gará quando terminar o tempo programado.
16 Guia de Utilização
4. Prima qualquer tecla para parar o sinal so-noro, nesse momento o símbolo apagar-se-á.
Caso pretenda alterar o tempo do avisador, siga novamente os passos descritos. Ao ace-der ao temporizador, será exibido o tempo res-tante atual, que poderá ser alterado.
NoTa
Com a função Avisador, o tempo restan-te será permanentemente exibido no visor. Com esta função ativada, não é possível visualizar a hora nem o tempo total progra-mado para o cozinhado.
programação da Duração do Cozinhado
1. Prima ou até que o símbolo fique intermitente no visor e prima . No visor será exibida a indicação 00:00.
2. Selecione o tempo, após o qual pretende que o relógio avise, tocando em ou . Ouvirá 2 beeps seguidos como confirmação e será exibida a contagem decrescente do tempo definido. O símbolo piscará lentamente.
3. Selecione uma função e uma temperatura de cozinhado através dos comandos do forno.
4. Decorrida a duração do cozinhado, o for-no desligar-se-á, soará um sinal sonoro e o símbolo piscará mais depressa.
5. Prima qualquer tecla para parar o sinal so-noro e apagar o símbolo , ligando de novo o forno.
6. Coloque os comandos na posição para desligar o forno.
Pode alterar o tempo de cozinhado restante a qualquer momento, bastando para tal premir
ou até que o símbolo comece a piscar rapidamente. De seguida, prima para alterar o tempo.
NoTa
Com a função Duração de cozinhado, o tempo restante será permanentemente exi-bido no visor. Com esta função ativada, não é possível visualizar a hora atual no visor.
programação da Hora de Finalização do Cozinhado
1. Prima ou até que o símbolo fique intermitente no visor e prima . No visor será exibida a indicação 00:00.
2. Selecione o tempo, após o qual pretende que o relógio avise, tocando em ou . Ouvirá 2 beeps seguidos como confirmação e será exibida a contagem decrescente do tempo definido. O símbolo piscará lentamente.
3. Selecione uma função e uma temperatura de cozinhado.
4. Assim que for atingida a hora de finalização programada, o forno desligar-se-á, será emitido um sinal sonoro e o símbolo pis-cará mais depressa.
5. Prima qualquer sensor para parar o sinal sonoro e apagar o símbolo , ligando de novo o forno.
6. Coloque os comandos na posição para desligar o forno.
Pode alterar o tempo de cozinhado restante a qualquer momento, bastando para tal premir
ou até que o símbolo comece a piscar rapidamente. De seguida, prima para alterar o tempo.
programação da Duração e Finalização do Cozinhado
1. Prima ou até que o símbolo fique intermitente no visor e prima . No visor será exibida a indicação 00:00.
2. Selecione a duração do cozinhado, tocan-do em ou . Posteriormente, soarão 2 beeps seguidos e será exibido o tempo
17Guia de Utilização
Português
restante no visor e o símbolo piscará len-tamente.
3. Prima ou até que o símbolo fique intermitente no visor e prima . No visor será exibida a indicação 00:00.
4. Selecione a hora de finalização do cozinha-do, premindo ou . Posteriormente soarão 2 beeps seguidos, será mostrada a hora atual no visor.
5. Selecione uma função e uma temperatura de cozinhado. O forno permanecerá desli-gado e com os símbolos e ilumina-dos. O seu forno está programado.
6. Quando for alcançada a hora de início do cozinhado, o forno entrará em funciona-mento e o cozinhado decorrerá durante o tempo selecionado.
7. Durante o cozinhado será exibido o tempo de cozinhado restante e o símbolo pis-cará lentamente.
8. Assim que for atingida a hora de finaliza-ção programada, o forno desligar-se-á, será emitido um sinal sonoro e o símbolo
piscará mais depressa.
9. Prima qualquer sensor para parar o sinal sonoro e apagar o símbolo , ligando de novo o forno.
10. Coloque os comandos na posição para desligar o forno.
Pode alterar o tempo de cozinhado restante a qualquer momento, bastando para tal premir
ou até que o símbolo comece a piscar rapidamente. De seguida, prima para alterar o tempo.
Funções de segurança BLoQUEIo DE sEGURaNÇa paRa CRIaNÇas
Esta função pode ser selecionada a qualquer momento durante a utilização do forno.
Para ativar a função, prima as teclas e simultaneamente de modo prolongado até que soe 1 sinal sonoro e o símbolo seja exi-bido no visor. O relógio está bloqueado.
Se o forno estiver desligado e a segurança para crianças estiver ativa, o forno não cozinhará mes-mo que selecione uma função de cozinhado.
Caso ative esta função enquanto estiver a uti-lizar o forno, apenas bloqueará a manipulação do relógio electrónico.
Para desativar a função, prima as teclas e simultaneamente de modo prolongado até
que soe 1 sinal sonoro.
BLoQUEIo MaNUaL Da poRTa
Disponível apenas nos modelos pirolíticos.
Esta função permite bloquear a porta do forno.
IMpoRTaNTE
Esta função só poderá ser selecionada quando o forno se encontrar com o coman-do de funções na posição de repouso .
Para ativar/desativar o bloqueio da porta, siga os seguintes passos:
1. Prima ou haté que o símbolo fique intermitente no visor.
Será exibido o estado atual do bloqueio da porta: “On” se estiver ativo e “Off” se estiver desativado.
2. Prima , para alterar o bloqueio para o estado contrário nesse mesmo momento: Se a porta estiver desbloqueada, esta blo-quear-se-á e vice-versa.
3. Logo que a porta se bloqueie/desbloqueie, o novo estado de bloqueio de porta será exibido no visor.
No caso de o bloqueio estar ativado, o sím-bolo iluminar-se-á fixamente no visor.
18 Guia de Utilização
Função Teka Hydroclean®
Esta função facilita a limpeza de gordura e res-tos de sujidade que tenham aderido às paredes do forno.
Para facilitar a limpeza, evite a acumulação de sujidade. Limpe frequentemente o forno.
pRoGRaMaR a FUNÇÃo TEKa HYDRoCLEaN®
aTENÇÃo
Não verta água no interior do forno enquanto este ainda estiver quente, pois poderá dani-ficar o esmalte do mesmo.
Realize sempre o ciclo com o forno frio. Se o procedimento for efetuado com o forno dema-siado quente, poderá haver alterações no re-sultado e poderá danificar o esmalte.
Retire previamente os tabuleiros e todos os acessórios do interior do forno, incluindo os su-portes dos tabuleiros ou as guias telescópicas. para tal, siga as instruções presentes no manual de instalação e manutenção forne-cido com o forno.
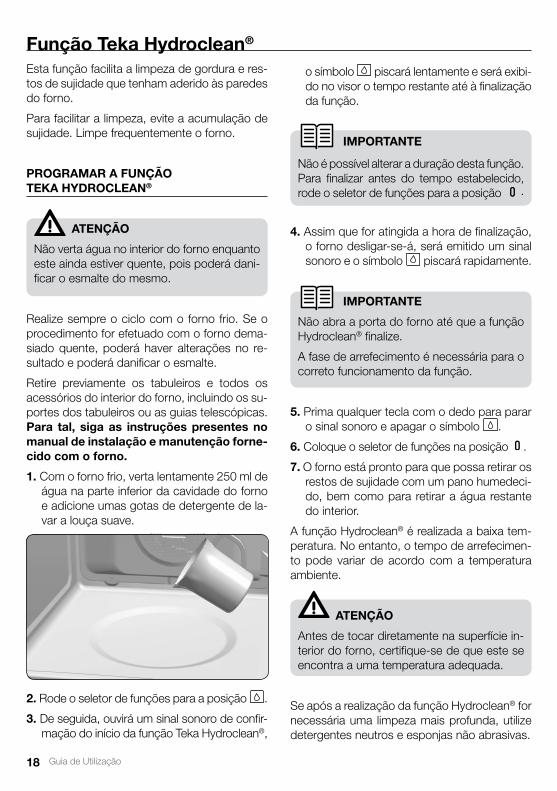
1. Com o forno frio, verta lentamente 250 ml de água na parte inferior da cavidade do forno e adicione umas gotas de detergente de la-var a louça suave.
o símbolo piscará lentamente e será exibi-do no visor o tempo restante até à finalização da função.
IMpoRTaNTE
Não é possível alterar a duração desta função. Para finalizar antes do tempo estabelecido, rode o seletor de funções para a posição .
4. Assim que for atingida a hora de finalização, o forno desligar-se-á, será emitido um sinal sonoro e o símbolo piscará rapidamente.
IMpoRTaNTE
Não abra a porta do forno até que a função Hydroclean® finalize.
A fase de arrefecimento é necessária para o correto funcionamento da função.
5. Prima qualquer tecla com o dedo para parar o sinal sonoro e apagar o símbolo .
6. Coloque o seletor de funções na posição .
7. O forno está pronto para que possa retirar os restos de sujidade com um pano humedeci-do, bem como para retirar a água restante do interior.
A função Hydroclean® é realizada a baixa tem-peratura. No entanto, o tempo de arrefecimen-to pode variar de acordo com a temperatura ambiente.
aTENÇÃo
Antes de tocar diretamente na superfície in-terior do forno, certifique-se de que este se encontra a uma temperatura adequada.
Se após a realização da função Hydroclean® for necessária uma limpeza mais profunda, utilize detergentes neutros e esponjas não abrasivas.
2. Rode o seletor de funções para a posição .
3. De seguida, ouvirá um sinal sonoro de confir-mação do início da função Teka Hydroclean®,

19Guia de Utilização
Português
Função de autolimpeza por pirólise Função disponível para modelo HLC 840 P.
aTENÇÃo
Antes de realizar o ciclo de limpeza por pi--rólise, leia atentamente as instruções de segurança disponibilizadas no início do ma-nual de Instalação e Manutenção.
Esta função permite-lhe realizar um ciclo de limpeza por pirólise, durante o qual se produz um processo de carbonização das gorduras acumuladas, devido às elevadas temperaturas que são atingidas no interior do forno.
Em geral, recomenda-se a realização de uma pirólise a cada 4 ou 5 cozinhados e a utilização do programa mais adequado ao nível de suji-dade do seu forno. Em caso de maior sujidade, escolha um programa de maior duração.
Durante a pirólise, a iluminação do forno per-manecerá apagada.
pRoGRaMaR a FUNÇÃo pIRóLIsE
IMpoRTaNTE
Antes de realizar a pirólise é imprescindível retirar todos os acessórios e loiça do forno, incluindo os suportes de tabuleiros e/ou guias telescópicas. Para tal, siga as instruções pre-sentes no manual de instalação e manuten-ção fornecido com o forno.
aTENÇÃo
Retire qualquer vertido ou resto excessivo de sujidade, dado que durante o processo de pirólise poderia inflamar-se, correndo pe-rigo de incêndio.
1. Rode o comando seletor de funções de co-zinhado para a posição Pirólise: .
2. Após alguns segundos, o símbolo ilumi-nar-se-á no visor do relógio e será possível ler a indicação P2 (programa 2 de pirólise).
3. Nesse momento, poderá alterar o programa de pirólise para P1, P2 ou P3 com as teclas
o :
p1: Pirólise suave. Duração 1 hora. p2: Pirólise normal. Duração 1 hora e 30 min. p3: Pirólise intensiva. Duração 2 horas.
4. Uma vez selecionado o programa preten-dido, prima . O bloqueio automático da porta será ativado imediatamente a seguir.
5. Quando a porta estiver bloqueada, iluminar-se-á o símbolo no visor do relógio e será exibido o tempo restante para a finalização da pirólise.
IMpoRTaNTE
Ao chegar a este ponto, o forno está pro-gramado e encontra-se a realizar o ciclo de limpeza pirolítica. Durante a realização deste ciclo, não poderá selecionar nenhuma das funções do relógio do forno, exceto a função de segurança para crianças.
Não deve tentar abrir a porta do forno, pois poderá interromper o processo de limpeza.
6. Quando a limpeza pirolítica estiver finalizada, ouvirá um sinal sonoro, o símbolo ficará intermitente e será exibida a indicação 0:00 no visor do relógio.
7. Prima qualquer tecla do relógio para parar o sinal sonoro.
8. Coloque o seletor de funções na posição .
9. O processo de aquecimento do forno fi-nalizou, no entanto, o forno está excessi-vamente quente e não pode ser utilizado.

20 Guia de Utilização
A refrigeração continua a funcionar até que o forno arrefeça e o símbolo permanece iluminado.
IMpoRTaNTE
Devido às altas temperaturas no interior do forno, o tempo de arrefecimento pode variar de acordo com a temperatura ambiente.
10. Logo que o forno tenha arrefecido, o sím-bolo apagar-se-á.
11. Abra a porta do forno e passe um pano humedecido pelo interior da cavidade, reti-rando a cinza produzida durante o ciclo de limpeza. Em zonas de difícil acesso do in-terior do forno será necessário limpar com algum esfregão de fibra não metálica.
12. Quando o interior do forno estiver limpo, lembre-se de voltar a colocar os suportes e respetivos acessórios.
13. O forno está preparado para um novo co-zinhado.
IMpoRTaNTE
Caso detete algum problema durante a programação ou manuseio desta função, consulte o guia de instalação e manutenção fornecido com o seu forno.
CaNCELaMENTo Da pIRóLIsE
A pirólise é uma função automática e, como tal, só pode ser acionada através da programação do relógio. Para cancelar um processo de pi-rólise em curso, é necessário desprogramar o forno, seguindo as seguintes instruções:
1. Coloque o seletor de funções na posição .
No visor do relógio será exibido
2. Dependendo da temperatura do interior do forno, podem ocorrer as seguintes duas situações:
a) Temperatura do interior perigosa: Neste caso, a porta permanecerá bloqueada até que a temperatura atinja valores seguros.
b) Temperatura do interior segura: Se a tem-peratura do interior do forno for segura, o desbloqueio realizar-se-á imediatamente.
3. Logo que a porta se encontre desbloqueada e seja possível abri-la, a hora será novamen-te exibida no visor do relógio.

21User’s Guide
English
1 2 3
Description of the oven1 Control panel
2 Door lock (only for pyrolytic models)
3 Grill element
4 Tray supports
5 Grid shelf
6 Tray
7 Hinge
8 Inner Glass
9 Air cooling outlet
10 Unit mounting
11 Lamp
12 Back Wall Panel
13 Fan
14 Oven Seal
15 Door
Control panel
1 Function control dial
2 Electric clock/timer
3 Temperature control dial
1
10
13
14
15
5
6
7
3
2
4
9
11
8
12

22 User’s Guide
Function selector symbols
HLC 840 Model
oven functions
INFoRMaTIoN
For a description of how to use each of the features, see the cooking guide that comes with your oven.
oVEN sWITCH-oFF
CoNVENTIoNaL
GRILL
MaxIGRILL
LoWER ELEMENT
MaxIGRILL WITH FaN
TURBo
pIZZa
ECo
DEFRosTING
HYDRoCLEaN
FasT pREHEaTING

23User’s Guide
English
Electronic clock/timer description
1 KEYs
, and : Enable you to programme the electronic clock/timer functions.
2 sYMBoLs
Clock settings
aVIsaDoR: Lights up when the clock/ timer is selected. Generates an acoustic signal when the time is up. The oven does not turn off at the end of the timer period. This function can also be used while the oven is cooking.
and pRoGRaMMING: Light up to indi-cate that the oven is programmed (cooking time, stop time or total).
• Cooking Time: This function allows you to programme the cooking time, after which the oven will turn off automatically.
• Cooking stop Time: This setting al-lows you to programme the time for cook-ing to stop, after which the oven will turn off automatically.
• and Cooking Time and Cooking stop Time: This setting allows you to pro-gramme the cooking time and cooking stop time. The oven switches on automatically at the set time and operates for the select-ed cooking time (Cooking Time). It then switches off automatically at the indicated time (Cooking Stop Time).
CLoCK/TIMER LoCK: Indicates that the touch keys for the clock/timer are locked, preventing modifications by small children. Indicates that the touch keys for the clock/timer are locked, preventing modifications by small children.
other functions
HEaTING: Indicates that the oven is trans-mitting heat to the food.
HYDRoCLEaN: Lights up while the Teka Hydroclean® function is in progress.
pYRoLYsIs: For pyrolytic models only. Lights up while the Pyrolytic function is in progress.
DooR LoCK: For pyrolytic models only. Indicates that the door is locked, either manually or automatically while the pyrolytic function is in progress.
WaRNING
The sensitivity of the touch keys adapts continually to environmental conditions. Make sure the surface of the control panel is clean and free of obstacles when plugging in the oven.
If the clock does not respond correctly when you touch the keys, unplug the oven for a few seconds and then plug it in again. Doing this causes the sensors to adjust au-tomatically so that they will react once more to fingertip control.
sETTING THE TIME
• When you plug in the oven, you will see the clock flashing 12:00.
• Touch or to adjust the hours and then the minutes. You will hear a double beep confirming the time is set.
2 1 2

24 User’s Guide
• If you wish to modify the time, touch or until the time starts flashing. Touch
and and follow the instructions in the previ-ous point.
NoTE
The clock light has a night mode so the dis-play light will dim between 00:00 and 6:00 hours.
WaRNING
In the event of a power failure, your elec-tronic clock/timer settings will be erased and 12:00 will flash on the clock display. Reset it and programme again.
oven use
Press to cycle the display between cook time and current time.
oVEN TIMER opERaTIoN
programming the Buzzer
1. Touch or until the symbol on the display starts flashing, then press . The indication ‘00:00’ will appear on the display.
2. Select the time after which you want the alarm to sound by pressing or . You will hear 2 beeps to confirm that the time has been set and the clock will start counting down from the selected time. The sym-bol will flash slowly.
3. Once the time has expired, an acoustic sig-nal will sound for 90 seconds and the symbol will flash quickly.
NoTE
With the Buzzer function, the oven will not turn off when the time expires.
MaNUaL opERaTIoN
• After setting the clock, the oven is ready for use. Select a cooking function and tempera-ture.
INFoRMaTIoN
In models with an electronic temperature control, when the selector switch is turned, the clock display will show the temperature.
After selecting the temperature, the clock display will automatically reappear.
• You will notice that the symbol lights up during cooking to indicate that heat is being transmitted to the food. This symbol disap-pears when the selected temperature has been reached.
• Set the controls to to turn off the oven.
INFoRMaTIoN
When a cooking cycle begins, the oven will automatically display the total time for the cycle in progress.
25User’s Guide
English
4. Touch any key to stop the alarm. The symbol will then disappear.
If you wish to modify the time on the buzzer, re-peat the steps shown. Upon entering the timer control, the time currently remaining will appear, which you will be able to adjust.
NoTE
With the Buzzer function, the remaining time will show permanently on the display. With this programmed function, it is not possible to view the time or the total programmed cooking time.
programming Cooking Time
1. Touch or until the symbol on the display starts flashing, then press . The indication ‘00:00’ will appear on the display.
2. Select the time after which you want the alarm to sound by pressing or . You will hear 2 beeps to confirm that the time has been set and the clock will start counting down from the selected time.The sym-bol will flash slowly.
3. Select a function and a cooking temperature using the oven commands.
4. Once the cooking time is up, the oven will turn off, an alarm will sound and the symbol will flash quickly.
5. Touch any key to stop the alarm and turn off the symbol. The oven will switch on again.
6. Set the controls to the position to turn off the oven.
You can change the remaining cooking time at any time by touching or until the symbol starts to flash quickly. Now press to change the time.
NoTE
With the Cooking Time function, the remain-ing time will show permanently on the dis-play. You cannot see the current time on the display when this function is set.
programming the Cooking stop Time
1. Touch or until the symbol on the display starts to flash and press . The in-dication ‘00:00’ will appear on the display.
2. Select the time after which you want the alarm to sound by pressing or . You will hear 2 beeps to confirm that the time has been set and the clock will start counting down from the selected time. The sym-bol will flash slowly.
3. Select a cooking function and temperature.
4. When the cycle is finished, the oven will turn itself off, a buzzer will sound and symbol will flash quickly.
5. Touch any sensor to stop the alarm and to turn off the , symbol. The oven will switch on again.
6. Set the controls to the position to turn off the oven.
You can change the remaining cooking time at any time by touching or until the symbol starts to flash quickly. Now press to change the time.
programming Cooking Time and Cooking stop Time
1. Touch or until the symbol on the display starts flashing, then press . The indication ‘00:00’ will appear on the display.
2. Select the cooking time by touching or . Next, a double beep will sound, the re-
maining time will appear on the display and the symbol will flash slowly.
26 User’s Guide
3. Touch or until the symbol on the display starts flashing, then press . The indication ‘00:00’ will appear on the display.
4. Select the cooking end time by touching or . Next, a double beep will sound and the current time will be displayed on the display.
5. Select a cooking function and temperature. The oven will remain disconnected with the
and symbols lit up. The oven is now programmed.
6. When it is time to start cooking, the oven will turn on and will operate for the programmed cooking time.
7. While cooking, the cooking time remaining will be displayed and the symbol will flash slowly.
8. When the cooking time is up, the oven will turn off, a buzzer will sound, and the symbol will flash quickly.
9. Touch any sensor to stop the buzzer and turn off the symbol. The oven will switch on again.
10. Set the controls to the position to turn off the oven.
You can change the remaining cooking time at any time by touching or until the symbol starts to flash quickly. Now press to change the time.
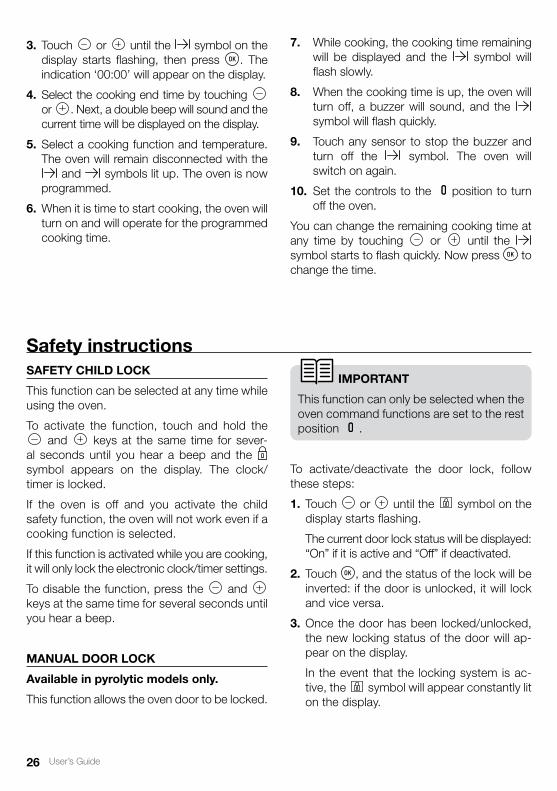
safety instructions saFETY CHILD LoCK
This function can be selected at any time while using the oven.
To activate the function, touch and hold the and keys at the same time for sever-
al seconds until you hear a beep and the symbol appears on the display. The clock/ timer is locked.
If the oven is off and you activate the child safety function, the oven will not work even if a cooking function is selected.
If this function is activated while you are cooking, it will only lock the electronic clock/timer settings.
To disable the function, press the and keys at the same time for several seconds until you hear a beep.
MaNUaL DooR LoCK
available in pyrolytic models only.
This function allows the oven door to be locked.
IMpoRTaNT
This function can only be selected when the oven command functions are set to the rest position .
To activate/deactivate the door lock, follow these steps:
1. Touch or until the symbol on the display starts flashing.
The current door lock status will be displayed: “On” if it is active and “Off” if deactivated.
2. Touch , and the status of the lock will be inverted: if the door is unlocked, it will lock and vice versa.
3. Once the door has been locked/unlocked, the new locking status of the door will ap-pear on the display.
In the event that the locking system is ac-tive, the symbol will appear constantly lit on the display.
27User’s Guide
English
Teka Hydroclean® functionThis function makes it easy to remove grease and other food debris that may have stuck to the sides of the oven.
For easier cleaning, do not allow dirt to accu-mulate. Clean the oven frequently.
pRoGRaMMING THE TEKa HYDRoCLEaN® FUNCTIoN
WaRNING
Do not pour water into a hot oven as this can damage the enamel of the oven.
Always run the cycle on a cold oven. The result could be affected and the varnish damaged if it is run when the oven is too hot.
First remove the trays and all accessories from the oven interior, including the tray supports and telescopic guide rails. To do this, follow the instructions in the installation and mainte-nance guide accompanying the oven.
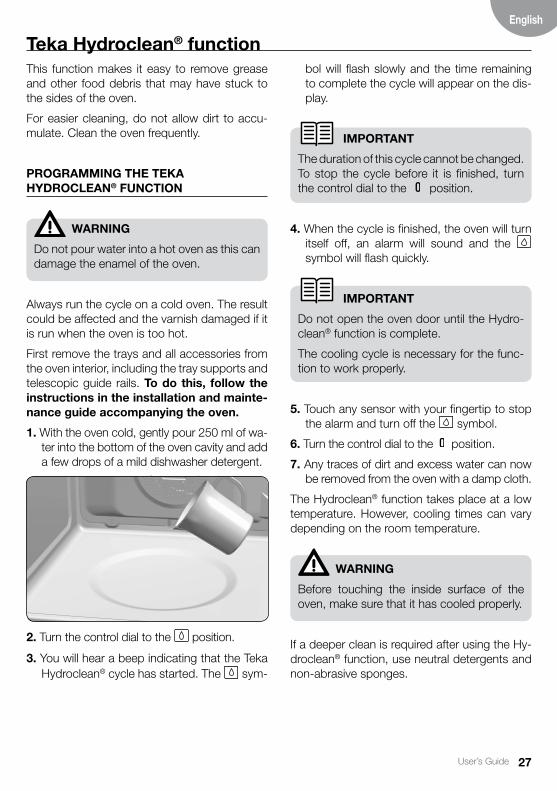
1. With the oven cold, gently pour 250 ml of wa-ter into the bottom of the oven cavity and add a few drops of a mild dishwasher detergent.
bol will flash slowly and the time remaining to complete the cycle will appear on the dis-play.
IMpoRTaNT
The duration of this cycle cannot be changed. To stop the cycle before it is finished, turn the control dial to the position.
4. When the cycle is finished, the oven will turn itself off, an alarm will sound and the symbol will flash quickly.
IMpoRTaNT
Do not open the oven door until the Hydro-clean® function is complete.
The cooling cycle is necessary for the func-tion to work properly.
5. Touch any sensor with your fingertip to stop the alarm and turn off the symbol.
6. Turn the control dial to the position.
7. Any traces of dirt and excess water can now be removed from the oven with a damp cloth.
The Hydroclean® function takes place at a low temperature. However, cooling times can vary depending on the room temperature.
WaRNING
Before touching the inside surface of the oven, make sure that it has cooled properly.
If a deeper clean is required after using the Hy-droclean® function, use neutral detergents and non-abrasive sponges.
2. Turn the control dial to the position.
3. You will hear a beep indicating that the Teka Hydroclean® cycle has started. The sym-
28 User’s Guide
pyrolytic self-cleaning functionFunction available the model HLC 840 P.
WaRNING
Before setting the pyrolytic cleaning cycle, carefully read the safety instructions, which you will find at the start of the Installation and Maintenance guide.
This function allows you to carry out a pyrolytic cleaning cycle during which, due to the high tem-peratures reached inside the oven, accumulated grease undergoes a carbonisation process.
The general recommendation is to perform a py-rolytic cycle every 4-5 uses, using the most suit-able programme according to the level of stains present in the oven. The more stained the oven, the longer the duration of the programme.
During the pyrolytic cycle the light inside the oven will remain off.
pRoGRaMMING THE pYRoLYTIC FUNCTIoN
IMpoRTaNT
Before carrying out the pyrolysis, you must remove all accessories and dishes from the oven, including the shelves and/or telescop-ic guide rails. To do this, follow the instruc-tions in the installation and maintenance guide accompanying the oven.
WaRNING
Clean any spillages or excess dirt from the inside, as these could ignite during the py-rolysis and create a fire hazard.
1. Turn the cooking control dial to the Pyrolysis position .
2. TAfter a few seconds, the symbol will light up on the clock display, reading ‘P2’ (Pyrolysis programme 2.
3. You can now change the pyrolysis pro-gramme to P1, P2 or P3 by pressing the or keys:
p1: Light pyrolysis. Lasts 1 hour. p2: Regular pyrolysis. Lasts 1 hour 30 min. p3: Intensive pyrolysis. Lasts 2 hours.
4. Once the desired programme has been se-lected, press . The automatic door lock will be activated immediately.
5. Once the door is locked, the symbol will light up on the clock display and the time re-maining before the end of the pyrolysis will ap-pear.
IMpoRTaNT
At this point, the oven is programmed and the pyrolytic cleaning cycle is under way. During the cycle, none of the oven timer functions may be chosen (except the child lock).
Do not try to open the oven door as this may interrupt the cleaning process.
6. When the pyrolytic cleaning cycle has fin-ished, an alarm will sound, the symbol will flash and you will see the time ‘0:00’ on the clock display.
7. Press any of the timer’s keys to disable the alarm.
8. Turn the control dial to the position.
9. The oven’s heating process has finished. However, the oven is extremely hot and cannot be used.

29User’s Guide
English
The cooling process will continue to oper-ate and the symbol will remain lit until the oven cools down.
IMpoRTaNT
As a result of the high temperatures inside the oven, the cooling process may vary de-pending on the room temperature..
10. Once the oven has cooled down, the symbol will turn off.
11. Open the oven door and wipe the inside with a damp cloth, removing the ash from the cleaning cycle. Hard-to-reach areas in the oven will need to be cleaned with a non-metallic fibre scourer.
12. Once the oven is clean, do not forget to replace the supports and accessories.
13. The oven is now ready to be used.
IMpoRTaNT
If any incident is detected in the program-ming or use of this function, consult the in-stallation and maintenance guide included with your oven.
CaNCELLING THE pYRoLYTIC FUNCTIoN
Pyrolysis is an automatic function and there-fore it can only be activated from the timer programme. To cancel a pyrolysis in progress it is necessary to reset the oven, following the instructions below:
1. Set the control dial to the position.
The timer display will appear as follows
2. Depending on the internal temperature of the oven, either of the two following situations could arise:
a) Dangerous internal temperature: In this case, the door will remain locked until the temperature reaches safe levels.
b) Safe internal temperature: If the temper-ature inside the oven is safe, the door will be unlocked immediately.
3. Once the door has been unlocked and can be opened, the time will show once again on the timer display.
30 Guide d’utilisation
1 2 3
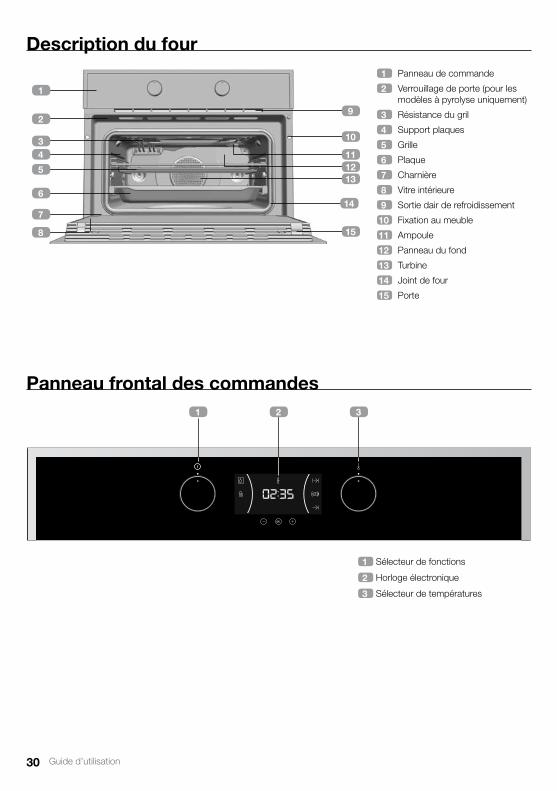
Description du four 1 Panneau de commande
2 Verrouillage de porte (pour les modèles à pyrolyse uniquement)
3 Résistance du gril
4 Support plaques
5 Grille
6 Plaque
7 Charnière
8 Vitre intérieure
9 Sortie dair de refroidissement
10 Fixation au meuble
11 Ampoule
12 Panneau du fond
13 Turbine
14 Joint de four
15 Porte
panneau frontal des commandes
1 Sélecteur de fonctions
2 Horloge électronique
3 Sélecteur de températures
1
10
13
14
15
5
6
7
3
2
4
9
11
8
12
31Guide d’utilisation
Français
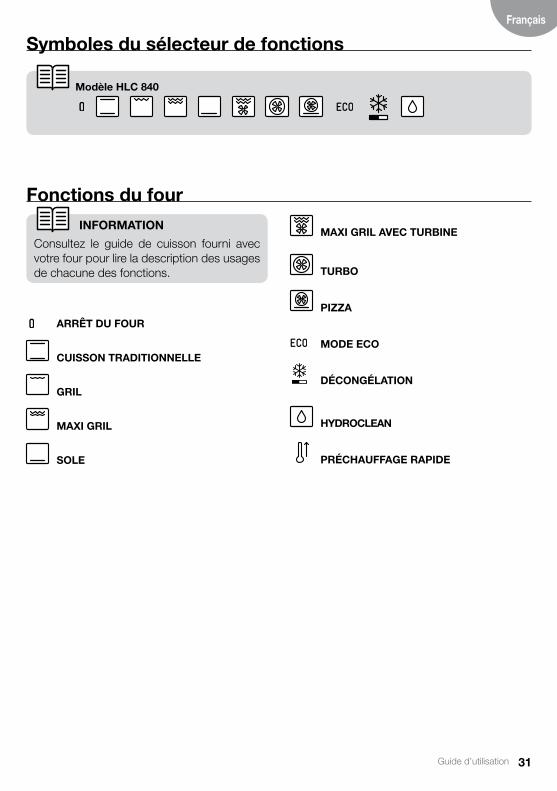
symboles du sélecteur de fonctions
Modèle HLC 840
Fonctions du four
INFoRMaTIoN
Consultez le guide de cuisson fourni avec votre four pour lire la description des usages de chacune des fonctions.
aRRÊT DU FoUR
CUIssoN TRaDITIoNNELLE
GRIL
MaxI GRIL
soLE
MaxI GRIL aVEC TURBINE
TURBo
pIZZa
MoDE ECo
DÉCoNGÉLaTIoN
HYDRoCLEaN
pRÉCHaUFFaGE RapIDE
32 Guide d’utilisation
Description de l’horloge électronique
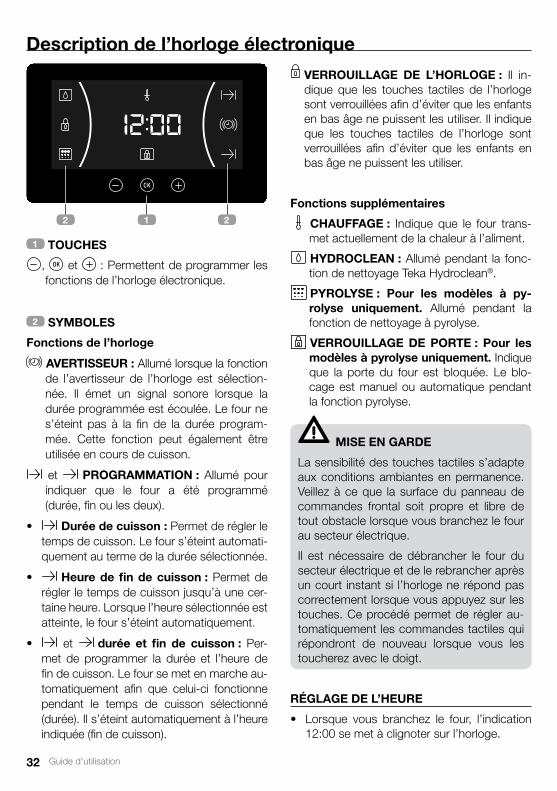
1 ToUCHEs
, et : Permettent de programmer les fonctions de l’horloge électronique.
2 sYMBoLEs
Fonctions de l’horloge
aVERTIssEUR : Allumé lorsque la fonction de l’avertisseur de l’horloge est sélection-née. Il émet un signal sonore lorsque la durée programmée est écoulée. Le four ne s’éteint pas à la fin de la durée program-mée. Cette fonction peut également être utilisée en cours de cuisson.
et pRoGRaMMaTIoN : Allumé pour indiquer que le four a été programmé (durée, fin ou les deux).
• Durée de cuisson : Permet de régler le temps de cuisson. Le four s’éteint automati-quement au terme de la durée sélectionnée.
• Heure de fin de cuisson : Permet de régler le temps de cuisson jusqu’à une cer-taine heure. Lorsque l’heure sélectionnée est atteinte, le four s’éteint automatiquement.
• et durée et fin de cuisson : Per-met de programmer la durée et l’heure de fin de cuisson. Le four se met en marche au-tomatiquement afin que celui-ci fonctionne pendant le temps de cuisson sélectionné (durée). Il s’éteint automatiquement à l’heure indiquée (fin de cuisson).
VERRoUILLaGE DE L’HoRLoGE : Il in-dique que les touches tactiles de l’horloge sont verrouillées afin d’éviter que les enfants en bas âge ne puissent les utiliser. Il indique que les touches tactiles de l’horloge sont verrouillées afin d’éviter que les enfants en bas âge ne puissent les utiliser.
Fonctions supplémentaires
CHaUFFaGE : Indique que le four trans-met actuellement de la chaleur à l’aliment.
HYDRoCLEaN : Allumé pendant la fonc-tion de nettoyage Teka Hydroclean®.
pYRoLYsE : pour les modèles à py-rolyse uniquement. Allumé pendant la fonction de nettoyage à pyrolyse.
VERRoUILLaGE DE poRTE : pour les modèles à pyrolyse uniquement. Indique que la porte du four est bloquée. Le blo-cage est manuel ou automatique pendant la fonction pyrolyse.
MIsE EN GaRDE
La sensibilité des touches tactiles s’adapte aux conditions ambiantes en permanence. Veillez à ce que la surface du panneau de commandes frontal soit propre et libre de tout obstacle lorsque vous branchez le four au secteur électrique.
Il est nécessaire de débrancher le four du secteur électrique et de le rebrancher après un court instant si l’horloge ne répond pas correctement lorsque vous appuyez sur les touches. Ce procédé permet de régler au-tomatiquement les commandes tactiles qui répondront de nouveau lorsque vous les toucherez avec le doigt.
RÉGLaGE DE L’HEURE
• Lorsque vous branchez le four, l’indication 12:00 se met à clignoter sur l’horloge.
2 1 2

33Guide d’utilisation
Français
• Appuyez sur ou pour régler l’heure puis les minutes. 2 bips sonores consécutifs retentissent alors en guise de confirmation de la sélection de l’heure.
• Si vous souhaitez modifier l’heure, appuyez sur ou jusqu’à ce que l’heure appa-raisse en clignotant. Appuyez sur et sui-vez les mêmes étapes décrites ci-dessus.
REMaRQUE
L’horloge est pourvue du mode éclairage nocturne, de façon à réduire l’intensité lu-mineuse de l’écran entre minuit et 6 heures.
MIsE EN GaRDE
En cas de coupure de courant, toute la pro-grammation de l’horloge électronique est annulée et l’indication 12:00 se met à cli-gnoter sur l‘écran. Il vous faudra remettre l’horloge à l’heure et procéder à une nou-velle programmation.
Fonctionnement du four
En appuyant sur vous pouvez rempla-cer la visualisation du temps de cuisson par celle de l’heure actuelle.
FoNCTIoNNEMENT MINUTERIE DU FoUR
programmation de l’avertisseur
1. Appuyez sur ou jusqu’à ce que le symbole se mette à clignoter sur l’écran et appuyez sur . L’écran affiche alors l’indication 00:00.
2. Sélectionnez le temps après lequel vous souhaitez que l’horloge sonne en appuyant sur ou . 2 bips sonores consécutifs sont alors émis à titre de confirmation et le compte à rebours s’affiche sur l’écran. Le symbole se met à clignoter lentement.
3. Une fois terminé, un signal sonore retentit pendant 90 secondes et le symbole se met à clignoter rapidement.
REMaRQUE
Le four ne s’éteint pas au terme du temps programmé lorsque la fonction Avertisseur est activée.
FoNCTIoNNEMENT MaNUEL
• Une fois l’horloge réglée, votre four est prêt à fonctionner. Sélectionnez une fonction de cuisson et une température.
INFoRMaTIoN
Dans les modèles avec régulation électro-nique de la température, lorsque vous tour-nez le sélecteur, la température s’affiche sur l’écran de l’horloge.
Une fois la température sélectionnée, l’hor-loge sera de nouveau affichée automatique-ment à l’écran.
• Vous remarquerez que le symbole s’allume durant la cuisson, indiquant ainsi que la chaleur est transmise à l’aliment. Ce symbole s’éteint lorsque la température sélectionnée est atteinte.
• Pour éteindre le four, placez les commandes sur la position .
INFoRMaTIoN
Lorsque vous démarrez une cuisson, votre four affiche par défaut la durée totale de la cuisson en cours.
34 Guide d’utilisation
4. Appuyez sur n’importe quelle touche pour couper le signal sonore. Le symbole s’éteint.
Pour modifier la durée de l’avertisseur, effec-tuez à nouveau les étapes indiquées. À l’affi-chage du minuteur, apparaît le temps restant actuel que vous pouvez modifier.
REMaRQUE
Avec la fonction Avertisseur, le temps restant s’affiche sur l’écran de manière permanente. Lorsque cette fonction est programmée, il n’est pas possible de visualiser l’heure ni la durée de cuisson totale programmée.
programmation de la durée de cuisson
1. Appuyez sur ou jusqu’à ce que le symbole se mette à clignoter sur l’écran et appuyez sur . L’écran affiche alors l’in-dication 00:00.
2. Sélectionnez le temps après lequel vous souhaitez que l’horloge sonne en appuyant sur ou . 2 bips sonores consécutifs sont alors émis à titre de confirmation et le compte à rebours s’affiche sur l’écran. Le symbole se met à clignoter lentement.
3. Sélectionnez une fonction et une tempéra-ture de cuisson au moyen des commandes du four.
4. Une fois la durée de cuisson écoulée, le four s’éteint, un signal sonore retentit et le sym-bole se met à clignoter rapidement.
5. Appuyez sur n’importe quelle touche pour couper le signal sonore et éteindre le sym-bole . Le four se remet alors sous tension.
6. Placez les commandes sur la position pour éteindre le four.
Vous pouvez modifier à tout moment le temps de cuisson restant en appuyant sur ou jusqu’à ce que le symbole se mette à cli-gnoter rapidement. Ensuite, appuyez sur pour modifier la durée.
REMaRQUE
Avec la fonction Avertisseur, le temps restant s’affiche sur l’écran de manière permanente. Lorsque cette fonction est programmée, il n’est pas possible de visualiser l’heure ni la durée de cuisson totale programmée.
programmation de l’heure de fin de cuisson
1. Appuyez sur ou jusqu’à ce que le symbole se mette à clignoter sur l’écran et appuyez sur . L’écran affiche alors l’in-dication 00:00.
2. Sélectionnez le temps après lequel vous souhaitez que l’horloge sonne en appuyant sur ou . 2 bips sonores consécutifs sont alors émis à titre de confirmation et le compte à rebours s’affiche sur l’écran. Le symbole se met à clignoter lentement.
3. Sélectionnez une fonction et une tempéra-ture de cuisson.
4. Une fois la durée de cuisson écoulée, le four s’éteint, un signal sonore retentit et le sym-bole se met à clignoter rapidement.
5. Appuyez sur n’importe quelle touche pour couper le signal sonore et éteindre le sym-bole . Le four se remet alors sous tension.
6. Placez les commandes sur la position pour éteindre le four.
Vous pouvez modifier à tout moment le temps de cuisson restant en appuyant sur ou jusqu’à ce que le symbole se mette à cli-gnoter rapidement. Ensuite, appuyez sur pour modifier la durée.
programmation de la durée et fin de cuisson
1. Appuyez sur ou jusqu’à ce que le symbole clignote sur l’écran et appuyez sur . L’écran affiche alors l’indication 00:00.
2. Sélectionnez la durée de cuisson en ap-puyant sur ou . 2 bips consécutifs sont alors émis, le temps restant s’affiche
35Guide d’utilisation
Français
sur l’écran et le symbole se met à clignoter lentement.
3. Appuyez sur ou jusqu’à ce que le symbole se mette à clignoter sur l’écran et appuyez sur . L’écran affiche alors l’indication 00:00.
4. Sélectionnez l’heure de fin de cuisson, en appuyant sur ou . 2 bips sonores consécutifs sont alors émis et l’heure actuelle s’affiche à l’écran.
5. Sélectionnez une fonction et une tempéra-ture de cuisson. Le four restera éteint et les symboles et allumés. Votre four est programmé.
6. À l’heure de début de cuisson programmée, le four se met en marche et la cuisson s’effectue pendant la durée sélectionnée.
7. Pendant la cuisson, le temps de cuisson restant s’affiche à l’écran et le symbole clignote lentement.
8. À l’heure programmée pour la fin de cuis-son, le four s’éteint, un signal sonore retentit et le symbole se met à clignoter rapidement.
9. Appuyez sur n’importe quelle commande tactile pour couper le signal sonore et éteindre le symbole . Le four se remet alors sous tension.
10. Placez les commandes sur la position pour éteindre le four.
Vous pouvez modifier à tout moment le temps de cuisson restant en appuyant sur ou jusqu’à ce que le symbole se mette à cli-gnoter rapidement. Ensuite, appuyez sur pour modifier la durée.
Fonctions de sécurité VERRoUILLaGE DE sÉCURITÉ poUR LEs ENFaNTs
Cette fonction peut être sélectionnée à tout moment pendant l’utilisation du four.
Pour activer la fonction, appuyez de façon si-multanée et prolongée sur les touches et
, jusqu’à ce qu’un bip sonore retentisse et que le symbole s’affiche à l’écran. Ce mes-sage indique que l’horloge est verrouillée.
Si la fonction de sécurité enfants est activée lorsque le four est éteint, l’appareil ne fonc-tionne pas même si une fonction de cuisson est sélectionnée.
Si cette fonction est activée pendant que vous cuisinez avec le four, seule la manipulation de l’horloge électronique sera verrouillée.
Pour désactiver la fonction, maintenez simul-tanément les touches et enfoncées jusqu’à ce qu’un bip sonore retentisse.
VERRoUILLaGE MaNUEL DE poRTE
Disponible pour les modèles à pyrolyse uniquement.
Cette fonction permet de bloquer la porte du four.
IMpoRTaNT
Cette fonction ne peut être sélectionnée que si le sélecteur de fonctions du four est placé sur le mode veille .
Pour activer/désactiver le verrouillage de porte, suivez les étapes suivantes :
1. Appuyez sur ou jusqu’à ce que le symbole se mette à clignoter sur l’écran.
L’état actuel du verrouillage de la porte s’af-fiche alors : « On » s’il est activé et « Off » s’il est désactivé.
2. Appuyez sur pour modifier l’état du ver-rouillage : La porte se verrouillera si elle était déverrouillée, et inversement.
3. Une fois la porte verrouillée/déverrouillée, l’écran affiche l’état de la porte actualisé.
Si le verrouillage est activé, le symbole s’allume sans clignoter.
36 Guide d’utilisation
Fonction Teka Hydroclean®
Cette fonction facilite le nettoyage des traces de graisse et de saleté pouvant rester collées aux parois du four.
Pour un nettoyage plus efficace, évitez que la sa-leté ne s’accumule. Nettoyez régulièrement le four.
pRoGRaMMER La FoNCTIoN TEKa HYDRoCLEaN®
MIsE EN GaRDE
Ne versez pas d’eau à l’intérieur du four chaud : cette opération peut endommager l’émail de votre four.
Effectuez systématiquement le cycle de net-toyage lorsque le four est froid. Si le cycle est lancé avec un four trop chaud, il est possible que le résultat ne soit pas celui attendu en plus d’affecter l’émail.
Retirez préalablement les plaques et tous les accessoires présents à l’intérieur du four, y compris les supports de plaques ou les rails télescopiques. pour ce faire, suivez les ins-tructions figurant dans le manuel d’instal-lation et d’entretien fourni avec votre four.
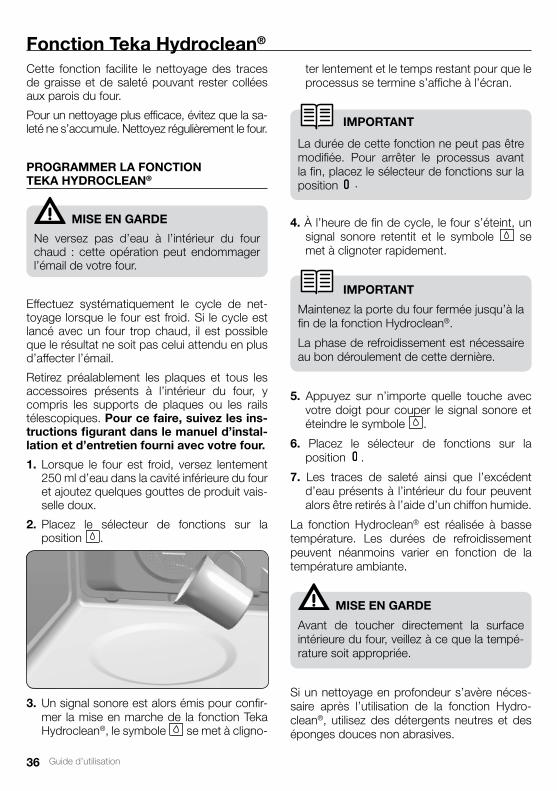
1. Lorsque le four est froid, versez lentement 250 ml d’eau dans la cavité inférieure du four et ajoutez quelques gouttes de produit vais-selle doux.
2. Placez le sélecteur de fonctions sur la position .
ter lentement et le temps restant pour que le processus se termine s’affiche à l’écran.
IMpoRTaNT
La durée de cette fonction ne peut pas être modifiée. Pour arrêter le processus avant la fin, placez le sélecteur de fonctions sur la position .
4. À l’heure de fin de cycle, le four s’éteint, un signal sonore retentit et le symbole se met à clignoter rapidement.
IMpoRTaNT
Maintenez la porte du four fermée jusqu’à la fin de la fonction Hydroclean®.
La phase de refroidissement est nécessaire au bon déroulement de cette dernière.
5. Appuyez sur n’importe quelle touche avec votre doigt pour couper le signal sonore et éteindre le symbole .
6. Placez le sélecteur de fonctions sur la position .
7. Les traces de saleté ainsi que l’excédent d’eau présents à l’intérieur du four peuvent alors être retirés à l’aide d’un chiffon humide.
La fonction Hydroclean® est réalisée à basse température. Les durées de refroidissement peuvent néanmoins varier en fonction de la température ambiante.
MIsE EN GaRDE
Avant de toucher directement la surface intérieure du four, veillez à ce que la tempé-rature soit appropriée.
Si un nettoyage en profondeur s’avère néces-saire après l’utilisation de la fonction Hydro-clean®, utilisez des détergents neutres et des éponges douces non abrasives.
3. Un signal sonore est alors émis pour confir-mer la mise en marche de la fonction Teka Hydroclean®, le symbole se met à cligno-
37Guide d’utilisation
Français
Fonction d’autonettoyage pyrolytique Fonction disponible sur le modèle HLC 840 P.
MIsE EN GaRDE
Avant de procéder au cycle de nettoyage pyrolytique, lisez attentivement les instruc-tions de sécurité que vous trouverez au dé-but du manuel d’installation et d’entretien.
Cette fonction vous permet de réaliser un cycle de nettoyage pyrolytique durant lequel, en raison des hautes températures atteintes à l’intérieur du four, se produit un processus de carbonisation des graisses accumulées.
Il est généralement recommandé de réaliser une pyrolyse toutes les 4-5 cuissons et d’utili-ser le programme le plus approprié au niveau de saleté du four. Plus le four est sale, plus la durée du programme doit être longue.
L’éclairage intérieur du four restera éteint du-rant la pyrolyse.
pRoGRaMMER La FoNCTIoN pYRoLYsE
IMpoRTaNT
Avant de lancer la pyrolyse, il est indispen-sable de retirer tous les accessoires et la vaisselle du four, y compris les supports des plaques et/ou les rails télescopiques. Pour ce faire, suivez les instructions figurant dans le manuel d’installation et d’entretien fourni avec votre four.
MIsE EN GaRDE
Retirer du four tout écoulement ou résidu de saleté majeur car ils pourraient prendre feu et déclencher un incendie durant la pyrolyse.
1. Placez le sélecteur de fonctions de cuisson sur la position Pyrolyse : .
2. Au bout de quelques secondes, le symbole s’allume et l’indication P2 (programme
P2 de pyrolyse) s’affiche sur l’écran de l’horloge.
3. Vous pouvez alors modifier le programme de pyrolyse sur P1, P2 ou P3 en appuyant sur la touche ou :
p1 : Pyrolyse douce. Durée 1 heure.
p2 : Pyrolyse normale. Durée 1 heure et 30 minutes.
p3 : Pyrolyse forte. Durée 2 heures.
4. Une fois le programme souhaité sélectionné, appuyez sur . Le verrouillage automatique de porte s’activera immédiatement après.
5. Lorsque la porte est verrouillée, le symbole s’allume sur l’écran de l’horloge et le
temps restant avant la fin de la pyrolyse s’affiche.
IMpoRTaNT
Une fois arrivé à ce stade, le four est pro-grammé et effectue le cycle de nettoyage pyrolytique. Durant ce cycle, vous ne pour-rez sélectionner aucune fonction de l’horloge du four, à l’exception de la fonction sécurité pour les enfants.
N’essayez pas non plus d’ouvrir la porte du four au risque d’interrompre le processus de nettoyage.
6. Lorsque le cycle de nettoyage pyrolytique s’achève, un signal sonore retentit, le sym-bole se met à clignoter et 0:00 s’affiche sur l’écran de l’horloge.
7. Appuyez sur n’importe quel symbole de l’horloge pour arrêter le signal sonore.
8. Placez le sélecteur de fonctions sur la position .
9. Une fois le processus de préchauffage du four terminé, le four restera très chaud et ne pourra être utilisé.

38 Guide d’utilisation
Jusqu’à ce que le four refroidisse, le re-froidissement continue de fonctionner et le symbole reste éclairé.
IMpoRTaNT
En raison des hautes températures à l’inté-rieur du four, il se peut que le temps de refroi-dissement varie en fonction de la température ambiante.
10. Une fois votre four refroidi, le symbole s’éteint.
11. Ouvrez la porte du four et passez un chif-fon humide à l’intérieur de la cavité, afin de retirer la cendre produite durant le cycle de nettoyage. Dans les coins difficiles d’accès à l’intérieur du four, il faudra utiliser une éponge en fibre non métallique.
12. Une fois l’intérieur du four propre, n’ou-bliez pas de remettre les supports et les ustensiles.
13. Le four est prêt pour une prochaine utilisation.
IMpoRTaNT
Si vous repérez un quelconque problème dans la programmation et l’utilisation de cette fonction, reportez-vous au guide d’uti-lisation et d’entretien fourni avec votre four.
aNNULaTIoN DE La pYRoLYsE
La pyrolyse est une fonction automatique, elle se met donc uniquement en marche par le biais de la programmation de l’horloge. Pour annuler une pyrolyse en cours, il est néces-saire de déprogrammer le four en suivant les instructions suivantes :
1. Placez le sélecteur de fonctions sur la position .
L’écran de l’horloge affiche alors
2. Selon les températures à l’intérieur du four, deux situations sont possibles :
a) Température intérieure dangereuse : Dans ce cas, la porte reste verrouillée jusqu’à ce que la température ne représente plus de risque.
b) Température intérieure sans risque : Si la température à l’intérieur du four ne repré-sente pas de risque, le déverrouillage est réalisé immédiatement.
3. Une fois que la porte s’est déverrouillée et peut être ouverte, l’heure s’affiche de nouveau sur l’écran de l’horloge.
39Bedienungsanleitung
Deutsch
1 2 3
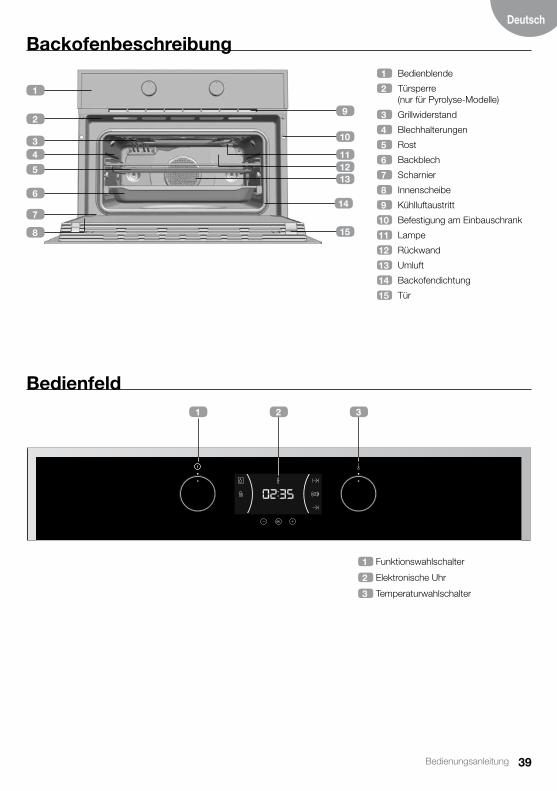
Backofenbeschreibung 1 Bedienblende
2 Türsperre (nur für Pyrolyse-Modelle)
3 Grillwiderstand
4 Blechhalterungen
5 Rost
6 Backblech
7 Scharnier
8 Innenscheibe
9 Kühlluftaustritt
10 Befestigung am Einbauschrank
11 Lampe
12 Rückwand
13 Umluft
14 Backofendichtung
15 Tür
Bedienfeld
1 Funktionswahlschalter
2 Elektronische Uhr
3 Temperaturwahlschalter
1
10
13
14
15
5
6
7
3
2
4
9
11
8
12
40 Bedienungsanleitung
Funktionswahlschaltersymbole
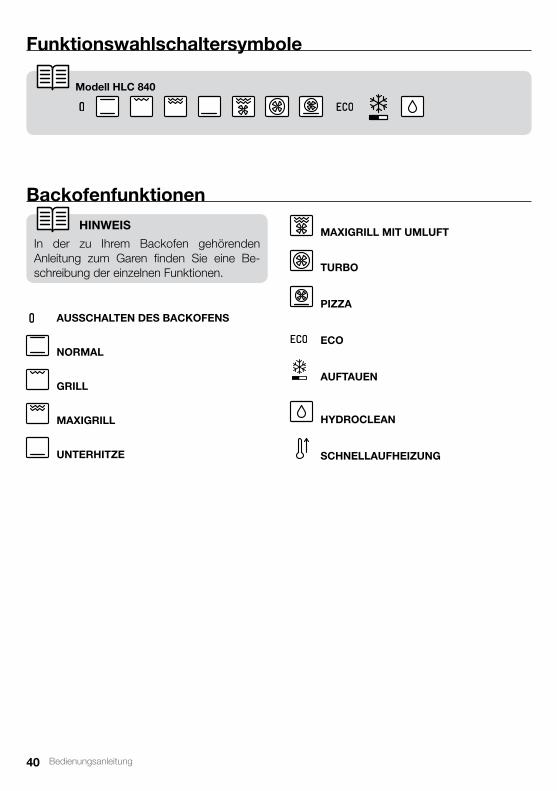
Modell HLC 840
Backofenfunktionen
HINWEIs
In der zu Ihrem Backofen gehörenden Anleitung zum Garen finden Sie eine Be-schreibung der einzelnen Funktionen.
aUssCHaLTEN DEs BaCKoFENs
NoRMaL
GRILL
MaxIGRILL
UNTERHITZE
MaxIGRILL MIT UMLUFT
TURBo
pIZZa
ECo
aUFTaUEN
HYDRoCLEaN
sCHNELLaUFHEIZUNG

41Bedienungsanleitung
Deutsch
Beschreibung der elektronischen Uhr
1 TasTEN
, und : Ermöglichen das Program-mieren der Funktionen des elektronischen Timers.
2 sYMBoLE
Funktionen der schaltuhr
TIMER: Leuchtet, wenn die Timer-Funktion gewählt wird. Nach einer gewissen Zeit erzeugt er ein akustisches Signal. Der Backofen wird nicht ausgeschaltet, wenn die Zeit abgelaufen ist. Diese Funktion kann auch genutzt werden, wenn der Backofen am Garen ist.
und pRoGRaMMIERUNG: Sie leuch-ten, um anzuzeigen, dass der Backofen programmiert ist (Dauer, Ende oder gesamt).
• Garzeit-Dauer: Ermöglicht das Garen während einer gewählten Zeit. Danach schaltet sich der Backofen automatisch aus.
• Garzeit-Ende: Ermöglicht das Garen bis zu einer vorab eingestellten Uhrzeit. Danach schaltet sich der Backofen automatisch aus.
• und Garzeit-Dauer und Garzeit-Ende: Ermöglicht die Einstellung der Dauer und Endzeit des Garvorgangs. Der Backofen schaltet sich automatisch für die vorab eingestellte Garzeit (Dauer) ein und schaltet sich automatisch beim Erreichen der eingestellten Zeit (Garzeit-Ende) ab.
sCHaLTUHRspERRE: Zeigt an, dass die Touch-Tasten der Schaltuhr gesperrt sind, um zu verhindern, dass sie von Kleinkindern manipuliert werden können. Zeigt an, dass die Touch-Tasten der Schaltuhr gesperrt sind, um zu verhindern, dass sie von Kleinkindern manipuliert werden können.
sonstige Funktionen
HEIZEN: Zeigt an, dass der Ofen Wärme auf die Speisen überträgt.
HYDRoCLEaN: Leuchtet während der Teka Hydroclean® Funktion.
pYRoLYsE: Nur für pyrolyse-Modelle. Leuchtet während der Pyrolyse-Reini-gungsfunktion.
TÜRspERRE: Nur für pyrolyse-Modelle. Zeigt an, dass die Tür gesperrt ist. Das kann durch manuelle oder automatische Sperrung während der Pyrolyse-Funktion bedingt sein.
aCHTUNG
Die Empfindlichkeit der Touch-Tasten passt sich ständig den Umgebungsbedingungen an. Wenn Sie den Ofen an das Stromnetz anschließen, müssen Sie darauf achten, dass die Oberfläche des Bedienfeldes sauber und frei von Hindernissen ist.
Sollte die Uhr bei Berührung der Tasten nicht richtig reagieren, ist der Ofen vom Stromnetz zu trennen und nach einem Augenblick wieder anzuschließen. Auf diese Weise stellen sich die Sensoren automatisch richtig ein und reagieren wieder auf Berührung mit dem Finger.
ZEITEINsTELLUNG
• Wenn Sie den Backofen an das Netz an-schließen, blinkt auf der Uhr die Anzeige 12:00.
2 1 2

42 Bedienungsanleitung
• Durch Berühren von oder werden die Stunden und danach die Minuten eingestellt. Anschließend ertönen 2 aufeinanderfolgende Pieptöne zur Bestätigung der gewählten Uhrzeit.
• Wenn Sie die Uhrzeit ändern möchten, müs-sen Sie oder berühren, bis die Uhrzeit blinkt. Berühren Sie und folgen Sie den im obigen Punkt beschriebenen Schritten.
aNMERKUNG
Ihre Uhr besitzt einen nächtlichen Beleuch- tungsmodus, sodass die Lichtintensität
des Displays zwischen 00:00 und 6:00 Uhr sinkt.
aCHTUNG
Im Falle eines Stromausfalls wird die gesamte Programmierung der elektronischen Uhr gelöscht und auf der Uhr blinkt die Anzeige 12:00. Sie müssen die Uhr dann wieder einstellen und erneut programmieren.
Bedienung des Backofens MaNUELLER BETRIEB
• Nach Einstellung der Uhrzeit ist der Backofen funktionsbereit. Wählen Sie eine Garfunktion und eine Temperatur.
HINWEIs
Bei Modellen mit elektronischer Temperaturein-stellung erscheint die Temperatur auf der Uhran-zeige, sobald der Wahlschalter gedreht wird.
Nachdem die Temperatur ausgewählt wurde, erscheint wieder automatisch die Uhrzeit auf der Anzeige.
• Sie sehen, dass das Symbol während des Garens leuchtet, um die Wärmeübertragung auf das Essen anzuzeigen. Dieses Symbol erlischt, wenn die gewählte Temperatur erreicht ist.
• Zum Ausschalten des Backofens müssen Sie die Schalter auf die Position auf die Position stellen.
HINWEIs
Wenn Sie mit dem Garen beginnen, zeigt Ihr Backofen als Defaultwert die Gesamtdauer des laufenden Garvorgangs an.
Durch Drücken können Sie zwischen Garzeitanzeige und der aktuellen Uhrzeit wechseln.
BaCKoFENFUNKTIoN MIT ZEITsCHaLTUNG
programmierung des Timers
1. Berühren Sie oder , bis das Symbol auf dem Display blinkt, und drücken Sie. Auf dem Display erscheint 00:00.
2. Wählen Sie die Zeitdauer, nach deren Ablauf der Timer ertönen soll, indem Sie oder drücken. Danach ertönen zur Bestätigung 2 aufeinander folgende Pieptöne und der Countdown ab dem gewählten Zeitpunkt wird angezeigt. Das Symbol blinkt langsam.
3. Wenn die Zeit zu Ende ist, ertönt 90 Sekun-den lang ein akustisches Signal und das Symbol blinkt schnell.
aNMERKUNG
Bei der Timerfunktion schaltet sich der Backofen nach Ablauf der programmierten Dauer nicht ab.

43Bedienungsanleitung
Deutsch
4. Berühren Sie eine beliebige Taste, um das akustische Signal zu stoppen. Im selben Moment schaltet sich das Symbol aus.
Wenn Sie die Timer-Zeit ändern möchten, müssen Sie die gezeigten Schritte erneut ausführen. Wenn Sie auf den Timer zugreifen, erscheint die aktuell verbleibende Zeit. Diese kann geändert werden.
aNMERKUNG
Bei der Timerfunktion wird die verbleibende Zeit permanent auf dem Display angezeigt. Wenn diese Funktion programmiert ist, kann weder die Uhrzeit noch die Gesamtzeit des programmierten Garvorgangs angezeigt werden.
programmierung der Gardauer
1. Berühren Sie oder , bis das Symbol auf dem Display blinkt, und drücken Sie . Auf dem Display erscheint 00:00.
2. Wählen Sie die Zeitdauer, nach deren Ablauf der Timer ertönen soll, indem Sie oder drücken. Danach ertönen zur Bestätigung 2 aufeinander folgende Pieptöne und es wird der Countdown ab dem gewählten Zeitpunkt angezeigt. Das Symbol blinkt langsam.
3. Wählen Sie mit den Backofenschaltern eine Funktion und eine Gartemperatur.
4. Nach Ablauf der Garzeit schaltet sich der Backofen aus, es ertönt ein akustisches Signal und das Symbol blinkt schnell.
5. Berühren Sie eine beliebige Taste, um das akustische Signal zu stoppen und das Symbol auszuschalten. Der Backofen schaltet sich wieder ein.
6. Stellen Sie die Schalter auf die Aus-schaltstellung des Backofens.
Sie können jederzeit die restliche Gardauer ändern, indem Sie oder berühren, bis das Symbol schnell blinkt. Berühren Sie anschließend , um die Zeit zu ändern.
aNMERKUNG
Bei der Gardauerfunktion wird die verblei-bende Zeit permanent auf dem Display an-gezeigt. Ist die Funktion programmiert, kann die aktuelle Uhrzeit nicht auf dem Display angezeigt werden.
programmierung des Garzeit-Endes
1. Berühren Sie die Touchtaste oder , bis das Symbol auf dem Display blinkt, und drücken Sie . Auf dem Display erscheint 00:00.
2. Wählen Sie die Zeitdauer, nach deren Ablauf der Timer ertönen soll, indem Sie oder
drücken. Danach ertönen zur Bestätigung 2 aufeinander folgende Pieptöne und es wird der Countdown ab dem gewählten Zeitpunkt angezeigt. Das Symbol blinkt langsam.
3. Wählen Sie eine Garfunktion und -temperatur.
4. Nach Ablauf der programmierten Zeit schaltet sich der Backofen aus, es ertönt ein akustisches Signal und das Symbol blinkt schnell.
5. Berühren Sie irgendeine Taste, um das akustische Signal zu stoppen und das Symbol auszuschalten. Der Backofen schaltet sich wieder ein.
6. Stellen Sie die Schalter auf die Ausschaltstellung des Backofens.
Sie können jederzeit die restliche Gardauer ändern, indem Sie oder berühren, bis das Symbol schnell blinkt. Berühren Sie anschließend , um die Zeit zu ändern.
programmierung der Gardauer und des Garzeit-Endes
1. Berühren Sie oder , bis das Symbol auf dem Display blinkt , und drücken Sie
. Auf dem Display erscheint 00:00.
2. Wählen Sie die Gardauer, indem Sie oder berühren. Anschließend ertönen 2 aufeinanderfolgende Pieptöne und die ver
44 Bedienungsanleitung
bleibende Garzeit wird auf dem Display an-gezeigt und das Symbol blinkt langsam.
3. Berühren Sie oder , bis das Symbol auf dem Display blinkt, und drücken Sie . Auf dem Display erscheint 00:00.
4. Wählen Sie die Endzeit des Garens, indem Sie oder berühren. Anschließend ertönen 2 aufeinanderfolgende Pieptöne und die aktuelle Uhrzeit wird auf dem Display angezeigt.
5. Wählen Sie eine Garfunktion und -temperatur. Der Backofen bleibt ausgeschaltet und die Symbole und leuchten weiter. Ihr Backofen ist nun programmiert.
6. Wenn die eingestellte Uhrzeit des Gar- beginns erreicht ist, schaltet sich der Backo-fen ein und führt den Garvorgang während der vorgewählten Zeit durch.
7. Während des Garvorgangs wird die Restgarzeit angezeigt und das Symbol b-linkt langsam.
8. Nach Ablauf der programmierten Zeit schaltet sich der Backofen aus, es ertönt ein akustisches Signal und das Symbol blinkt schnell.
9. Berühren Sie eine beliebige Taste, um das akustische Signal zu stoppen und das Symbol auszuschalten. Der Backofen schaltet sich wieder ein.
10. Stellen Sie die Schalter auf Position , um den Ofen auszuschalten.
Sie können jederzeit die restliche Gardauer ändern, indem Sie oder berühren, bis das Symbol schnell blinkt. Berühren Sie anschließend , um die Zeit zu ändern.
sicherheitsfunktionen sICHERHEITsspERRE FÜR KINDER
Diese Funktion kann während des Backofen-betriebs jederzeit gewählt werden.
Um die Funktion zu aktivieren, berühren Sie gleichzeitig die Tasten und und halten diese gedrückt, bis Sie 1 Piepton hören und auf dem Display das Symbol erscheint. Die Uhr ist blockiert.
Wenn der Backofen ausgeschaltet ist und Sie die Kindersicherung aktivieren, gart der Backofen auch dann nicht, wenn Sie eine Garfunktion wählen.
Wenn Sie diese Funktion aktivieren, während Sie mit dem Ofen backen oder braten, blockieren Sie nur die Handhabung des elektronischen Timers.
Um die Funktion auszuschalten, berühren Sie gleichzeitig die Tasten und und halten diese gedrückt, bis Sie 1 Piepton hören.
MaNUELLE TÜRspERRE
Nur für pyrolyse-Modelle erhältlich.
Mit dieser Funktion kann die Backofentür gesperrt werden.
WICHTIG
Diese Funktion kann nur gewählt werden, wenn der Funktionsschalter des Backofens auf der Ruhestellung steht.
Um die Türsperre ein- / auszuschalten, müssen Sie folgende Schritte durchführen:
1. Berühren Sie oder , bis das Symbol auf dem Display blinkt.
Der aktuelle Status der Türsperre wird angezeigt: “On” für eingeschaltet und “Off” für ausgeschaltet.
2. Berühren Sie , und die Sperre schaltet auf den entgegengesetzten Zustand des aktuellen um: ist die Tür gesperrt, wird sie entsperrt, oder umgekehrt.
3. Sobald die Tür gesperrt / entsperrt ist, erscheint auf dem Display der neue Status der Türsperre.
Wenn die Sperre eingeschaltet ist, leuch-tet das Symbol auf dem Display durchgehend.

45Bedienungsanleitung
Deutsch
Teka Hydroclean® FunktionMit dieser Funktion wird die Reinigung der Fett- und Schmutzreste, die an den Backofenwänden haften, erleichtert.
Verhindern Sie die Ansammlung von Schmutz, damit die Reinigung leichter erfolgen kann. Reinigen Sie den Backofen regelmäßig.
pRoGRaMMIERUNG DER TEKa HYDRoCLEaN® FUNKTIoN
aCHTUNG
Gießen Sie kein Wasser in den heißen Backofen. Dadurch könnte die Emaillierung beschädigt werden.
Führen Sie den Reinigungszyklus immer bei kaltem Ofen aus. Wenn Sie ihn bei zu heißem Backofen durchführen, kann das Ergebnis be-einträchtigt und sin außerdem die Emaillierung beschädigt werden.
Nehmen Sie vorher die Bleche und alle Zubehörteile inkl. die Blechhalterungen oder ausziehbaren Schienen aus dem Backofenin-neren. Befolgen sie dafür die anweisungen, die im Einbau- und Wartungshandbuch, das zum Lieferumfang des Backofens gehört, angegeben sind.
1. Bei kaltem Ofen müssen Sie langsam 250 ml Wasser in den unteren Teil der Backofenröhre gießen und ein paar Tropfen mildes Geschirrspülmittel hinzufügen.
Funktion eingeschaltet wurde. Das Symbol blinkt langsam und auf dem Display wird
die Zeit angezeigt, die bis zum Ende der Funktion verbleibt.
WICHTIG
Die Dauer dieser Funktion kann nicht geändert werden. Um sie vorher zu beenden, müssen Sie den Funktionswahlschalter auf die Position stellen.
4. Nach Ablauf der programmierten Zeit schaltet sich der Backofen aus, es ertönt ein akustisches Signal und das Symbol blinkt schnell.
WICHTIG
Öffnen Sie die Ofentür nicht, bis die Hydroclean® Funktion beendet ist.
Die Abkühlphase ist für den korrekten Ablauf der Funktion notwendig.
5. Berühren Sie mit dem Finger eine beliebige Taste, um das akustische Signal und das Symbol auszuschalten.
6. Drehen Sie den Funktionswahlschalter auf Position .
7. Der Backofen ist jetzt für die Entfernung der Schmutzreste mit einem feuchten Tuch wie auch für die Entnahme des im Inneren verbliebenen Wassers bereit.
Die Hydroclean® Funktion erfolgt bei niedriger Temperatur. Allerdings kann die Abkühlzeit je nach Außentemperatur unterschiedlich sein.
aCHTUNG
Vergewissern Sie sich, dass die Innenflä-chen des Ofens die richtige Temperatur ha-ben, bevor Sie sie berühren.
Sollte nach der Hydroclean® Funktion eine gründlichere Reinigung erforderlich sein, müssen Sie neutrale Reinigungsmittel und nicht scheuernde Schwämme verwenden.
2. Drehen Sie den Funktionswahlschalter auf Position .
3. Im Anschluss ertönt ein akustisches Signal zur Bestätigung, dass die Teka Hydroclean®
46 Bedienungsanleitung
selbstreinigungsfunktion anhand pyrolyse Bei das Modell HLC 840 P erhältliche Funktion.
aCHTUNG
Bevor Sie den Reinigungszyklus anhand Pyrolyse ausführen, müssen Sie die Sicherheitsanleitungen im Einbau- und Wartungshandbuch aufmerksam lesen.
Mit dieser Funktion erfolgt ein Reinigungs- zyklus, anhand Pyrolyse, bei dem das ange-sammelte Fett durch die heißen Temperaturen, die im Backofeninneren entstehen, verbrannt werden.
Generell wird empfohlen, alle 4-5 Garvorgänge eine Pyrolyse durchzuführen und dabei das je nach Verschmutzungsgrad des Backofens geeignetste Programm zu wählen. Bei stärke-rer Verschmutzung müssen Sie ein längeres Programm wählen.
Während der Pyrolyse bleibt das Innenlicht des Backofens ausgeschaltet.
pYRoLYsE-FUNKTIoN pRoGRaMMIEREN
WICHTIG
Vor der Durchführung der Pyrolyse entfernen Sie bitte sämtliches Zubehör und Geschirr aus dem Backofen, einschließlich der Führungsschienen der Backbleche und/oder der Teleskopauszüge. Befolgen Sie dafür die Anweisungen, die im Einbau- und Wartungshandbuch, das zum Lieferumfang des Backofens gehört, angegeben sind.
aCHTUNG
Entfernen Sie Speisereste oder übermäßigen Schmutz, denn diese könnten sich während der Pyrolyse entzünden und Brandgefahr verursachen.
1. Drehen Sie den Garfunktionswahlknopf auf Position Pyrolyse: .
2. Nach ein paar Sekunden leuchtet auf dem Schaltuhrdisplay das Symbol auf und man sieht die Anzeige P2 (Pyrolyse-Programm 2).
3. Jetzt können Sie das Pyrolyse-Programm auf P1, P2 oder P3 ändern, indem Sie die Tasten oder drücken:
p1: Sanfte Pyrolyse. Dauer 1 Stunde. p2: Normale Pyrolyse. Dauer 1 Stunde und
30 min. p3: Intensive Pyrolyse. Dauer 2 Stunden.
4. Nach Anwahl des gewünschten Programms, drücken Sie . Sofort danach wird die automatische Türsperre eingeschaltet.
5. Sobald die Tür gesperrt ist, leuchtet das Symbol auf dem Display der Schaltuhr auf und es wird die bis zum Ende der Pyrolyse verbleibende Zeit angezeigt.
WICHTIG
Zu diesem Zeitpunkt ist der Backofen programmiert und führt den Pyrolyse- reinigungsvorgang durch. Während der Ausführung dieses Vorgangs kann keine Funktion der Backofenuhr außer der Kindersicherung gewählt werden.
Versuchen Sie auch nicht, die Backofentür zu öffnen, weil dadurch der Reinigungsprozess unterbrochen werden könnte.
6. Nach Beendigung der Pyrolyse-Reinigung ertönt ein akustisches Signal und das Symbol blinkt. Auf dem Display der Uhr erscheint 0:00.
7. Drücken Sie eine beliebige Taste der Uhr, um das Signal abzustellen.
8. Drehen Sie den Funktionswahlschalter auf Position .
9. Der Aufheizvorgang des Backofens ist beendet; dennoch ist der Backofen extrem heiß und kann nicht benutzt werden.
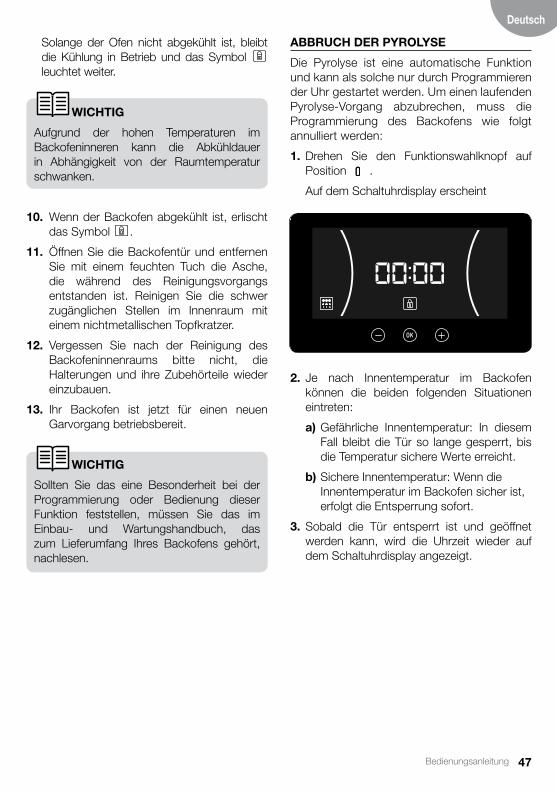
47Bedienungsanleitung
Deutsch
Solange der Ofen nicht abgekühlt ist, bleibt die Kühlung in Betrieb und das Symbol leuchtet weiter.
WICHTIG
Aufgrund der hohen Temperaturen im Backofeninneren kann die Abkühldauer in Abhängigkeit von der Raumtemperatur schwanken.
10. Wenn der Backofen abgekühlt ist, erlischt das Symbol .
11. Öffnen Sie die Backofentür und entfernen Sie mit einem feuchten Tuch die Asche, die während des Reinigungsvorgangs entstanden ist. Reinigen Sie die schwer zugänglichen Stellen im Innenraum mit einem nichtmetallischen Topfkratzer.
12. Vergessen Sie nach der Reinigung des Backofeninnenraums bitte nicht, die Halterungen und ihre Zubehörteile wieder einzubauen.
13. Ihr Backofen ist jetzt für einen neuen Garvorgang betriebsbereit.
WICHTIG
Sollten Sie das eine Besonderheit bei der Programmierung oder Bedienung dieser Funktion feststellen, müssen Sie das im Einbau- und Wartungshandbuch, das zum Lieferumfang Ihres Backofens gehört, nachlesen.
aBBRUCH DER pYRoLYsE
Die Pyrolyse ist eine automatische Funktion und kann als solche nur durch Programmieren der Uhr gestartet werden. Um einen laufenden Pyrolyse-Vorgang abzubrechen, muss die Programmierung des Backofens wie folgt annulliert werden:
1. Drehen Sie den Funktionswahlknopf auf Position .
Auf dem Schaltuhrdisplay erscheint
2. Je nach Innentemperatur im Backofen können die beiden folgenden Situationen eintreten:
a) Gefährliche Innentemperatur: In diesem Fall bleibt die Tür so lange gesperrt, bis die Temperatur sichere Werte erreicht.
b) Sichere Innentemperatur: Wenn die Innentemperatur im Backofen sicher ist, erfolgt die Entsperrung sofort.
3. Sobald die Tür entsperrt ist und geöffnet werden kann, wird die Uhrzeit wieder auf dem Schaltuhrdisplay angezeigt.
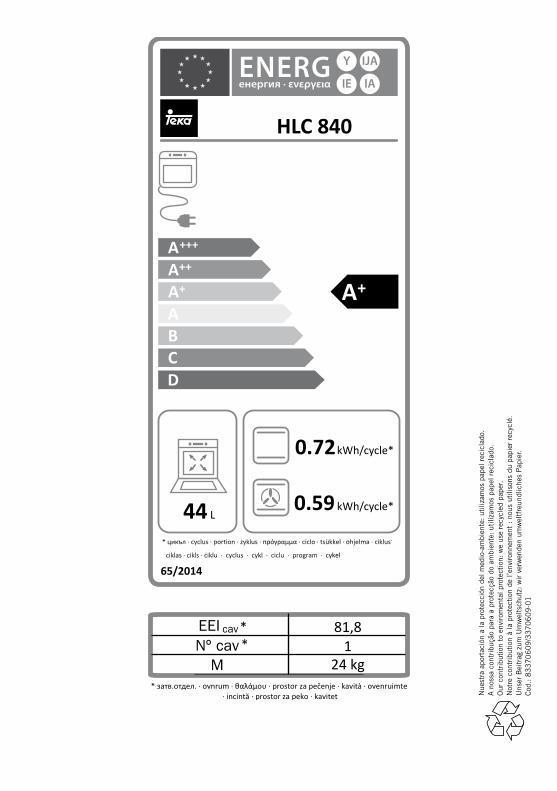
Nue
stra
apo
rtac
ión
a la
pro
tecc
ión
del m
edio
-am
bien
te:
utili
zam
os p
apel
rec
icla
do.
A n
ossa
con
trib
ução
par
a a
prot
ecçã
o do
am
bien
te:
utili
zam
os p
apel
rec
icla
do.
Our
con
trib
utio
n to
env
irom
enta
l pro
tect
ion:
we
use
recy
cled
pap
er.
Not
re c
ontr
ibut
ion
à la
pro
tect
ion
de l’
envi
ronn
emen
t :
nous
uti
lison
s du
pap
ier
recy
clé.
Uns
er B
eitr
ag z
um U
mw
elts
chut
z: w
ir v
erw
ende
n um
wel
tfre
undl
iche
s P
apie
r.C
od.: 8
33
70
60
9/3
37
06
09
-01
kWh/cycle*
kWh/cycle*L
**
0.59
0.72
44
81,81
24 kg
HLC 840