tabla de contenidos - produktinfo.conrad.com · quemador de alcohol o queroseno, su mejor...
TRANSCRIPT

2
TABLA DE CONTENIDOS
BÁSICAMENTE ............................................................................................................................ 3
POWERSPOT MINI THERMIX .................................................................................................. 4
DIRIGIDO A: ................................................................................................................................. 5
INSTRUCCIONES DE USO ........................................................................................................ 6
USO Y APLICACIONES ............................................................................................................... 8
PRECAUCIONES ....................................................................................................................... 10
MANTENIMIENTO .................................................................................................................... 11
SUGERENCIAS ........................................................................................................................... 11
ESPECIFICACIONES TÉCNICAS ............................................................................................. 13
CERTIFICADO DE GARANTÍA COMERCIAL ......................................................................... 15
3
ESPAÑOL
BÁSICAMENTE
Los aparatos PowerSpot son generado-res eléctricos portátiles de baja poten-cia alimentados por combustión externa, refrigerados por agua o aire, y práctica-mente libres de mantenimiento y averías.
La gama PowerSpot está basada en la ge-neración de electricidad conseguida por diferencia de temperatura, de tal manera que si se calienta su base con cualquier tipo de llama y se refrigera la parte supe-rior con agua o aire, se genera una co-rriente eléctrica aprovechable, variando la potencia de cada aparato según sus com-ponentes, el tipo de llama y su intensidad.
Todos ellos pueden cargar teléfonos, pi-las y tablets. Todos ellos iluminan inten-samente en muy diversos puntos, y todos ellos están libres de mantenimiento. To-dos funcionan con cualquier combusti-ble y todos son muy robustos y portátiles.
Los periféricos de PowerSpot han sido escogidos o diseñados para soportar las condiciones más duras. Por ejemplo: las bombillas PowerSpot pueden sumergirse en agua un buen rato y seguir luciendo, pueden golpearse y seguir funcionando, y se activan desde 3 hasta 30 voltios.
Los aparatos PowerSpot generan energía siempre, en cualquier momento y lugar. Sin averías ni mantenimiento.
4
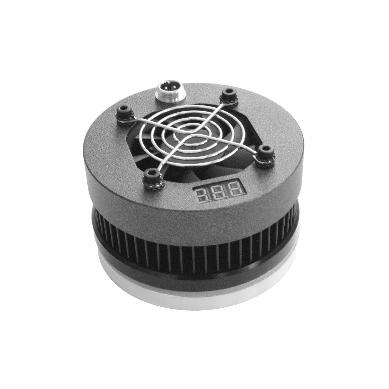
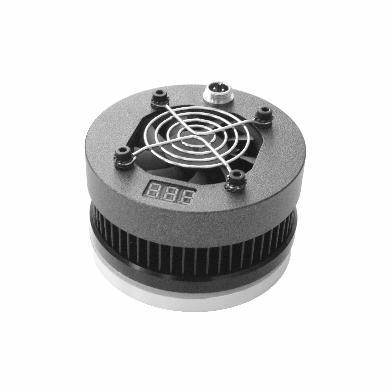
POWERSPOT MINI THERMIXEspecialmente diseñado para iluminar, cargar y calentar sin necesidad de su-pervisión.
El Mini Thermix es un aparato robusto que no necesita supervisión ni mantenimiento y que puede generar una corriente eléctrica de 10-13W, suficiente para cargar cualquier teléfono o tablet; que puede nutrir pilas recargables; que alimenta hasta diez bombillas LED conectadas en paralelo (especialmente las proporcionadas por Powerspot) y que tiene una capacidad calórica de tantos vatios como tenga la llama que le alimenta. Esto es: expulsa una corriente de aire de 45 m3/h lejos y hacia abajo. Puede así elevar la temperatura de una sala de unos 10 m3 unos 10ºC sobre la temperatura ambiente.
Este aparato, para funcionar, sólo requiere de un suministro constante de fuego (ya sea producido por gas, queroseno, alcohol, etc.) y, una vez establecida la llama, no requiere supervisión, pues posee un mecanismo interior de protección de sobrecalentamiento.
El consumo medio es de unos 50 gr de gas, queroseno o alcohol a la hora. Así, una botella de un litro de queroseno alimentará el Mini Thermix durante unas 20 horas a pleno rendimiento, o 30 horas de uso normal.
5
DIRIGIDO A:
Cargar, calentar e iluminar pequeños espacios sin supervisión, Camping y Montaña.
Este aparato ha sido diseñado para pequeñas instalaciones aisladas, sin acceso a la red eléctrica o que sufren o pueden sufrir cortes de electricidad, y que necesitan un uso de varias horas o constante sin necesidad de supervisión. Una tienda de campaña o una típica cabaña de no más de cinco habitaciones -aislada en la montaña, o en la nieve, o en una jungla- es el punto ideal para que el Mini Thermix demuestre su capacidad. Calentará la estancia donde se sitúe, iluminará todas las habitaciones y cargará los aparatos electrónicos de los habitantes apenas sin ruido y con muy escaso o ningún coste. Y no requiere que se le preste ninguna atención: puede funcionar ininterrumpidamente y sin ningún mantenimiento.
A nivel doméstico es muy útil para ilumi-nar zonas de recreo alejadas de la vivien-da principal o como generador eléctrico de emergencia si la vivienda sufre cortes de luz. También puede llevarse a habita-ciones independientes y, en ellas, pres-
Es ideal para ser utilizado como fuente de iluminación individual. Un Mini Thermix alimentando una bombilla LED Powerspot de 5w-5V consumirá apenas 10 grs de gas o alcohol a la hora. Situado en un rincón de una sala de hospital, puede iluminar suavemente veinte camas utilizando estas bombillas cableadas en paralelo.
Asimismo es muy útil para montañismo y camping, tanto para proveer de electricidad en puntos alejados de la base como para sustituir el uso de aparatos voluminosos y pesados para iluminación y calentar una tienda de campaña. Además, su ausencia de mantenimiento permite llevarlo a lugares recónditos sin que nunca necesite ningún tipo de asistencia post adquisición. Y puesto que no requiere ser rellenado de agua como el Lanyard o el Explorer, puede dejarse permanente-mente en uso sin incurrir en el riesgo de avería por olvido.
tar su función sin que haya necesidad de utilizar un grupo electrógeno para cargar un teléfono o iluminar un solo dormi-torio o cuarto de baño.
6
INSTRUCCIONES DE USOEste Kit PowerSpot Mini Thermix incluye:
•Un generador Mini Thermix•Un cable conector•Un cable conector-alargador con toma
para bombillas E-27•Una bombilla PowerSpot COB de 5W•Una bombilla PowerSpot 5W
1. Colocar el Mini Thermix sobre una llama mediana. La llama ideal debe ser alrededor de la mitad de diámetro o menos que la base del Mini Thermix. En unos segundos el ventilador comenzará a moverse y el voltímetro mostrará un punto parpadeante. Si la llama es demasiado grande o demasiado pequeña, el Mini Thermix puede tener problemas para arrancar antes de calentarse en exceso.
Aunque basta un pequeño fuego como el proporcionado por un pequeño quemador de alcohol o queroseno, su mejor rendimiento se obtiene con llamas provenientes de quemadores de gas. En todo caso, se ha de procurar que esta llama no sobrepase nunca los bordes del recipiente. En primer lugar porque se somete al aparato a una fatiga de material innecesaria, y en segundo lugar porque cualquier llama que exceda el diámetro del Mini Thermix no ejercerá ningún efecto de calefacción de su base, pudiendo sobrecalentar el chasis y, por tanto, quemar los componentes internos.
En su interior el Mini Thermix alberga un termostato que cortará el flujo de energía a la salida de 12V cuando se sobrepase una temperatura determinada, enviando toda su potencia al ventilador. Esto impide que un exceso de fuego o de carga sobrecaliente el aparato llegando a quemarlo.
•Un convertidor 12V a USB 5V-2A•Una funda de neopreno•Una etiqueta térmica
7
2. Esperar hasta alcanzar los 12 voltios y regular la llama para que se mantengan estables. El voltímetro indica la intensidad generada. Puesto que un componente electrónico interior envía, primero, toda la energía al ventilador y después a la salida de carga, el aparato mostrará entre 3 y 4 voltios durante unos treinta segundos. Después, una vez alcanzada la máxima potencia para el ventilador, desviará la electricidad a la salida, momento en que el voltímetro comenzará a incrementar el número mostrado. El óptimo es de 12 a 13 voltios y la temperatura indicada en la etiqueta térmica (provista en el kit, que el usuario puede pegar donde desee, aunque lo ideal es un lateral de la carcasa) no debe sobrepasar los 75ºC. Si la temperatura indicada es superior a ésta, se está aplicando un exceso de fuego. El color de las distintas barras de la etiqueta térmica varía según la temperatura alcan-zada. Si la barra está negra, la tempe-ratura es menor o mayor que la cifra
3. Conectar el aparato deseado. Una vez alcanzado un voltaje estable, se puede proceder a conectar el periférico deseado. Es muy importante recordar que al conectar bombillas, móviles, etc, el voltímetro mostrará un número menor, pero esto no debe preocuparle: Mini Thermix es un generador eléctrico con regulación de ventilación automática. Las bombillas Powerspot Aire lucirán al 100% mientras el voltímetro marque por encima de los 10 voltios, aunque proporcionarán luz desde los 8,5 volts. Se debe buscar la llama idónea para cada instalación, y se debe procurar siempre que la llama no sobrepase el perímetro de la base.
que en ella se indica. Si está verde o azul, estará indicando la temperatura a la que está sometido el Mini Thermix en ese momento. Pero un aumento de llama no conlleva necesariamente un aumento de potencia: si las llamas son excesivas o sobrepasan los bordes del aparato éste se calentará pero no generará más vatios.
8
USO Y APLICACIONESA. Móviles, tablets y pilas recargables: La carga de móviles, pilas y otros dispositivos recargables mediante USB se ha de realizar utilizando el convertidor 12V-USB suministrado con el Mini Thermix.
En caso de conectar demasiados aparatos simultáneamente, el Mini Thermix puede llegar a calentarse por encima de los 90ºC. Si esto llegara a ocurrir, su mecanismo de autoprotección derivará todo el suministro de corriente hacia el ventilador hasta rebajar la temperatura por debajo de 75ºC, momento en que volverá a su funcionamiento normal. Esto impide averías en el generador o en alguno de sus componentes, aunque a costa de alargar el tiempo de carga.
Evite utilizar el Mini Thermix sobre fuego excesivamente intenso, y procure mantener el voltímetro del Mini Thermix en una cifra cercana a los 10 voltios antes de conectar ningún periférico.
El ritmo de carga de teléfonos móviles oscila entre un 0,5% y un 0,7% por minuto, ligeramente superior al que se
obtiene en un enchufe doméstico, aun-que dependerá del estado de la batería. Lo mismo se aplica a minitablets y pilas recargables. No aconsejamos su uso para carga de tablets grandes debido los elevados tiempos de carga.
B. Iluminación: Enchufe la pequeña bombilla suminis- trada en el kit directamente en el conector situado sobre el chasis del aparato para obtener inmediatamente una luz de gran intensidad, pudiendo disminuir su luminosidad a voluntad bajando la llama.
Las bombillas LED AIRE diseñadas por Powerspot -como la suministrada en este kit- comienzan a iluminarse a los 7 u 8 voltios. Si se utiliza sólo una (o dos) de ellas, iluminarán con la misma intensidad que una bombilla incandescente de 80w cada una. Una vez conectadas, el voltaje general irá descendiendo según se añaden bombillas. Las proporcionadas por Powerspot en este kit lucirán desde que el voltímetro marque 5v hasta los 30v, aunque su funcionamiento óptimo se sitúa entre los 8,5 y los 10v.
9
En este caso, no sólo el aire caliente de refrigeración que surge del disipador será expulsado, sino que la columna de aire caliente de la propia llama del quemador será impulsada por la corriente de aire. De esta manera, colocado sobre un quemador normal, se obtendrán alrededor de 500-1.000 vatios de energía calórica. Situado sobre la superficie de una estufa, se debe vigilar que comience a girar. En este caso las revoluciones serán menores, pero aun así enviará aire caliente a la estancia. Este aparato es ideal para su uso en pequeños espacios tales como una tienda de campaña o un refugio, pero si la utilidad fundamental que se desea es la de calefacción, sugerimos el uso del Mini Thermix, mucho más potente tanto eléctrica como caloríficamente.
Se pueden conectar hasta 20 de ellas en paralelo, a cualquier distancia (no más de cien metros en total), aunque cuanto mayor sea su número, menos la intensidad con que luce cada una de ellas. De esta manera, es posible iluminar simultáneamente distintas estancias de una misma vivienda o distintos puntos de un campamento o asentamiento, siempre con un consumo mínimo.
No es posible cargar e iluminar al mismo tiempo.
D. Calefacción: El Mini Thermix siempre emite una corriente de aire cuando se coloca sobre una superficie caliente y el ventilador se acciona, pero si se conectan bombillas u otros elementos, el flujo y la presión de éste serán bajos y no alcanzará para calentar una pequeña sala más allá de 5ºC sobre la temperatura ambiente. Sin embargo, si se desea calentar una estancia, se debe colocar sobre un fuego controlado (nunca una hoguera) y vigilar que el voltaje sea mayor de 12 v y menor de 15 v.
10
PRECAUCIONESA. Nunca desatornillar ni aflojar los tor-nillos de la tapa ni los interiores. Los tornillos han sido ajustados dinamomé-tricamente para conseguir un rendi-miento máximo. La manipulación de los tornillos de la tapa o del interior del Mini Thermix provocará un desajuste que afectará con toda seguridad al rendimiento del aparato. Además, es muy probable que cause un deterioro irreversible de las placas termoeléc-tricas alojadas en su interior.
B. Nunca sumergir. Las juntas de mica y de cerámica que separan la placa caliente del resto del conjunto no son estancas, por lo que pueden permitir el paso del agua, que estropeará los componentes que integran el aparato.
C. No enfriar súbitamente
D. Evitar que se introduzcan objetos extraños en el ventilador.
E. Al comenzar su uso, utilice una llama mediana hasta que el ventilador comience a girar.
F. No colocar sobre hogueras, brasas o llamas que sobrepasen el borde. La aspiración generada por el ventilador puede succionar las llamas, el humo y las brasas, provocando el deterioro del ventilador y generando un importante riesgo de incendio por la proyección de pequeñas pavesas a gran distancia.
G. Precaución. La superficie del aparato puede estar muy caliente.
H. No permita que el aparato sea usado o supervisado por niños.
I. No deposite el aparato sobre super-ficies sensibles al calor. Al retirarlo de la fuente de calor el Mini Thermix seguirá generando electricidad durante unos minutos, al tiempo que el ventilador seguirá girando. La superficie inferior mantendrá muy alta temperatura durante algunos minutos.
J. Nunca toque personas, objetos o ani-males con el Mini Thermix cuando éste haya sido sometido a una fuente de calor. La temperatura de la placa inferior puede alcanzar los 400oC, pudiendo provocar serias quemaduras e intensí-simo dolor.

11
MANTENIMIENTO
Si se va a dejar a la intemperie, colocarlo hacia abajo, de manera que no caigan ob-jetos extraños entre las aspas del ventilador.
Antes de ponerlo sobre el fuego, siem-pre revisar que nada impida el giro de las aspas del ventilador. Para limpiarlo, pasar un paño suave por su superficie
SUGERENCIASMini Thermix puede funcionar perfecta-mente colocado sobre superficies calientes como una plancha caliente, una estufa o una placa vitrocerámica. De hecho, se requiere menos calor que con una llama directa ya que éste llegará muy disipado calentando muy regular-mente toda la base del aparato.
Colocado sobre una estufa, y siempre que se inicie el giro del ventilador, pro-vocará que la columna de aire caliente sea enviada a toda la habitación en lugar de directamente al techo, aumentando la eficiencia de la estufa y contribuyendo sensiblemente al ahorro de combustible.
Sobre una placa vitrocerámica funciona maravillosamente bien. Aunque puede parecer un sinsentido utilizar una placa eléctrica para activar un generador eléc-trico, Mini Thermix puede calentar una cocina utilizando esta fuente de calor si es que en la sala no se encuentra otro elemento de calefacción.
Si se utiliza en una barbacoa es imprescindible colocarlo sobre una plancha metálica. Proporcionará varios metros cuadrados de iluminación al aire libre merced a un sencilla instalación eléctrica, aunque hay que procurar que no se salpique de aceites y grasas que, al entrar en contacto con el disipador, harán que el olor a aceite quemado persiga al aparato durante largo tiempo al hacerlo funcionar.
12
Mini Thermix puede alcanzar los 20V sobre la llama adecuada, aunque el voltímetro incluido sólo alcanza a indicar 17,3V. Con esta tensión el ventilador expulsará una fuerte corriente de aire, pero las bombillas que conectemos parpadearán, y la vida del aparato se verá seriamente acortada. Si se va a utilizar como calentador, sugerimos que no se le deje sobrepasar los 15V si se espera que se cumplan las 50.000 horas garantizadas por el fabricante.
Idealmente, Mini Thermix provee dos puntos de luz a 9W ( 1.600 lúmenes). Sin embargo, puede iluminar con una discreta potencia al menos diez puntos, lo que suele ser suficiente para una vivienda aislada. Se debe tener en cuenta que cada vez que se añada una bombilla el voltaje se reducirá ligeramente, luciendo menos cada una de ellas. Se obtienen así más puntos de luz pero con menos intensidad.
Todos los generadores termoeléctri-cos de PowerSpot pueden conectarse en serie o en paralelo, aumentando así la potencia total disponible para un mis-mo circuito. Si se desea realizar una ins-talación de este tipo, PowerSpot ofrece el cable periférico adecuado.
Asimismo, todos los generadores PowerSpot pueden enviar su corriente a una instalación eléctrica preexistente en una casa, pudiendo sustituir así un ge-nerador de explosión por nuestros apa-ratos. Para ello, basta enviar la electrici-dad generada a cualquier enchufe de la instalación eléctrica para que ésta se in-yecte en ella. Sustituyendo las bombillas ya instaladas por bombillas LED de 12V, o por las fabricadas por PowerSpot, y des-enchufando aquellos aparatos que re-quieran más de 15W (televisiones, neve-ras, etc.), se podrá hacer llegar la energía a cualquier punto de toma de corriente ya existente en una vivienda.
13
ESPECIFICACIONES TÉCNICASMINI THERMIX
∞ Peso: 690 gr
∞ Dimensiones: Alto: 70 mm. Ø: 100 mm
∞ Potencia de salida max: 13 W
∞ Voltaje max: 20 V
∞ Amperaje max: 1,9 A
∞ Autonomía: 50.000 h. de uso continuo
∞ Temperatura de funcionamiento: 150 oC - 400 oC
∞ Componentes• Base: Aluminio 6061
• Placa de aislamiento: Mica 100%
• Disipador y cubierta Aluminio AB 47100
(Si 10.5% - a 13.5 %; Fe 0.7%; Cu 0.9%; Mn 0.05%;
a 0.55%; Mg 0.35; Al Csp 100%)
• Mango Poliamida Ignífuga 6-V0
• Voltímetro Min 3,4 max 17,3
• Ventilador 3,4 V a 20 V
Garantizado 50.000 h @ 12 V
1.500 rpm @ 12 V Consumo 3 W
Flujo de aire: 45 m3/h
Temperatura del aire: la indicada en la etiqueta
térmica de la cubierta protectora. ( max 95 ºC)
14
• Placas Termoeléctricas: 3
- Tamaño : 35 x 35 x 4 mm
- Voltaje en circuito abierto: 8.3 V
- Resistencia de carga: 2.1 ohms
- Tensión de salida de carga emparejada: 4.15 V
- Corriente de salida de carga emparejada: 1.9 amperios
- Potencia de salida de carga adaptada: 7.9 W
- Flujo de calor a través del módulo: 152 W
- Flujo de calor: 12.4 W/cm2
- Composición: Teluro de bismuto, cerámica y grafito. RoHs
- Rejilla protectora: Alambre de acero niquelado
- Tornillos: Acero pavonado
• Bombillas: 54 LEDs SMD
Potencia: 9 W
800 lúmenes
50.000 horas
100% instant
Temperatura del color: 5.000 K
De 8,5 a 30 V
RoHs; Fc; CE; no desechable
15
CERTIFICADO DE GARANTÍA COMERCIALREQUISITOS PARA LA VALIDEZ DE LA GARANTÍA:
1. La presente garantía sólo ampara pro-ductos oficiales PowerSpot y para bene-ficiarse de la misma se deberá
A. En el período preventa, (tienda física u online), se deberá reflejar el modelo del aparato y su fecha de adquisición.
B. En el período de Garantía Comer-cial será requisito imprescindible ad-juntar, junto a la presente debida-mente cumplimentada y sellada por el establecimiento, el original de la fac-tura de compra que identifique el mo-delo del aparato.
2. Los beneficios de la garantía sólo se-rán válidos si se utilizan los servicios téc-nicos que PowerSpot, S.L. tiene estable-cidos en su Red de Asistencia Técnica.
3. El aparato tiene que ser utilizado de conformidad a las instrucciones que se detallan en el manual pertinente.
COBERTURA DE LA GARANTÍA
El período de garantía para portes, piezas, modelo completo y mano de obra es de 2 años. La aplicación de la garantía co-mienza a partir de la fecha de adquisición.
16
EXCLUSIONES DE LA GARANTÍA
•Incumplimiento de cualquiera de los re-quisitos expresados en el punto anterior.
•Todo componente o accesorio interioro exterior del aparato que no esté espe-cificado e incluido en este certificado de garantía
•La puesta en marcha y demostracióndel producto.
•Si la avería es producida por incendio,inundación, agentes meteorológicos, golpeo, aplastamiento o aplicación de voltaje o energía inadecuada.
•Los daños por el mal trato, incluso los delos transportes, que deberán reclamarse en presencia del personal de la Compañía de Transportes, por lo que conviene inspec-cionar los paquetes antes de confirmar los albaranes de entrega correspondientes.
•Las averías causadas por rotura física,tales como carcasas, plásticos, esmal-tes, cristales, embellecedores y similares.
•Los producidos por mal uso al no aten-der las instrucciones de mantenimiento y manejo que se adjuntan con el aparato. El comprador acepta desde el momento de la compra la lectura de las instrucciones y su comprensión, y admite que, de tener al-guna duda, consultará con PowerSpot, S.L. antes de la puesta en marcha del aparato.
•Por la utilización de accesorios no ade-cuados para el aparato.
•Si el aparato es reparado o manipu-lado por personal no autorizado por PowerSpot, S.L.
17
NOTA IMPORTANTE
•La presente Garantía Comercial noafecta a los derechos de que dispone el usuario conforme a las previsiones con-tenidas en la ley 23/2003 de 10 de julio, de Garantía de Bienes de Consumo (BOE, de 11 de julio 2013)
•Durante el tiempo que dure la repara-ción no se abonarán daños y perjuicios por el tiempo que el aparato esté fuera de servicio
•PowerSpot, S.L. no se hace responsa-ble de los daños que un aparato pueda causar a elementos externos.
•La mera inspección del estado del apara-to puede conllevar la destrucción de ele-mentos esenciales para su funcionamien-
to. Si durante esta inspección se detecta que la avería ha sido causada por cual-quiera de los puntos expresados en el apartado anterior de “exclusiones de la ga-rantía”, los gastos para devolver el aparato a un estado operativo deberán ser abona-dos por el cliente, o éste asumirá la devo-lución del bien en estado no funcional.
•Los productos PowerSpot no han sidodiseñados para ningún “uso crítico”. Uso crítico significando sistemas de apoyo de vida, usos médicos, conexiones a dispo-sitivos implantados, transporte comer-cial, instalaciones o sistemas nucleares o cualquier otro uso donde el fracaso del producto pudiese conducir a daño o pér-dida de vida o a daño a la propiedad.
20
TABLE OF CONTENTS
BASICALLY ................................................................................................................................. 21
POWERSPOT MINI THERMIX ................................................................................................ 22
ADDRESSED TO: ....................................................................................................................... 23
INSTRUCTIONS OF USE ......................................................................................................... 24
APPLICATIONS ......................................................................................................................... 26
PRECAUTIONS ........................................................................................................................ 28
MAINTENANCE ........................................................................................................................ 29
SUGGESTIONS ......................................................................................................................... 29
TECHNICAL SPECIFICATIONS ............................................................................................... 31
COMMERCIAL CERTIFICATE OF GUARANTEE ................................................................................ 33
21
ENGLISH
BASICALLY
PowerSpot devices are portable low power electric generators fed by external combustion, cooled by water or air, and practically maintenance and failure free.
The PowerSpot range is based in the generation of electricity through a shift in temperature, in such a way that if the base is heated with any kind of flame and the superior part is cooled with water or air, it generates profitable energy, which power varies according to the compo-nents of each device, the kind of flameand its intensity.
All devices can charge phones, recharge-able batteries and tablets. They can also produce intense light in diverse points and they are all maintenance free. All PowerSpot devices work with any kind of combustible and are robust and portable.
The PowerSpot peripheral devices have been selected and designed to with-stand the toughest conditions. For ex-ample: the PowerSpot light bulb can be immersed in water for a certain period of time and keep emitting light, they can be smashed and they keep working, and they can be activated from 3 to 30 watts.
PowerSpot devices generate energy at all times, at any time and place. Without failure or maintenance.
22
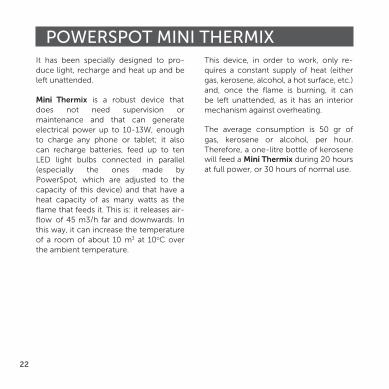
POWERSPOT MINI THERMIXIt has been specially designed to pro-duce light, recharge and heat up and be left unattended.
Mini Thermix is a robust device that does not need supervision or maintenance and that can generate electrical power up to 10-13W, enough to charge any phone or tablet; it also can recharge batteries, feed up to ten LED light bulbs connected in parallel (especially the ones made by PowerSpot, which are adjusted to the capacity of this device) and that have a heat capacity of as many watts as the flame that feeds it. This is: it releases air-flow of 45 m3/h far and downwards. In this way, it can increase the temperature of a room of about 10 m3 at 10oC over the ambient temperature.
This device, in order to work, only re-quires a constant supply of heat (either gas, kerosene, alcohol, a hot surface, etc.) and, once the flame is burning, it can be left unattended, as it has an interior mechanism against overheating.
The average consumption is 50 gr of gas, kerosene or alcohol, per hour. Therefore, a one-litre bottle of kerosene will feed a Mini Thermix during 20 hours at full power, or 30 hours of normal use.

23
ADDRESSED TO:
Charging, heating and lighting small spaces without supervision. Camping and Mountain.
This device has been designed for small isolated premises with no access to the power grid or that may suffer power cuts, where a reliable power supply is needed for several hours or permanently without the need for supervision. A tent or a typical cabin with no more than five rooms—isolated in the mountain, in the snow, or in a jungle—this is the ideal medium for the Mini Thermix to show its capability. It will keep the place warm, illuminate all rooms and charge the personal electronic devices of lodgers quietly and with very little or no cost. And it does not require any attention: it can run continuously and without any maintenance.
At a domestic level it is very useful to light up leisure areas away from the main dwelling or as an emergency electric generator if the house often experien-ces power cuts. It can also be taken to independent rooms and, in them, be used to charge a phone or light up a
It is ideal for use as an individual source of lighting. A Mini Thermix supplying a 5W-5V Powerspot LED bulb hardly consumes 10 grams (0.4 oz.) of gas or alcohol per hour. Located in the corner of a hospital room, it can softly illuminate twenty beds using these bulbs wired in parallel.
It is also very useful for hiking and camping both to provide power in remote areas far away from base and to replace bulky and heavy lighting and heating appliances. Furthermore, the lack of a need for maintenance allows for its use in remote areas without the need for any type of assistance after its acquisition. And since it does not require to be refilled with water, as the Lanyard or the Explorer, it can be left perma-nently in use without incurring the risk of damage due to forgetfulness.
room or a bathroom without the need of a diesel power generator.
24
INSTRUCTIONS OF USEThis Kit PowerSpot Mini Thermix includes:
•A Mini Thermix generator•A double connector•A extension-connector cable with inlet
for E-27 light bulbs•A 5W PowerSpot COB bulb
1. Place the Mini Thermix over a medium flame. The ideal flame should be about half or less in diameter than the base of the Mini Thermix. Within seconds the fan will start moving and the voltmeter will display a blinking light. If the flame is too large or too small, the Mini Thermix may have trouble starting before overheating.
Although a small flame is sufficient, as one provided by a small alcohol or kerosene burner, its best performance is obtained with the flame from a gas burner. In any case, one must make sure that the flame never exceeds the edges of the container. In the first place because this would subject the device to unnecessary materials fatigue and secondly, because any part of the flame that exceeds the diameter of the Mini Thermix will not heat the base and may instead overheat the frame causing heat damage to internal components.
•A 5W PowerSpot bulb•A USB 12V / 5V-2A converter•A neoprene rubber bag•A termical label
The Mini Thermix has in its interior a ther-mostat that will cut the 12V energy flow when the selected temperature is sur-passed, sending all its power to the fan. This prevents the overheating and burn-ing of the device due to excess of flame or charge.
25
2. Wait until 12 volts are reached and then adjust the flame for it to remain stable there.
The voltmeter indicates the generated current. Since an inner electronic component first sends power to the fan and then to the load output, it will first display 3 or 4 volts for about thirty seconds. Afterwards, once the maximum power to the fan is reached, it will divert power to the outlet and the voltmeter will begin to increase. The optimum is 12 to 13 volts and the temperature indicated in the adhesive thermometer should not exceed 75° C (about 170° F). If the thermometer indicates above this temperature the fire is excessive. The adhesive thermometer is provided in the kit; the user can stick it where they wish, although the ideal is on the side of the casing. The colour of the thermometer varies with temperature. If the bar is black, the temperature is lower or higher than the figure indicated in it. If it is green or blue it indicates the tempe-rature at which the Mini Thermix is at.
Note that an increase in the flame does not necessarily mean an increase in power: if the flames are excessive or beyond the edges of the device it will heat up but not generate more watts.
3. Connect the desired device.Once a stable voltage is reached connect the desired electric device. It is very important to remember that when connecting bulbs, phones, etc., the voltmeter will decrease somewhat; this is no cause for worry: Mini Thermix is a power generator with automatic ventilation. The Powerspot 'Air' bulbs will illuminate at 100% while the voltmeter dial is above 10 volts, although they start providing light above 8.5 volts. An ideal flame should be sought for each individual installation, always ensuring that the flame does not exceed the perimeter of the base.
26
APPLICATIONSA. Mobile phones, tablets and rechar-geable batteries: The charging of phones, rechargeable batteries and other devices with the USB (Universal Serial Bus) connector should be carried out using the 12V-USB converter supplied with the Mini Thermix.
If too many pieces of equipment are connected simultaneously the Mini Thermix may heat up above 90° C (approx. 195° F). If this occurs the self-protection mechanism will divert all power to feed the fan so as to lower the temperature below 75° C (about 170° F) at which point it will return to normal operation. This prevents damage to the generator and any of its components (at the cost of extending the recharging time).
Avoid using the Mini Thermix over an excessively intense fire and try to keep the Mini Thermix voltmeter close to 10 volts before connecting any external device.
The loading rate of mobile phones ranges between 0.5% and 0.7% per mi-
nute, slightly higher than that obtained in a house plug, depending on the state of the phone battery. The same applies to mini tablets and rechargeable batteries. Its use is not recommended for loading large tablets because of the high loading times.
B. Lighting: Plug in the small bulb supplied in the kit directly into the connector located on the frame of the device to instantly obtain a useful high-intensity light. One may decrease its brightness at will by simply lowering the flame.
The LED 'AIR' bulbs designed by Powerspot – as the one provided in this kit – begin to light up at 7 or 8 volts. If only one (or two) of them are used, each one will illuminate with the same intensity as an 80W incandescent bulb. Once connected, the overall voltage will decrease as more bulbs are added. The bulbs supplied by Powerspot in this kit will light up with the voltmeter between 5V and 30V, although optimal perfor-mance is between 8.5V and 10V.

27
You may connect up to 20 of them in
parallel, at any distance (no more than
one hundred meters or yards in total),
but the higher the number of bulbs the
less the intensity of each one. In this way
it is possible to simultaneously illuminate
different rooms in a building or different
parts of a campsite or settlement, with a minimum of fuel consumption.
It is not possible to charge and illuminate
simultaneously.
C. Heating: The Mini Thermix always
emits a stream of air when placed over a
hot surface as the fan starts, but if bulbs
or other devices are connected the hot
air flow and pressure will be low and will
not be sufficient to heat a small room
beyond 5° C (9 degrees F) above
ambient temperature. However, if you wish to warm up a space, the Mini Thermix should be placed over a
controlled fire (never over an open or
campfire) monitoring that the voltage is
more than 12V and less than 15V.
In this way both the hot cooling air from
the device and the hot air from the burner
flame itself will be ejected by the air
stream. When placed over a normal
burner around 500 to 1000 watts of heat
energy is obtained. If placed over the
surface of a stove one should make sure
that the fan begins to turn. In this case the
speed will be lower but it will still spread
hot air into the surrounding space. This
device is ideal for use in small spaces
such as a tent or a shelter but if its
primary utility is to heat we suggest the
use of the Mini Thermix, much more
powerful both electrically and in terms of
heating power.
28
PRECAUTIONS A. Never unscrew or loosen the screws on the cover or in the inside. The screws have been adjusted to precise torques for maximum performance. Tampering with the cover screws or with the screws inside the Mini Thermix will cause an imbalance and most probably affect the performance of the device. Additionally, it is very likely to cause irreversible damage to the thermoelectric plates housed inside.
B. Never immerse underwater. The mica and ceramic joints that separates the hot plate from the rest of the device are not airtight, so they could let the water flow, and then damage com-ponents inside.
C. Do not cool down suddenly.
D. Do not introduce any objects in the fan.
F. Do not place over fires or embers, or flames that exceed the edges of the container. The suction produced by the fan can suck in the flames as well as the smoke and embers, causing deterioration of the fan and creating a major fire hazard by spreading hot ashes over great distances.
G. The surface of the appliance can be really hot.
H. Do not allow children to use or super-vise the device.
I. Do not place the apparatus over heat sensitive surfaces. When removing from the heating source, the Mini Thermix will still generate electricity for a few minutes, and the fan will still spin. The inferior surface will maintain a high temperature for a few minutes.
J. Never touch people, objects or an-imals with the Mini Thermix when this has been over a heat source: the temperature of the inferior plate could reach 400oC that could provoke serious burns and acute pain.
E. When running for the first time, use a small flame until the fan starts to spin.
29
MAINTENANCE
If the device is going to be left outside, place it downward, so strange objects cannot fall over the fan blades. Before placing it over a flame, please check that
nothing is blocking the fan blades from spinning. To clean, use a soft cloth over the surface.
SUGGESTIONSMini Thermix can work perfectly by placing it over hot surfaces such as a hot iron, a heater or a vitroceramic hob. In fact, it requires less heat than the one from a direct flame given that the heat will be dissipated regularly on the base of the device.
Placed over a heater, and as long as the fan starts to spin, a hot air column will be spread over the whole room instead of directly to the ceiling, increasing the effi-ciency of the heater and contributing to fuel economy.
Over a vitroceramic hob the device works amazingly well. Although it seems a non-sense to use an electric hob to activate an electric generator, Mini Thermix can heat a kitchen using this heat source if there is no other heating device in the room.
If used over a barbecue it is better to place it over the plate. It will provide sev-eral square metres of light in the open air through a simple electric installation, al-though it is important to avoid oils and fats which smell, when getting in contact with the heat sink, will stay on the device for a long time when using it.
30
Mini Thermix can reach 20V over the adequate flame, although the voltmeter included can only indicate up to 17.3V. With this tension the fan will release a powerful heat air stream, but its life will be severely shortened. If it is going to be used as a heater, we suggest that it does not surpass the 15V if you desire to fulfil the 50,000 hours guaranteed by the manufacturer.
Ideally, Mini Thermix provides two 9W light points (1,600 lumens). However, it can slightly light up at least ten points, which is usually enough for a family house. You must take into account that every time you add a light bulb the voltage will be reduced slightly, and each light bulb will shine less. Therefore you will have more light points but with lower intensity.
All the PowerSpot thermoelectric gen-erators can be connected in a series or in parallel, increasing therefore the to-tal available power for the same circuit. If you wish to fit this kind of installation, Powerspot offers the adequate peripher-al cable.
Also, all the PowerSpot generators can send power to a pre-existent electri-cal installation in a house. For that, the generated electricity can be sent to each socket of the electrical installation so this is fed by it. Substituting light bulbs al-ready installed by 12V LED bulbs, or by the ones manufactured by PowerSpot, and unplugging those devices that re-quire more than 15W (TV sets, fridges etc.), the power will reach any socket al-ready existing in a house.
31
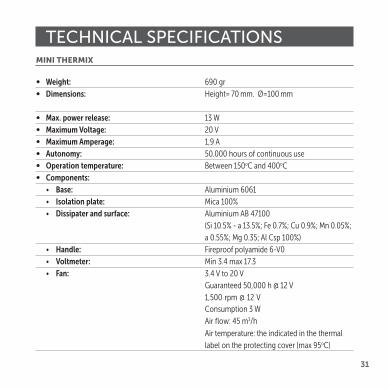
TECHNICAL SPECIFICATIONSMINI THERMIX
∞ Weight: 690 gr
∞ Dimensions: Height= 70 mm. Ø=100 mm
∞ Max. power release: 13 W
∞ Maximum Voltage: 20 V
∞ Maximum Amperage: 1,9 A
∞ Autonomy: 50.000 hours of continuous use
∞ Operation temperature: Between 150oC and 400oC
∞ Components:• Base: Aluminium 6061
• Isolation plate: Mica 100%
• Dissipater and surface: Aluminium AB 47100
(Si 10.5% - a 13.5%; Fe 0.7%; Cu 0.9%; Mn 0.05%;
a 0.55%; Mg 0.35; Al Csp 100%)
• Handle: Fireproof polyamide 6-V0
• Voltmeter: Min 3.4 max 17.3
• Fan: 3.4 V to 20 V
Guaranteed 50,000 h @ 12 V
1,500 rpm @ 12 V Consumption 3 W
Air flow: 45 m3/h
Air temperature: the indicated in the thermal
label on the protecting cover (max 95oC)
32
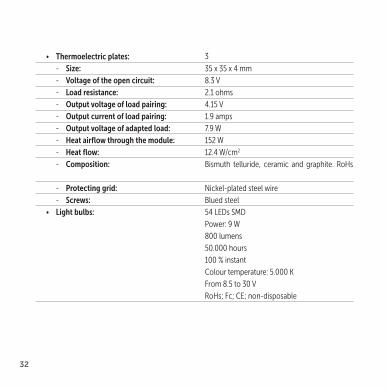
• Thermoelectric plates: 3
- Size: 35 x 35 x 4 mm
- Voltage of the open circuit: 8.3 V
- Load resistance: 2.1 ohms
- Output voltage of load pairing: 4.15 V
- Output current of load pairing: 1.9 amps
- Output voltage of adapted load: 7.9 W
- Heat airflow through the module: 152 W
- Heat flow: 12.4 W/cm2
- Composition: Bismuth telluride, ceramic and graphite. RoHs
- Protecting grid: Nickel-plated steel wire
- Screws: Blued steel
• Light bulbs: 54 LEDs SMD
Power: 9 W
800 lumens
50.000 hours
100 % instant
Colour temperature: 5.000 K
From 8.5 to 30 V
RoHs; Fc; CE; non-disposable

33
COMMERCIAL CERTIFICATE OF GUARANTEEREQUIREMENTES FOR THE VALIDITY OF THE GUARANTEE:
1. The present guarantee only covers PowerSpot officia products and to ben-efit from it, it must fulfil the following re-quirements:
A. Reflect the device model and date of acquisition in the period of pre-sale (physical shop or online shop).
B. In the period of Commercial Guar-antee it will be an ESSENTIAL RE-QUIREMENT to attach the present COMMERCIAL GUARANTEE proper-ly filled and stamped by the shop and the original invoice of purchase identi-fying the model of the device.
2. The benefits of the guarantee will only be valid if you use the technical services that PowerSpot S.L. has established in its Network of Technical Services.
3. The device must be used according to the instructions that are detailed in the pertinent manual of use.
GUARANTEE COVER
The period of the guarantee for parts or whole model, labour and shipping is 2 years. The application of the guarantee starts from the date of purchase.
34
EXCLUSIONS OF THE GUARANTEE
•The non-fulfilment of any of the re-quirements expressed above.
•All component or interior or exterior ac-cessory from the device that is not specifieor included in this certific te of guarantee.
•The start up and demonstration of the product.
•If the failure is produced by fi e, flood,meteorological agents, impact, crushing or the application of inadequate voltage or power.
•The damages due to bad handling, even in transport, will be claimed in presence of the staff from the shipping compa-ny, therefore it is essential to check the packages before signing the correspond-ing delivery note.
•The damages caused by physical break on the casing, plastic, paint, glass, trims and similar.
•The damages produced by bad han-dling due to not reading properly the in-structions of use and maintenance at-tached to the device. The buyer agrees at the moment of purchase the reading of the instructions and its understanding, and admits that, if having any doubt, will ask PowerSpot, S.L. before starting up the device.
•Due to the use of accessories not ap-propriate for this device.
•If the device is repaired or manipulat-ed by staff non authorized by Power-Spot, S.L.
35
IMPORTANT NOTE
•The present Commercial Guarantee does not affect the rights the user has regarding the regulations contained in the Law 23/2003 of July 10, of Consum-er Goods Guarantee (BOE, July 11, 2013)
•During the time the repair lasts no dam-ages or liabilities will be paid for the time the device is out of service.
•PowerSpot S.L. is not responsible for the damage that the device could cause in external elements.
•The mere inspection of the state of the device could entail the destruction of the essential elements for its use. If during the inspection the technician detects the damage has been caused by any of the
points expressed in the previous section of “exclusions of the guarantee”, the ex-penses to return the device to an opera-tive state will be payable by the client, or the client will assume the devolution of the device in a non functional state.
•The PowerSpot products have not been designed for any “critical use”. Critical use meaning life support sys-tems, medical uses, connections to im-plemented devices, commercial trans-port, nuclear installations or systems or any other use where the product failure could lead to damage or the loss of a life or property damage.

2011/65/EU