pistola caliente - doc.ferm.comdoc.ferm.com/servotool/documents/ham6005 ma-e 0902-24.pdf ·...
TRANSCRIPT

Ident.-No.: PHG-2000 0902-24
PISTOLA CALIENTE
PHG-2000
ES PISTOLA CALIENTE Instrucciones de utilización y de seguridad
GB
MTHEAT GuNOperation and Safety Notes
IT
MTPISTOLA TErMICAIndicazioni per l’uso e per la sicurezza
DE
ATHEISSLuFTGEBLÄSEBedienings- en veiligheidsinstructies
ES Antes de empezar a leer abra la página que contiene las imágenes y, en se-guida, familiarícese con todas las funciones del dispositivo.
IT
MT
Prima di leggere aprire la pagina con le immagini e prendere confidenza con le diverse funzioni dell’apparecchio.
GB
MT
Before you begin reading this information, please unfold the page with the il-lustrations and familiarize yourself with all functions of the tool.
DE
AT
Klappen Sie vor dem Lesen die Seite mit den Abbildungen aus und machen Sie sich anschließend mit allen Funktionen des Gerätes vertraut.
ES Instrucciones de utilización y de seguridad Página 05
IT/MT Indicazioni per l’uso e per la sicurezza Pagina 13
GB/MT Operation and Safety Notes Page 21
DE/AT Bedienungs- und Sicherheitshinweise Site 28
HAM6005 Ma-E # 0902-24.indd 1-3 2/24/09 10:45:10 AM
4
1
2
3
Fig. A
Fig. B1
Fig. B3
Fig. B2
Fig. B4
4 5
6 7
HAM6005 Ma-E # 0902-24.indd 4-6 2/24/09 10:45:12 AM

Contenido
ES 5
1. Datos de la herramienta Página 62. Instrucciones de seguridad Página 6-83. Puesta en servicio Página 8-104. Mantenimiento Página 10-115. Eliminación y garantía Página 116. Declaración de conformidad / fabricante de la CE Página 127. Lista de piezas de recambio Página 36-37
HAM6005 Ma-E # 0902-24.indd 5 2/24/09 4:11:01 PM
ES6
Pistola caliente
Lea siempre detenidamente las instrucciones de los aparatos eléctricos antes de utilizarlos. Le ayudará a comprender mejor su producto y a evitar riesgos innecesarios. Guarde estas instrucciones en un lugar seguro por si necesita usarlas más adelante.
1. Datos De la HeRRaMienta
especificaciones técnicas
Voltaje 230 V~Frecuencia 50 HzEntrada de corriente 2000 WPeso 0,62 kgIP Clase IP 20Posición I Corriente del aire 300 l/min Temperatura del aire 450 °CPosición II Corriente del aire 500 l/min Temperatura del aire 600 °C
contenido del embalaje1 Pistola de aire caliente1 Boquilla de protección de vidrio1 Boquilla de gancho1 Boquilla de reducción plana1 Boquilla de reducción1 Manual de usuario1 Garantía
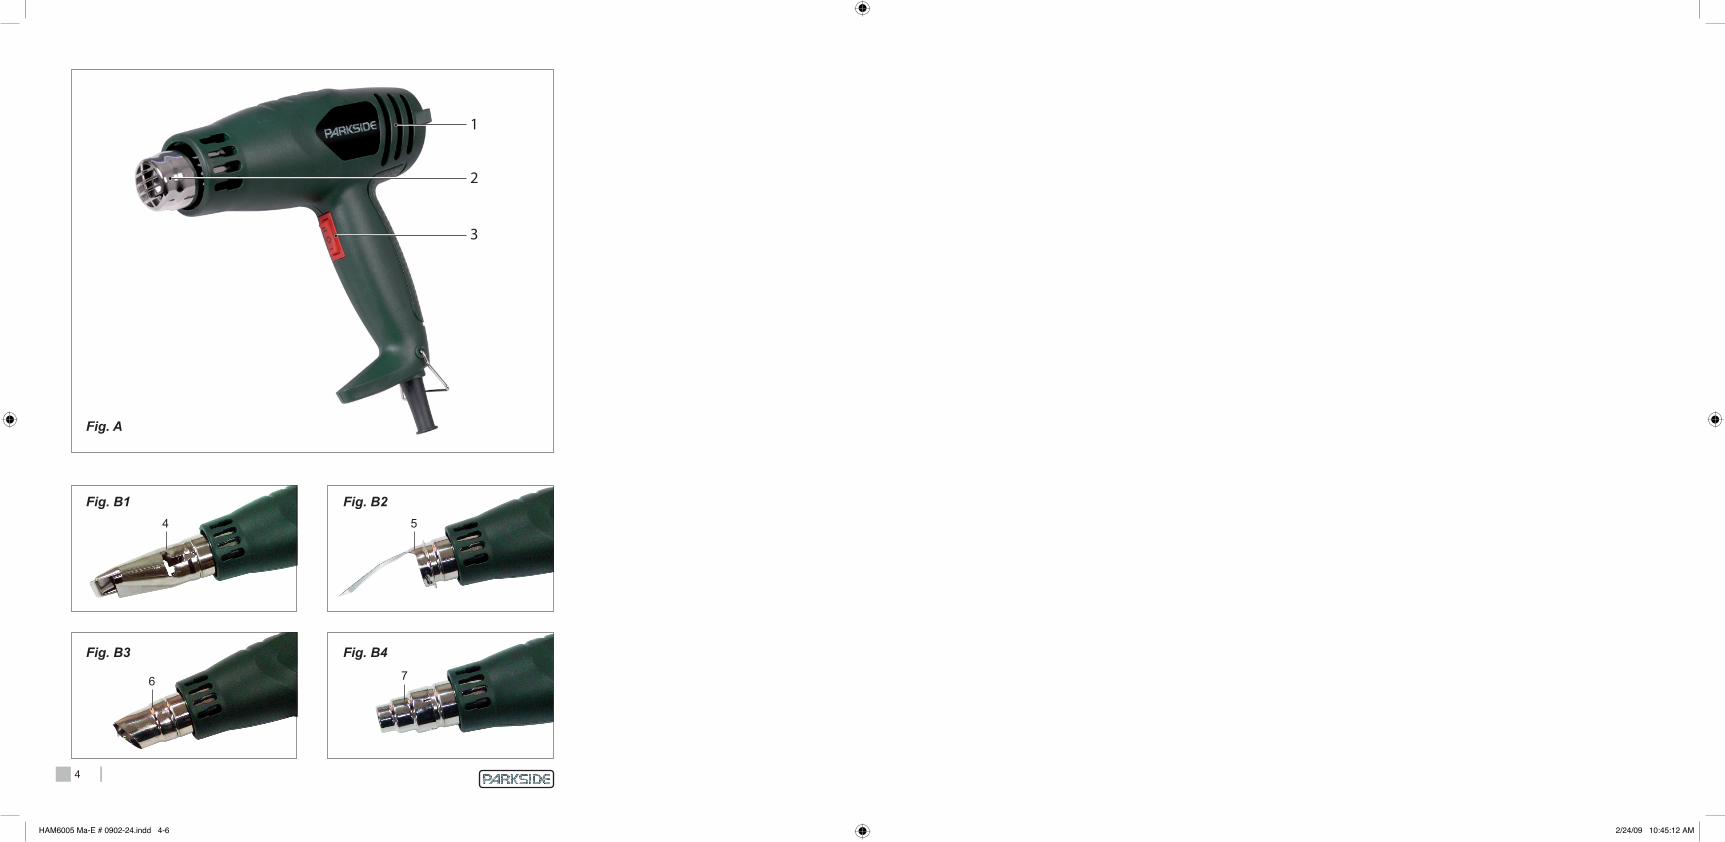
información de producto(Los números del texto hacen referencia a los diagramas de la página 4)1. Ranuras de ventilación2. Boquilla
3. Interruptor4. Boquilla de protección de vidrio5. Boquilla de gancho6. Boquilla de reducción plana7. Boquilla de reducción
2. instRUcciones De seGURiDaD
explicación de los símbolos
Indica peligro de accidente, de muerte o riesgo de provocar averías en el aparato en caso de no seguir las instrucciones de este manual.
Indica el peligro de sufrir descargaseléctricas.
instrucciones especiales de seguridadSiempre que utilice máquinas eléctricas, observe las normativas sobre seguridad existentes en su país, para reducir los riesgos de incendio, de sacudidas eléctricas y de lesiones personales.Lea las siguientes instrucciones de seguridad, así como las adjuntas.
Si el cable eléctrico sufre daños, deberá cambiarlo por un cable especial. Estos cables se encuentran disponibles en el centro del fabricante o del servicio al cliente autorizado. El cable tan sólo deberá ser cambiado por el fabricante, un centro de servicio autorizado o una persona cualificada.
Este aparato no se destina al uso de personas (incluyendo niños) con capacidades mentales o sensoriales reducidas, o carentes de la experiencia y el conocimiento necesario, a menos que estén
Datos de la herramienta / Instrucciones de seguridad
HAM6005 Ma-E # 0902-24.indd 6 2/24/09 4:11:01 PM
ES 7
Instrucciones de seguridad
siendo vigilados o que hayan recibido las instrucciones relativas al uso del aparato por parte de una persona encargada de su seguridad.
Los niños deberán estar vigilados para garantizar que no jueguen con el aparato.
instrucciones especiales de seguridad para la pistola calientea. Puede provocar un incendio si no utiliza
atentamente el dispositivo.b. Preste atención cuando utilice el
dispositivo cerca de materiales inflamables. No lo dirija hacia el mismo punto durante demasiado tiempo. ¡Peligro de incendio!
c. No lo utilice en una atmósfera potencialmente explosiva. ¡Peligro de explosión!
d. El calor puede dirigirse hacia los materiales inflamables que estén cubiertos. ¡Peligro de incendio!
e. Tras terminar de utilizarlo, coloque el dispositivo en su soporte y deje que se enfríe antes de guardarlo. ¡Peligro de incendio y daños!
f. No deje el dispositivo sin supervisión cuando esté en funcionamiento. ¡Peligro de incendio y daños!
antes de utilizar el dispositivoEl uso de este dispositivo podrá provocar •daños personales y materiales mediante incendios o electrocuciones. Antes de utilizar el dispositivo, deberá comprobar lo siguiente:
Compruebe que el voltaje indicado •en la pistola caliente es el mismo que el voltaje de la red. Compruebe que el cable eléctrico y la •toma están en buenas condiciones: El cable y la toma deberán gozar del
tamaño adecuado para el uso previsto; el cable no deberá estar torcido ni dañado.
No utilice un cable de extensión más •largo de lo necesario para el uso previstoAntes de conectar el cable, compruebe •que el interruptor se encuentra en la posición “0”.No utilice el dispositivo en entornos •húmedos.No utilice nunca el dispositivo para •secarse el pelo o cualquier otra parte de su cuerpo.No utilice nunca el dispositivo en el •cuarto de baño, sobre un barreño de agua ni en espacios en los que los líquidos inflamables se utilicen.
Mientras utiliza el dispositivoLa boquilla metálica de descarga se calienta.Preste atención y no toque la boquilla metálica de descarga. ¡Peligro de quemaduras!Evite cualquier daño al elemento de calentamiento. No conecte nunca ni bloquee la boquilla de descarga.No deje nunca el dispositivo sin vigilancia cuando esté encendido. ¡Peligro de incendio!
Cuando utilice la pistola de aire caliente, •se pueden generar gases o vapores dañinos para la salud durante un breve lapso de tiempo. Los asmáticos pueden sufrir ataques a consecuencia de dichas emanaciones;Comprobar que el interruptor esté en la •posición “0”, antes de conectar el enchufe de conexión a la red a la tensión de red.Siempre mantener el cable de conexión •a la red a distancia de la boquilla de la Pistola de aire caliente.
HAM6005 Ma-E # 0902-24.indd 7 2/24/09 4:11:02 PM

ES8
Instrucciones de seguridad / Puesta en servicio
Mantener a distancia a los niños y los •animales cuando usa el aparato.
Este aparato funciona a una temperatura de 600° Celsio sin indicios visibles de esta temperatura (no hay llama), sin embargo hay peligro de incendio. Cuidado con la corriente de aire caliente que sale de la boquilla. Esta corriente de aire puede causar que maduras.
Desconectar inmediatamente el aparato en caso de:
Fallo en el enchufe, en el cable o avería •del cable.Interruptor averiado.•Humo o mal humor de material aislante •quemado.
seguridad eléctricaTenga siempre presentes las normas de seguridad locales con respecto al peligro de incendio, peligro de sufrir descargas eléctricas y peligro de accidentes. Lea, además de las instrucciones que siguen a continuación, las normas de seguridad que aparecen en el cuadernillo anexo.
Controle que la tensión de la red sea la misma que la que aparece indicada en la placa.
Herramienta de tipo II – Doble aislamiento – No requiere enchufe con conexión a tierra.
Recambio de cables y enchufesSi la red eléctrica de cables resulta dañada, se debe sustituir con una red de cables especial que se puede obtener del fabricante o del servicio de atención al cliente.
Deshágase de los cables o clavijas antiguos inmediatamente después de sustituirlos por los nuevos. Es peligroso conectar a un enchufe la clavija de un cable suelto.
Uso de cables de extensiónUtilice siempre cables de extensión autorizados que sean aptos para la potencia del aparato. Los hilos deben tener un diámetro de 1,5 mm2. Cuando el cable de extensión esté en un carrete, desenrolle el cable completamente.
3. PUesta en seRVicio
Se puede usar la pistola de aire calientw, entre otras cosas, para:
Fontanería, como conexiones de tubos, •soldadura blanda, doblar tubos.Quitar pintura, barniz y laca sin peligro •de incendio.Secar rápidamente aparatos mojados.•Presecado de superficies para •reparación rápida.Quitar etiquetas autoadhesivas de una •manera limpia.Perfecta para la aplicación de etiquetas •de PVC.Alisar burbujas que pueden haberse •producido al pegar materiales de PVC.Quitar fácilmente alfombrado de vinilo.•Formar todos los materiales sintéticos de •baja temperatura (450° Celsio) como el polietileno y el PVC.Formar todos los materiales sintéticos de •alta temperatura (580° Celsio) como plexiglás y plástico acrílico.Fundir material sintético, como •materiales y láminas con capa de PVC.Aplicación de tubos retractables.•Embalajes retractables.•Descongelar tubos y motores.•
HAM6005 Ma-E # 0902-24.indd 8 2/24/09 4:11:02 PM

ES 9
Puesta en servicio
Reparar acabados: el esmalte del baño y •de aparatos domésticos; aplicación de revestimientos de polvo de epoxi.Reparar esquís, tablas de surf y otros •artículos deportivos.Soltar tornillos y conexiones demasiado •ajustados.
Por favor, tenga en cuenta que: Este dispositivo se destina exclusivamente al uso en hogares privados. Las aplicaciones comerciales o similares no constituyen el uso previsto y cancelarán cualquier reclamación de garantía.
ajustar y cambiar las boquillasElija siempre la boquilla más adecuada a su tarea. Instale o cambie las boquillas sólo cuando el dispositivo esté completamente enfriado. Proceda con precaución y preste atención a cualquier borde afilado de las boquillas. Podrá sacar las boquillas simplemente, liberando la boquilla de descarga o uniéndola mediante un deslizamiento. En determinadas circunstancias, esto deberá estar asistido por suaves movimientos giratorios.
Uso de la boquilla adecuadaLa pintura y el plástico se quemarán a grandes temperaturas.¡Peligro!No respire el humo.
Boquilla de protección de vidrio (Fig. B1)saque la pintura o el barniz de las ventanas. ¡Peligro de rotura del vidrio!Utilice siempre la boquilla de protección de vidrio cuando opere con vidrio u otras superficies sensibles.La pintura o el barniz en superficies moldeadas podrán retirarse utilizando una pala adecuada o cepillando con un cepillo de corte suave.
Fije la temperatura en 450°C
Boquilla de gancho (Fig. B2)Moldeado de tubos de plásticoInstale la boquilla reflectora.Para evitar doblar el tubo, rellénelo de arena y ciérrelo por ambos lados. Caliente el tubo con movimientos adecuados de lado a lado.Fije la temperatura en 450°C
Boquilla de reducción plana (Fig. B3)sacar la pintura o el barniz/ limpieza de adhesivosInstale la boquilla de reducción plana.Ablande la pintura o el barniz con aire caliente levantándola con la pala. Una larga exposición al calor quemará la pintura y el barniz y hará que la retirada sea difícil. Mantenga la pala afilada y limpia. Muchos adhesivos (como por ejemplo, las etiquetas) se ablandan con el calor. Por lo tanto, podrá romper los laterales o retirar demasiado adhesivo.Fije la temperatura en 450°C
Boquilla de reducción (Fig. B4)contracciónInstale la boquilla de reducción.Utilice la boquilla de reducción para calentar superficies pequeñas. El diámetro de la boquilla de reducción es de 20 mm. Caliente el tubo contraído de manera uniforme.Fije la temperatura en 450°C
soldaduraPara soldar por puntos, instale la boquilla de reducción.Cuando utilice un compuesto de soldadura sin flujos, ponga el flujo o la pasta de soldadura en la ubicación que va a soldar. En función del material, caliente el lugar de la soldadura durante 50–120 segundos. Añada el soldador.
HAM6005 Ma-E # 0902-24.indd 9 2/24/09 4:11:03 PM

ES10
Puesta en servicio / Mantenimiento
El soldador deberá fusionarse a la temperatura de la pieza de trabajo. Una vez que haya enfriado la zona de soldadura, saque el flujo.Fije la temperatura en 600°C
FuncionamientoFig. ASe puede trabajar normalmente con la Pistola de aire caliente en la mano, o colocarla verticalmente.
• Controlarsielinterruptorderedestáen la posición “0” antes de conectar el enchufe de conexión a la red a la red de alumbrado.
• Mantengaloscablesdealimentaciónalejados del flujo de aire caliente o de la boquilla;
• Pulsarelinterruptorderedalaposición“I o II” para encender su Pistola de aire caliente.
I = 450 ºC, flujo de aire 300 L/min 0 = Apagado II = 600 ºC, flujo de aire 500 L/min
Cuando la temperatura exceda los 600 °C, la resistencia se apagará inmediatamente, sin embargo, el calefactor continuará funcionando. Cuando se enfríe a una temperatura apta para el funcionamiento, la resistencia volverá a arrancar.
apagado:Mueva el interruptor a 0.
consejo: Para lograr mejores resultados, pruebe todas sus tareas primeramente en una parte separada de la pieza de trabajo.
4. ManteniMiento
Antes de cualquier trabajo de mantenimiento o limpieza saque siempre el enchufe de la caja de corriente (enchufe de pared). Nunca use aqua o otros líquidos durante el limpieza de la máquina.
Nunca emplear líquidos inflamables para •limpiar la Pistola de aire caliente, especialmente para la boquilla.Un mantenimiento periódico de la pistola •de aire caliente evita problemas inútiles. Mantenga limpias las rajas de ventilación del motor para evitar un sobre calientamiento.
averiasCuando la máquina no funciona como debiera, le indicamos abajo algunas causas posibles con las soluciones respectivas.
the engine gets overheated. Las aberturas de ventilación de la Pistola •de aire caliente están tapadas con el polvo.
Limpie las aberturas de ventilación.•
la máquina funciona cuando está conectada.
Interrupción en el circuito eléctrico:• Controle el cable y la clavija.•
El interruptor está defectuoso:• Quite el enchufe de conexión a la red, •es que hay peligro de incendio! Lleve la máquina a su distribuidor para un control y/o una reparación.
el motor no funciona, pero sí calienta. Interrupción en el motor eléctrico.•
HAM6005 Ma-E # 0902-24.indd 10 2/24/09 4:11:03 PM
ES 11
Mantenimiento / Eliminación y garantía
Quite el enchufe de conexión a la red, •es que hay peligro de incendio! Lleve la máquina a su distribuidor para un control y/o una reparación.
errores de funcionamientoSi ocurren defectos o interrupciones (por ej, a través del desgaste o el daño de una parte), por favor, póngase en contacto con nuestro servicio de reparaciones (véase la tarjeta de garantía). El dispositivo no incluye ninguna pieza que pueda ser cambiada por el usuario. Al final de este manual, encontrará una lista de piezas de recambio que podrá pedir, así como un diagrama explicativo del dispositivo.
5. eliMinación y GaRantía
Medio ambientePara prevenir daños durante el transporte, el producto se suministra en un embalaje resistente que está compuesto por materiales reutilizables.Por ello se ruega hacer uso de todas las opciones posibles para reciclar el embalaje.
No elimine los aparatos eléctricos junto con los desechos domésticos ordinarios.
De conformidad con la directiva europea 2002/96/EG sobre los dispositivos electrónicos y eléctricos y su implementación en la ley nacional, los dispositivos eléctricos utilizados deben recogerse separadamente y reciclarse de una forma que respete el medioambiente.Alternativas de reciclaje para devolver el equipo: En lugar de devolver el dispositivo, en caso de una transmisión de propiedad, el titular del dispositivo eléctrico deberá explicar su correcto uso.
Para ello, el dispositivo utilizado también puede gestionarse mediante una fábrica de recogida que efectuará su eliminación de conformidad con la economía circular nacional y la ley de eliminación de residuos. No están afectadas las piezas de accesorios y herramientas que acompañan los dispositivos utilizados pero que no incluyen componentes eléctricos.
GarantíaLas condiciones de la garantía se encuentran en la tarjeta de garantía adjunta.
HAM6005 Ma-E # 0902-24.indd 11 2/24/09 4:11:03 PM
ES12
6. DeclaRación De conFoRMiDaD / FaBRicanteDe la CE
Nosotros, Ferm BV, Lingenstraat 6, 8028PM, Zwolle, Netherlands, declaramos por la presente que este producto cumple las siguientes directrices europeas:
Directiva de baja tensión Ue (2006/95/ec)
compatibilidad electromagnética (2004/108/ec)
EN 60335-1, EN 60335-2-45, EN 55014-1, EN 55014-2, EN 61000-3-2, EN 61000-3-3,
EN62233
Denominación del producto:Parkside Pistola caliente PHG-2000
from 01-11-2008ZWolle nl
J.A. Bakker - van IngenCEO Ferm BV
J.F.J. StrikkersSenior Quality Manager Ferm BV
Queda reservado el derecho a realizar modificaciones técnicas para el perfeccionamiento del dispositivo.
Declaración de conformidad / fabricante de la CE
HAM6005 Ma-E # 0902-24.indd 12 2/24/09 4:11:04 PM

IT/MT 13
1. Dati della macchina Pagina 142. Instruzioni di sicurezza Pagina 14-163. Uso Pagina 16-184. Manutenzione Pagina 18-195. Smaltimento & garanzia Pagina 196. Dichiarazione di conformità / produttore CE Pagina 207. Elenco di parti di ricambio Pagina 36-37
Indice
HAM6005 Ma-E # 0902-24.indd 13 2/24/09 4:11:04 PM

IT/MT14
Pistola teRMica
Leggere sempre attentamente le istruzioni per i prodotti elettrici prima dell’uso. Vi aiuteranno a capire il funzionamento del vostro prodotto più facilmente e ad evitare rischi inutili. Conservare questo manuale di istruzioni in un luogo sicuro per uso futuro.
1. Dati Della MaccHina
specifiche tecniche
Tensione 230 V~Frequenza 50 HzPotenza assorbita 2000 WPeso 0,62 kgIP classe IP 20Posizione I Flusso aria 300 l/min Temperatura aria 450 °CPosizione II Flusso aria 500 l/min Temperatura aria 600 °C
contenuto della confezione1 Pistola termica1 Ugello di protezione in vetro1 Ugello a uncino1 Ugello di riduzione piatto1 Ugello di riduzione1 Manuale d’uso1 Certificato di garanzia
informazioni sull’apparecchio(I numeri nel testo si riferiscono ai diagrammi a pagina 4)1. Feritoie di ventilazione2. Ugello di diffusione3. Interruttore
4. Ugello di protezione in vetro5. Ugello a uncino6. Ugello di riduzione piatto7. Ugello di riduzione
2. instRUZioni Di sicUReZZa
legenda dei simboli
Segnala il rischio di lesioni personali, di morte o di danni all’apparecchio in caso di non osservanza delle istruzioni di questo manuale.
Indica il rischio di scossa elettrica.
speciali norme di siurezzaQuando si utilizzano macchinari elettrici, attenersi sempre alle norme di sicurezza del proprio paese di appartenenza per ridurre il rischio di incendio, scosse elettriche e lesioni alla persona. Leggere le seguenti istruzioni di sicurezza e le istruzioni allegate.
Se il cavo elettrico subisce danni, occorre sostituirlo con un cavo speciale, reperibile presso il produttore o un centro assistenza clienti autorizzato. Il cavo deve essere sostituito esclusivamente dal produttore, da un centro di assistenza autorizzato o da una persona dotata di una simile qualifica.
Questo apparecchio non è destinato per l’uso da parte di persone (compresi bambini) con capacità sensoriali o mentali ridotte, o con mancanza di esperienza e conoscenza, a meno che non abbiano ricevuto supervisione o istruzioni riguardo all’uso dell’apparecchio da parte di una persona responsabile per la loro sicurezza.
Dati della macchina / Instruzioni di sicurezza
HAM6005 Ma-E # 0902-24.indd 14 2/24/09 4:11:05 PM

IT/MT 15
Instruzioni di sicurezza
I bambini devono essere supervisionati per assicurarsi che non giochino con l’apparecchio.
istruzioni particolari di sicurezza relative alla pistola termicaa. Se il dispositivo non viene maneggiato
con attenzione, può provocare incendi.b. Prestare attenzione quando si usa
il dispositivo nei pressi di materiali infiammabili. Non mirare sullo stesso punto per un periodo prolungato.Rischio di incendi!
c. Non utilizzare in atmosfera potenzialmente esplosiva. Rischio di esplosioni!
d. È possibile che il calore sia diretto verso materiali infiammabili coperti. Rischio di incendi!
e. Dopo l’uso, sistemare il dispositivo sul suo supporto e lasciare che si raffreddi prima di conservarlo. Rischio di incendi e di lesioni!
f. Non lasciare il dispositivo senza sorveglianza durante il funzionamento. Rischio di incendi e di lesioni!
Prima dell’uso del dispositivoL’uso del dispositivo potrebbe provocare •lesioni e danni alle cose a causa di incendi e scosse elettriche. Prima di utilizzare il dispositivo, occorre pertanto controllare i seguenti elementi:
Verificare che la tensione dichiarata •sulla pistola termica coincida con la tensione dell’alimentazione. Verificare che il cavo elettrico e la •spina siano idonei: il cavo e la spina devono corrispondere alle dimensioni giuste in relazione all’uso previsto; il cavo non deve essere aggrovigliato o danneggiato.
Non usare prolunghe di una lunghezza •superiore alle esigenze imposte dall’uso previsto!Prima di inserire la spina del cavo, •verificare che l’interruttore sia in posizione “0”.Non usare il dispositivo in condizioni di •umidità.Non usare mai il dispositivo per •asciugare i capelli o altre parti del corpo.Non usare mai il dispositivo in bagno, su •bacinelle con acqua o in spazi dove vengono maneggiati liquidi altamente infiammabili.
Durante l’uso del dispositivoL’ugello di scarico di metallo diventa estremamente caldo.Prestare attenzione e non toccare l’ugello di scarico di metallo. Rischio di ustioni!Evitare di danneggiare l’elemento riscaldante. Non otturare o bloccare mai l’ugello di scarico.Non lasciare mai il dispositivo acceso senza sorveglianza. Rischio di incendi!
Se dovete usare la pistola termica, può •essere possibile per un breve periodo di tempo l’emissione di vapori e gas che possono essere dannosi per la salute. Gli asmatici in particolare possono risentirne;Controllare se l’interruttore non è •posizionato su ‘ON’ prima di inserire la spina nella presa di corrente.Mantenere il cavo di collegamento •sempre lontano dalla bocchetta del bruciatore.Mantenere il bruciatore lontano da •bambini ed animali.
HAM6005 Ma-E # 0902-24.indd 15 2/24/09 4:11:05 PM

IT/MT16
Instruzioni di sicurezza / Uso
Questo bruciatore funziona ad una temperatura di 600°C senza segni esterni di questa temperatura (senza fiamma), il che non esclude il rischio di incendio. Fare attenzione alla corrente di aria calda che esce dalla bocchetta. Quest’aria può causare ustioni.
Disattivare il bruciatore immediatamente in caso di:
Malfunzionamento della spina del cavo, •del cavo o danni al cavo stesso.Interruttore difettoso.•Fumo o odore di materiale isolante •bruciato.
norme elettriche di sicurezzaQuando utilizar máquinas eléctricas deve sempre respeitar as normas de segurança em vigor no local, devido ao perigo de incêndio, de choques eléctricos ou ferimentos pessoais. Para além das instruções abaixo, leia também as instruções de segurança apresentadas no folheto de segurança em anexo. Guarde as instruções num lugar seguro!
Accertarsi sempre che l’alimentazione elettrica corrisponda alla tensione indicata sulla targhetta dei dati caratteristici.
Macchina classe II - Doppio isolamento - Non è necessaria la messa a terra.
sostituzione dei cavi elettrici o delle spineSbarazzarsi immediatamente di vecchi cavi e spine una volta che sono stati sostituiti. E’ perimaccoloso collegare cavi sciolti ad una presa elettrica.
Uso di prolungheUtilizzare soltanto prolunghe approvate ed idonee alla potenza della macchina. I nuclei devono avere una sezione minima di 1,5mm2. Se la prolunga arrotolata su di una bobina, occorre srotolarla completamente.
3. Uso
Il bruciatore é da usare tra l’altroper:Lavori idraulici come collegamenti di •tubature, saldature morbide, piegatura di tubi;La rimozione di vernice, vernice •trasparente e lacca senza rischio di incendio;L’asciugatura rapida di apparecchiature •bagnate;L’asciugatura di superfici per facilitarne •una rapida riparazione;La rimozione di etichette autoadesive in •maniera pulita;La perfetta applicazione di etichette in •PVC;La rimozione di bolle d’aria sulle •superficie di materiali in PVC dopo la loro applicazione;La facile rimozione di moquette in vinile•Il modellamento di materiali in plastica a •temperatura moderata (450 °C), tra cui polietilene e PVC;Il modellamento di materiali in plastica a •temperatura elevata (580 °C), tra cui vetro in acrilico e Plexiglas;La fusione di materiali in plastica, tra cui •sostanze e pellicole con strato in PVC;L’uso di tubi termocontrattili;•Imballaggi con involucro termocontrattile;•Lo scongelamento di tubi e motori;•La riparazione di strati di rifinitura: smalto •di vasche da bagno ed elettrodomestici:
HAM6005 Ma-E # 0902-24.indd 16 2/24/09 4:11:05 PM

IT/MT 17
Uso
l’applicazione di strati di rifinitura in •polvere epossida;La riparazione di sci, tavole a vela ed altri •articoli sportivi;Svitare viti e attacchi fissati troppo stretti.•
Si ricordi che: Questo dispositivo è progettato per l’uso solamente nelle abitazioni private. Applicazioni commerciali o simili non costituiscono un uso previsto e annullerà tutte le rivendicazioni di garanzia.
inserimento e sostituzione degli ugelliScegliere sempre l’ugello più adatto al lavoro. Installare o cambiare gli ugelli solo a dispositivo assolutamente freddo. Procedere con cautela e fare attenzione ai bordi taglienti degli ugelli. Per rimuovere gli ugelli è sufficiente staccare l’ugello di scarico o applicarli facendolo scorrere sopra. In determinate circostanza, è possibile facilitare l’operazione con delicati movimenti rotatori.
Utilizzo dell’ugello giustoIl calore intenso può far bruciare vernici e plastiche.Pericolo! Non respirare le emissioni.
Ugello di protezione in vetro (Fig. B1)Rimuovere tinte o vernici dalle finestre. Pericolo di vetro rotto!Usare sempre l’ugello di protezione in vetro quando si lavora su vetro o altre superfici a rischio.Le tinte o le vernici su superfici sagomate possono essere sollevate con un raschietto idoneo o spazzolate con una morbida spazzola metallica.Impostare la temperatura su 450°C
Ugello a uncino (Fig. B2)Formatura di tubi in plasticaInstallare l’ugello riflettore.Per evitare pieghe nel tubo, riempirlo di sabbia e chiuderlo su entrambi i lati. Scaldare il tubo con movimenti uniformi da un lato all’altro.Impostare la temperatura su 450°C
Ugello di riduzione piatto (Fig. B3)Rimozione di tinte o vernici / eliminazione di adesiviInstallare l’ugello di riduzione piatto.Ammorbidire la tinta o la vernice con aria bollente mentre la si solleva con il raschietto. Un’esposizione prolungata al calore brucia le tinte e le vernici e ne rende difficile la rimozione.Il raschietto deve essere sempre tagliente e pulito. Molti adesivi (ad es. etichette) vengono ammorbiditi dal calore.È quindi possibile rompere il legame chimico o rimuovere l’adesivo in eccesso.Impostare la temperatura su 450°C
Ugello di riduzione (Fig. B4)RestringimentoInstallare l’ugello di riduzione.Utilizzare l’ugello di riduzione per riscaldare superfici di piccole dimensioni. Il diametro dell’ugello di riduzione è pari a 20 mm.Riscaldare in modo uniforme i tubi ritraibili.Impostare la temperatura su 450°C
saldaturaPer la saldatura a punti, installare l’ugello di riduzione.Se si usa un composto saldante senza fondente, applicare sulla zona da saldare il fondente o la pasta saldante. Scaldare la zona da saldare per 50 - 120 secondi,in base al tipo di materiale.Aggiungere lega per saldature.
HAM6005 Ma-E # 0902-24.indd 17 2/24/09 4:11:06 PM
IT/MT18
La lega per saldature deve amalgamarsi alla temperatura del pezzo in lavorazione. Dopo il raffreddamento della zona della saldatura, rimuovere il fondente.Impostare la temperatura su 600°C
FunzionamentoFig. AIl bruciatore può essere adoperato a mano o posizionato in maniera verticale.
Prima di inserire la spina nella presa di •corrente controllare se l’interruttore di rete si trova in posizione “0”.Tenere il cavo di alimentazione sempre •lontano dal getto d’aria calda e dal nasello.Premere l’interruttore in posizione “I o II” •per attivare il bruciatore:
II = 450 ºC, flusso dell’aria 350 l/min 0 = Spento III = 600 ºC, flusso dell’aria 500 l/min
Quando la temperatura è superiore a 600°C, il riscaldatore spegne automaticamente l’apparecchio ma continua a funzionare. Dopo essersi raffreddato ed essere tornato alla temperatura di esercizio, il riscaldatore siriaccende.
spegnimento:Spingere il pulsante su 0.
consiglio: Per ottenere risultati ottimali, testare innanzitutto il lavoro su una parte invisibile del pezzo in lavorazione.
4. ManUtenZione
Prima della manutenzione e della pulizia del bruciatore staccare sempre la spina dalla presa (presa di corrente). Non usare mai acqua o altri liquidi per la pulizia delle parti elettriche del bruciatore.
Non usare mai liquidi infiammabili per la •pulizia del bruciatore in genere e in particolare per la bocchetta.Mantenere pulite le fessure di •ventilazione del bruciatore per evitare surriscaldamento. La manutenzione periodica del bruciatore previene problemi inutili.
MalfunzionamentiNel caso che il bruciatore non dovesse funzionare correttamente elenchiamo qui di seguito alcune possibili cause e le soluzioni relative.
il motore si surriscalda. Le fessure di ventilazione del bruciatore •sono otturate di sporco.
Pulire le fessure di ventilazione.•
il bruciatore non funziona dopo l’attivazione.
Interruzioni nel circuito elettrico.• Controllare il cavo di collegamento e •la spina.
L’interruttore è rotto.• Staccare la spina dalla presa di •corrente, c’è pericolo di incendio! Rivolgersi al concessionario per la riparazione.
il motore non funziona, però riscalda. Interruzioni nel circuito elettrico.•
Uso / Manutenzione
HAM6005 Ma-E # 0902-24.indd 18 2/24/09 4:11:06 PM

IT/MT 19
Manutenzione / Smaltimento & garanzia
Staccare la spina dalla presa di •corrente, c’è pericolo di incendio! Rivolgersi al concessionario per la riparazione.
MalfunzionamentiSe si verificano difetti o interruzioni nel funzionamento (es. per l’usura di una parte), contattate il nostro dipartimento di vendita (vedere scheda di garanzia). Il dispositivo non contiene parti che possono essere restituite dall’utente. Alla fine del presente manuale, troverete un elenco di parti di ricambio che possono essere ordinate, insieme a un diagramma esploso del dispositivo.
5. sMaltiMento & GaRanZia
l’ambientemacchina viene consegnata con un resistente imballaggio con materiale prevalentemente riciclabile.Fare quindi uso delle opzioni di riciclaggio dell’imballaggio.
Non smaltire gli apparecchi elettrici insieme ai normali rifiuti domestici.In conformità alla Direttiva Europea
2002/96/EG sui dispositivi elettrici ed elettronici usati e la sua implementazione nella legge nazionale, i dispositivi elettrici usati devono essere raccolti separatamente e riciclati in maniera ecologica.Alternative di riciclaggio al requisito di restituzione: In alternativa alla restituzione del dispositivo, nel caso di un trasferimento di proprietà, un proprietario di dispositivi elettrici è tenuto fornire assistenza nell’utilizzo corretto.
Per questo scopo, il dispositivo usato può anche essere portato presso una struttura di raccolta che si occuperà del suo smaltimento secondo la legge nazionale sull’economia circolare e lo smaltimento dei rifiuti. Sono esenti da ciò le parti e gli utensili che accompagnano i dispositivi ma non contengono componenti elettrici.
GaranziaLe condizioni di garanzia sono riportate nella scheda di garanzia allegata separatamente.
HAM6005 Ma-E # 0902-24.indd 19 2/24/09 4:11:06 PM
IT/MT20
6. DicHiaRaZione Di conFoRMità / PRoDUttoRe CE
Noi, Ferm BV, Lingenstraat 6, 8028PM, Zwolle, Netherlands, dichiariamo la conformità di questo prodotto con le seguenti normative europee:
normativa ce per la bassa tensione (2006/95/ec)
compatibilità elettromagnetica (2004/108/ec)
EN 60335-1, EN 60335-2-45, EN 55014-1, EN 55014-2, EN 61000-3-2, EN 61000-3-3,
EN62233
Descrizione del prodotto:Parkside Pistola termica PHG-2000
from 01-11-2008ZWolle nl
J.A. Bakker - van IngenCEO Ferm BV
J.F.J. StrikkersSenior Quality Manager Ferm BV
Modifiche tecniche nel senso dello sviluppo rimangono riservati.
Dichiarazione di conformità / produttore CE
HAM6005 Ma-E # 0902-24.indd 20 2/24/09 4:11:06 PM

GB/MT 21
1. Machine data Page 222. Safety instructions Page 22-243. Using the appliance Page 24-254. Maintenance Page 265. Disposal & warranty Page 26-276. Declaration of conformity / CE manufacturer Page 277. List of replacement parts Page 36-37
Table of contents
HAM6005 Ma-E # 0902-24.indd 21 2/24/09 4:11:07 PM

GB/MT22
Heat GUn
Always read the instruction for electrical products carefully before use. It will help you understand your product more easily and avoid unnecessary risks. Keep this instruction manual in a safe place for future use.
1. MacHine Data
technical specifications
Voltage 230 V~Frequency 50 HzPower input 2000 WWeight 0.62 kgIP Class IP 20Position I Air flow 300 l/min Air temperature 450 °CPosition II Air flow 500 l/min Air temperature 600 °C
contents of packing1 Hot air gun1 Glass protection nozzle1 Hook nozzle1 Flat reduction nozzle1 Reduction nozzle1 Instruction manual1 Warranty card
Product information(The numbers in the text refer to thediagrams on page 4)1. Ventilation slots2. Nozzle outlet3. Switch4. Glass protection nozzle
5. Hook nozzle6. Flat reduction nozzle7. Reduction nozzle
2. saFety instRUctions
explanation of the symbols
Denotes risk of personal injury, loss of life or damage to the tool in case of non-observance of the instructions in this manual.
Indicates electrical shock hazard.
additional safety instructionsWhen using electric tools, basic safety precautions should always be followed to reduce the risk of fire, electric shock and personal injury. Read all these instructions before attempting to operate this product and save these instructions.
If the electrical cord becomes damaged, it must be replaced with a special cord. These are available from the manufacturer or authorised customer service. The cord must be changed only by the manufacturer, an authorised service facility or a similarly qualified person.
This appliance is not intended for use by persons (including children) with reduced sensory or mental capabilities, or lack of experience and knowledge, unless they have been given supervision or instructions concerning use of the appliance by a person responsible for their safety.
Children should be supervised to ensure that they do not play with the appliance.
Machine data / Safety instructions
HAM6005 Ma-E # 0902-24.indd 22 2/24/09 4:11:07 PM
GB/MT 23
special safety instructions for the heat guna. A fire can result if the device is not
handled carefully.b. Use caution when using the device near
flammable materials. Do not aim it at the same spot for an extended time. Fire hazard!
c. Do not use in a potentially explosive atmosphere. Explosion hazard!
d. Heat can be directed at flammable materials that are covered. Fire hazard!
e. After use, place the device on its stand and allow it to cool before putting it away. Fire and injury hazard!
f. Do not leave the device unsupervised when in operation. Fire and injury hazard!
Before using the deviceUse of this device may result in injury and •property damage through fire or electric shock. Before using the device, you must therefore check the following:
Make sure that the voltage stated on •the heat gun is the same as the voltage of the power supply. Make sure that the electrical cord and •plug are in proper condition: The cord and plug must be of the right size for the intended use; the cord must not be tangled or damaged.
Do not use an extension cord that is •longer than necessary for the intended use!Before plugging the cord in, make sure •the switch is in the “0” position.Do not use the device in damp •surroundings.Never use the device to dry hair or any •other part of the body.
Never use the device in a bathroom, over •a water basin or in spaces where highly flammable liquids are handled.
While using the deviceThe metal discharge nozzle gets hot.Use caution and do not touch the metal discharge nozzle. Burn hazard!Prevent damage to the heating element. Never plug or block the discharge nozzle.Never leave the device unsupervised when turned on. Fire hazard!
If you are going to use the hot air gun, •vapours and gas can be released during a short time. This can be harmful for your health. Asthmatics can suffer hindrance of it;Before connecting the plug to the mains •voltage you have to check if the switch is in position “0”;Keep the mains lead always away from •the mouthpiece of the hot air gun;Keep children and animals away from the •appliance if you are using it.
This appliance operates at a temperature of 600 degrees without visible signs of this temperature (no flames), still there is a chance of fire risk. Watch out for the hot air stream from the mouth piece. This air stream can cause burns.
Immediately switch off the appliance when:Plug and/or cable are defective or •damaged;The switch is defective;•You smell or see smoke caused by •scorched insulation from the hot air gun.
Safety instructions
HAM6005 Ma-E # 0902-24.indd 23 2/24/09 4:11:07 PM

GB/MT24
electrical safetyWhen using electric machines always observe the safety regulations applicable in your country to reduce the risk of fire, electric shock and personal injury. Read the following safety instructions and also the enclosed safety instructions.
Always check that the power supply corresponds to the voltage on the rating plate.
Class II machine – Double insulation – You don’t need any earthed plug.
Replacing cables or plugsImmediately throw away old cables or plugs when they have been replaced by new ones. It is dangerous to insert the plug of a loose cable in the wall outlet.
Using extension cablesOnly use an approved extension cable suitable for the power input of the machine. The minimum conductor size is 1.5 mm2. When using a cable reel always unwind the reel completely.
3. UsinG tHe aPPliance
The Hot air gun can be used for:Plumbing work like tube connections, •solder, bowing tubes;Removing paint, varnish and lacquer •without firerisk;Quickly drying of appliances which have •become wet;Drying surfaces for quick repairing;•Removing self-adhesive labels in a clean •way placing PVC labels;
Blistering after sticking PVC materials •can be smoothed after heating;Easy removing of vinyl carpeting:•Forming all synthetics with a low •temperature (450 degrees) among which polyethylene and PVC;Forming all synthetics with a high •temperature (580 degrees) among which acryl and plexiglass;Smelting synthetics, among which •matters and foils with PVC layer;Applying heat shrinking tubes;•Shrinkwrappers;•Thawing tubes and engines;•Repairing finishing layers: email of bath •and household appliances;Applying epoxypowder coverlayers;•Repairing of ski’s, surf-boards and other •sports goods;Unscrewing too fast fixed screws and •connections.
Please note: This device is intended exclusively for use in private households. Commercial or similar applications do not constitute intended use and will void all warranty claims.
Fitting and changing the nozzlesAlways choose the nozzle that is best suited to the job. Install or change nozzles only when the device is completely cool. Proceed with caution and beware of any sharp edges on the nozzles. You can remove the nozzles simply by detaching the discharge nozzle, or attach them by sliding it on. In some circumstances, this must be assisted by gentle turning motions.
Using the right nozzlePaint and plastic will burn under strong heat.Danger! Do not breathe in the fumes.
Safety instructions / Using the appliance
HAM6005 Ma-E # 0902-24.indd 24 2/24/09 4:11:08 PM

GB/MT 25
Glass protection nozzle (Fig. B1)Remove paint or varnish from windows. Broken glass hazard!Always use the glass protection nozzle when working on glass or other sensitive surfaces.Paint or varnish on moulded surfaces can be lifted using an appropriate scraper or brushed off with a soft wire brush.Set the temperature to 450°C
Hook nozzle (Fig. B2)shaping plastic tubesInstall the reflector nozzle.To prevent a kink in the tube, fill it with sand and close it on both sides. Heat the tube with consistent side-to-side motions.Set the temperature to 450°C
Flat reduction nozzle (Fig. B3)Removing paint or varnish / cleaning off adhesivesInstall the flat reduction nozzle.Soften the paint or varnish with hot air while lifting it with the scraper. Long heat exposure burns paint and varnish and makes removal difficult. Keep the scraper sharp and clean. Many adhesives (e.g., labels) are softened by heat. Bonds can then be broken or excess adhesive removed.Set the temperature to 450°C
Reduction nozzle (Fig. B4)shrinkingInstall the reduction nozzle.Use the reduction nozzle to heat small surfaces. The reduction nozzle’s diameter is 20 mm. Heat the shrinkable tubing consistently.Set the temperature to 450°C
solderingFor point soldering, install the reduction nozzle.
When using flux free soldering compound, put flux or soldering paste on the location to be soldered. Depending on the material, heat the solder location for 50–120 seconds. Add solder. The solder must melt at the work piece temperature. After the soldering area has cooled, remove the flux.Set the temperature to 600°C
operationFig. AYou can work manually with this hot air gun or you can put it in a vertical position.
Check if the mains switch is on position •“0” before you connect the apparatus;Keep the main lead always away from •the hot air stream and the mouth piece;Put the mains switch in position ‘I or II’ to •let your hot air gun operate:
“1” = 450 degrees, air flow 300 l/min. “0” = Off “2” = 600 degrees, air flow 500 l/min.
When the temperature is excess 600° C, the heats switches it off automatically, however, the heater continues to run. When the heater has cooled to operating temperature, the heater is switched on again.
switching off:Slide the switch to 0.
tip: For best results, test all work first on an inconspicuous part of the work piece.
Using the appliance
HAM6005 Ma-E # 0902-24.indd 25 2/24/09 4:11:08 PM

GB/MT26
4. Maintenance
Always disconnect the apparatus before carrying out inspection or cleaning. Never use water or other liquids to clean the electrical parts of the hot air gun.
Never use easy inflammable liquids for •cleaning the hot air gun, especially for the mouthpiece.Regular maintenance of your hot air gun •prevents unnecessary problems. Keep the ventilation slots of the hot air gun clean to prevent overheating.
troubleshootingIn case the hot air gun does not work well, we give you subjoined some possible causes and their solutions.
the engine gets overheated. The ventilation slots of the hot air gun are •dirty.
Clean the ventilation slots.•
the hot air gun does not start when it is switched on.
Interruption in the electrical circuit.• Check the mains lead and the mains •plug.
The switch is defective.• Pull the mains lead out of the wall •socket, because there is a chance of fire risk ! Have the hot air gun repaired at your local dealer.
the engine does not work, but it does heat.
Interruption in the electrical circuit.•
Pull the mains lead out of the wall •socket, because there is a chance of fire risk ! Have the hot air gun repaired at your local dealer.
MalfunctionsIf defects or interruptions in operation should occur (e.g., through wear and tear on a part), please contact our service department (see warranty card). The device contains no parts that can be replaced by the user. At the end of this manual, you will find a list of replacement parts that can be ordered, as well as an exploded diagram of the device.
5. DisPosal & WaRRanty
environmentTo prevent damage during transport, the appliance is delivered in a solid packaging which consists largely of reusable material.Therefore please make use of options for recycling the packaging.
Do not discard electric appliances together with ordinary household waste.
According to European Directive 2002/96/EG on used electrical and electronic devices and its implementation in national law, used electrical devices must be collected separately and recycled in an environmentally sound manner.Recycling alternatives to the return requirement: As an alternative to returning the device, in the case of a transfer of ownership, an electrical device owner is obliged to assist in proper utilisation.
Maintenance / Disposal & warranty
HAM6005 Ma-E # 0902-24.indd 26 2/24/09 4:11:08 PM

GB/MT 27
For this purpose, the used device can also be handed over to a collection facility that will see to its disposal in the accordance with the national circular economy and waste disposal law. Not affected are accessory parts and tools that accompany used devices but contain no electrical components.
WarrantyThe warranty conditions can be found on the separately enclosed warranty card.
6. DeclaRation oF conFoRMity / CE ManUFactUReR
We, Ferm BV, Lingenstraat 6, 8028PM, Zwolle, Netherlands, hereby declare that this product conforms to the following EU Directives:
ec low-Voltage Directive (2006/95/ec)
electromagnetic compatibility (2004/108/ec)
EN 60335-1, EN 60335-2-45, EN 55014-1, EN 55014-2, EN 61000-3-2, EN 61000-3-3,
EN62233
Product designation:Parkside Heat Gun PHG-2000
from 01-11-2008ZWolle nl
J.A. Bakker - van IngenCEO Ferm BV
J.F.J. StrikkersSenior Quality Manager Ferm BV
We reserve the right to make technical modifications in the course of product development.
Declaration of conformity / CE manufacturer
HAM6005 Ma-E # 0902-24.indd 27 2/24/09 4:11:09 PM

DE/AT28
Inhaltsverzeichnis
1. Informationen über das Gerät Seite 292. Sicherheitshinweise Seite 29-313. Einsatz des Geräts Seite 31-334. Reinigung & Wartung Seite 33-345. Entsorgung & Gewährleistung Seite 346. Konformitätserklärung / Hersteller CE Seite 357. Ersatzteilliste Seite 36-37
HAM6005 Ma-E # 0902-24.indd 28 2/24/09 4:11:09 PM

DE/AT 29
HeisslUFtGeBlÄse
Warnung! Lesen Sie die Anweisungen für elektrische Produkte vor dem Gebrauch stets aufmerksam durch. Dadurch gewinnen Sie ein besseres Verständnis des Produkts und können unnötige Risiken vermeiden. Heben Sie diese Anweisung an einem sicheren Platz auf, so dass sie jederzeit verfügbar ist.
1. inFoRMationen ÜBeR Das GeRÄt
technische Daten
Nennspannung 230 V~Nennfrequenz 50 HzLeistungsaufnahme 2000 WGewicht 0,62 kgSchutzart IP 20Position I Luftdurchsatz 300 l/min Lufttemperatur 450 °CPosition II Luftdurchsatz 500 l/min Lufttemperatur 600 °C
Verpackungsinhalt1 Heißluftgebläse1 Glasschutzdüse1 Hakendüse1 Reduzierflachdüse1 Reduzierdüse1 Bedienungsanleitung1 Garantieschein
Produktaufbau(Siehe Abbildung auf Seite 4)1. Lüftungsschlitze2. Austrittsdüse3. Schalter4. Glasschutzdüse5. Hakendüse6. Reduzierflachdüse7. Reduzierdüse
2. sicHeRHeitsHinWeise
erläuterung der symbole
Lebens- und Verletzungsgefahr und Gefahr von Beschädigungen am Gerät bei Nichteinhaltung der Sicherheitsvorschriften in dieser Anleitung.
Weist auf die Gefahr eines Stromschlags hin.
allgemeine sicherheitshinweiseAchtung! Sämtliche Anweisungen sind zu lesen. Fehler bei der Einhaltung der nachstehend aufgeführten Anweisungen können elektrischen Schlag, Brand und/oder schwere Verletzungen verursachen. Bewahren Sie diese Hinweise gut auf!
Wenn die Anschlussleitung beschädigt wird, muss diese durch eine besondere Anschlussleitung ersetzt werden. Diese erhalten Sie beim Hersteller oder seinem Kundendienst. Das Auswechseln der Anschlussleitung darf nur durch den Hersteller, seinen Kundendienst oder ähnlich qualifizierte Personen durchgeführt werden.
Informationen über das Gerät / Sicherheitshinweise
HAM6005 Ma-E # 0902-24.indd 29 2/24/09 4:11:09 PM

DE/AT30
Dieses Gerät ist nicht dafür bestimmt, durch Personen (einschließlich Kinder) mit eingeschränkten physischen, sensorischen oder geistigen Fähigkeiten oder mangels Erfahrung und/oder mangels Wissen benutzt zu werden.
Kinder sollten beaufsichtigt werden, um sicherzustellen, dass sie nicht mit dem Gerät spielen.
spezielle sicherheitshinweise für Heißluftgebläsea. Ein Brand kann entstehen, wenn mit dem
Gerät nicht sorgsam umgegangen wird.b. Vorsicht bei Gebrauch des Gerätes in der
Nähe brennbarer Materialien. Nicht für längere Zeit auf ein und dieselbe Stelle richten. Brandgefahr!
c. Nicht bei Vorhandensein einer explosionsfähigen Atmosphäre verwenden. Explosionsgefahr!
d. Wärme kann zu brennbaren Materialien geleitet werden, die verdeckt sind. Brandgefahr!
e. Nach Gebrauch auf die Standfläche stellen und abkühlen lassen, bevor es weggepackt wird. Brand- und Verletzungsgefahr!
f. Das Gerät nicht unbeaufsichtigt lassen, solange es in Betrieb ist. Brand- und Verletzungsgefahr!
Vor dem einsatz des GerätsEs besteht beim Einsatz des Geräts die •Gefahr von Verletzungen und Sachschäden durch elektrischen Schlag oder Brand. Prüfen Sie aus diesem Grunde vor dem Einsatz des Geräts Folgendes:
Stellen Sie sicher, dass der auf dem •Heißluftgebläse angegebene Spannungswert mit dem Wert der
Versorgungsspannung übereinstimmt.Prüfen Sie Netzkabel und •Netzstecker auf ordnungsgemäßen Zustand: Kabel und Stecker müssen ausreichend dimensioniert und für den Einsatzzweck geeignet sein; das Kabel darf nicht verwickelt oder beschädigt sein.
Verwenden Sie keine längeren •Verlängerungskabel als für den Verwendungszweck nötig!Stellen Sie vor dem Anschließen des •Steckers an die Netzsteckdose sicher, dass sich der Schalter in der Stellung „0“ befindet.Verwenden Sie das Gerät nicht in •feuchter Umgebung.Das Gerät darf nicht zum Trocknen von •Haaren oder menschlichen Körperteilen verwendet werden.Das Gerät darf nicht in einem Bad, über •Wasserbecken oder in Räumen, in denen leicht entflammbare Flüssigkeiten gehandhabt werden, verwendet werden.
Während des einsatzes des GerätsDie metallische Austrittsdüse wird heiß. Seien Sie aufmerksam und berühren die metallische Austrittsdüse nicht. Verbrennungsgefahr!Vermeiden Sie eine Beschädigung des Heizelements. Die Austrittsdüse weder verschließen noch blockieren.Das Gerät im eingeschalteten Zustand nicht unbeaufsichtigt lassen. Brandgefahr!
Während des Einsatzes des •Heißluftgebläses können kurzzeitig Dämpfe und Gase freigesetzt werden. Diese können gesundheitsgefährlich sein und insbesondere für Asthmatiker problematisch werden.
Sicherheitshinweise
HAM6005 Ma-E # 0902-24.indd 30 2/24/09 4:11:09 PM

DE/AT 31
Das Netzkabel stets von der •Austrittsdüse des Heißluftgebläses fernhalten, damit es nicht beschädigt wird.Kinder und Tiere während des Einsatzes •stets vom Gerät fernhalten.
Dieses Gerät funktioniert mit einer Temperatur von 600 Grad, ohne dass sichtbare Anzeichen dieser Temperatur vorhanden sind (keine Flammen), dennoch besteht Feuergefahr. Achten Sie auf den aus der Austrittsdüse austretenden Heißluftstrom.Der Heißluftstrom kann Verbrennungen hervorrufen.
Das Gerät in nachstehende Fällen sofort Ausschalten bei:
wenn Stecker bzw. Kabel beschädigt •sind.wenn der Schalter beschädigt ist.•wenn Rauch aus dem Heißluftgebläse •austritt bzw. wenn es verbrannt riecht.
elektrische sicherheitBeachten Sie beim Benutzen von Elektromaschinen immer eventuelle örtlich gültige Sicherheitsvorschriften bezüglich Feuerrisiko, Elektroschock und Verletzung. Informieren Sie sich diesbezüglich und beachten Sie diese Vorschriften ebenso wie die hier genannten Hinweise.
Überprüfen Sie immer, ob Ihre Netzspannung der des Typenschilds entspricht.
Gerät der Schutzklasse II – schutzisoliert – kein Schutzkontakt erforderlich.
austauschen von Kabeln oder steckernWenn die Netzanschlussleitung dieses Gerätes beschädigt wird, muss sie durch den Hersteller oder seinen Kundendienst oder eine ähnlich qualifizierte Person ersetzt werden, um Gefährdungen zu vermeiden.Entsorgen Sie alte Kabel oder Stecker, unmittelbar nachdem sie durch neue ersetzt wurden. Das Anschließen eines Steckers eines losen Kabels an eine Steckdose ist gefährlich.
Verwendung von VerlängerungskabelnBenutzen Sie nur ein geeignetes, zertifiziertes und entsprechend markiertes Verlängerungskabel, das der Maschinenleistung entspricht. Die Adern müssen einen Mindestquerschnitt von 1,5mm2 haben. Befindet das Kabel sich auf einem Haspel, muss es völlig abgerollt werden.
3. einsatZ Des GeRÄts
Das Heißluftgebläse kann für folgende Einsatzzwecke verwendet werden:
Installationsarbeiten wie •Rohrverbindungen, Löten, Rohrbiegen.
Entfernen von Farben, Anstrichen und •Lacken ohne Brandgefahr.
Schnelles Trocknen von nass •gewordenen Geräten.
Trocknen von Oberflächen für schnelle •Reparatur.
Sauberes Entfernen von •Siebdruckaufklebern.
Anbringen von PVC-Etiketten.• Nach dem Aufkleben von PVC-•Materialien entstandene Blasen können nach dem Anwärmen geglättet werden.
Problemloses Entfernen von Vinylböden.•
Sicherheitshinweise / Einsatz des Geräts
HAM6005 Ma-E # 0902-24.indd 31 2/24/09 4:11:10 PM
DE/AT32
Formen von Kunststoffen mit niedriger •Temperatur (450 °C) wie z.B. Polyethylen und PVC.
Formen von Kunststoffen mit hoher •Temperatur (580 °C) wie z.B. Akryl und Plexiglas.
Schmelzende Kunststoffe wie z.B. •Matten und Folien mit PVC-Schicht.
Aufbringen von Schrumpfschläuchen •und Schrumpffolien.
Reparieren von Deckschichten: Email •von Bad- und Haushaltsgeräten.
Aufbringen von •Epoxidpulverbeschichtungen.
Reparieren von Skibrettern, Surfboards •und anderen Sportgeräten.
Lösen von überzogenen Schrauben und •festsitzenden Verbindungen.
Bitte beachten Sie: Das Gerät ist ausschließlich für den Gebrauch in Privathaushalten vorgesehen. Eine gewerbliche oder vergleichbare Nutzung ist nicht bestimmungsgemäß und lässt sämtliche Garantieansprüche erlöschen.
anbringen und auswechseln der DüsenWählen Sie stets die für den Einsatzzweck am besten geeignete Düse aus. Installieren bzw. tauschen Sie die Düse nur, wenn das Gerät vollständig abgekühlt ist. Gehen Sie vorsichtig vor und achten Sie auf scharfe Kanten, die sich zum Teil funktionsbedingt an den Düsen befinden. Sie können die Düsen durch einfaches Abziehen von der Austrittsdüse entfernen, bzw. durch Aufschieben anbringen. U.U. müssen Sie dies durch leichte Drehbewegungen unterstützen.
Vorsatzdüsen verwendenZu starke Hitzeeinwirkung lässt Farben und Kunststoffe entflammen.Gefahr! Atmen Sie entstehende Dämpfe nicht ein.
Glasschutzdüse (Abb. B1)lack von Fenstern entfernen. Glasbruchgefahr!Unbedingt die Glasschutzdüse verwenden, wenn Sie an Glas oder anderen empfindlichen Oberflächen arbeiten.Auf profilierten Flächen kann der Lack mit dem passenden Spachtel abgehoben und mit einer weichen Drahtbürste abgebürstet werden.Temperatur einstellen auf 450°C
Hakendüse (Abb. B2)Kunststoffrohre verformenReflektordüse aufsetzen.Um ein Abknicken des Rohres zu verhindern, muss dieses mit Sand gefüllt und beidseitig verschlossen werden. Rohr gleichmäßig durch seitliches Hin- und Herbewegen erwärmen.Temperatur einstellen auf 450°C
Reduzierflachdüse (Abb. B3)lack entfernen/Kleber lösenReduzierflachdüse aufsetzen. Lack mit Heißluft aufweichen und gleichmäßig mit Spachtel abheben. Lange Hitzeeinwirkung verbrennt den Lack und erschwert das Entfernen. Der Spachtel sollte scharf und sauber gehalten werden.Viele Klebemittel (z.B. Aufkleber) werden durch Wärme weich. Verbindungen können dann getrennt oder überschüssiger Kleber entfernt werden.Temperatur einstellen auf 450°C
Einsatz des Geräts
HAM6005 Ma-E # 0902-24.indd 32 2/24/09 4:11:10 PM

DE/AT 33
Reduzierdüse (Abb. B4)schrumpfenReduzierdüse aufsetzen.Nutzen Sie die Reduzierdüse für das Erhitzen von kleinen Flächen. Der Durchmesser der Reduzierdüse beträgt 20mm.Den Schrumpfschlauch gleichmäßig erwärmen.Temperatur einstellen auf 450°C
WeichlötenFür Punktlötungen Reduzierdüse aufsetzen.Wird Lot ohne Flussmittel verwendet, Lötfett oder Lötpaste auf die Lötstelle geben. Lötstelle je nach Material etwa 50–120 s erwärmen. Lot zugeben. Das Lot muss durch die Werkstücktemperatur schmelzen. Nach Erkalten der Lötstelle Flussmittel entfernen.Temperatur einstellen auf 600°C
BetriebAbb. ASie können dieses Heißluftgebläse von Hand führen oder es zum Arbeiten senkrecht hinstellen.
Kontrollieren Sie, ob der Schalter in der •Position “0” steht, bevor Sie den Netzstecker in die Steckdose stecken.Halten Sie die Zuleitung immer von dem •Heißluftstrom und der Austrittsdüse fern.Wählen Sie eine der beiden •Schalterstellungen, um das Gerät einzuschalten
l = 450 ºC, Luftdurchsatz 300 l/minll = 600 ºC, Luftdurchsatz 500 l/min
Wenn die Temperatur 600° C überschreitet, schaltet die Hitze das Heizelement automatisch ab, wobei aber das Gebläse weiterläuft. Nachdem sich das Gerät auf Betriebstemperatur abgekühlt hat, wird das Heizelement erneut eingeschaltet.
ausschalten: Den Schalter auf 0 stellen.
tipp: Probieren Sie alle Arbeiten zunächst an einer unauffälligen Stelle des Werkstücks aus, um ein optimales Ergebnis zu erreichen.
4. ReiniGUnG & WaRtUnG
Trennen Sie vor der Durchführung von Inspektions- oder Reinigungsarbeiten das Gerät immer vom Netz. Die elektrischen Komponenten dem Heißluftgebläse nie mit Wasser oder anderen Flüssigkeiten reinigen. Es besteht die Gefahr eines elektrischen Schlages.
Das Heißluftgebläse und insbesondere •die Austrittsdüse nie mit leicht entflammbaren Flüssigkeiten reinigen. Es besteht Brandgefahr.Durch regelmäßige Pflege des •Heißluftgebläses lassen sich unnötige Probleme vermeiden. Die Lüftungsschlitze des Heißluftgebläses stets sauber halten, damit sich das Gerät nicht überhitzen kann.
störungssucheNachfolgend aufgelistet finden Sie eine Übersicht über mögliche Funktionsstörungen sowie Hinweise, wie Sie diese beheben können.
Der Motor ist überhitzt Die Lüftungsschlitze des •Heißluftgebläses sind verschmutzt.
Die Lüftungsschlitze reinigen.•
Einsatz des Geräts / Reinigung & Wartung
HAM6005 Ma-E # 0902-24.indd 33 2/24/09 4:11:11 PM
DE/AT34
Das Heißluftgebläse startet nicht, wenn es eingeschaltet wird
Unterbrechung im Stromkreis.• Netzkabel und Netzstecker prüfen.•
Der Schalter ist defekt.• Den Netzstecker aus der Steckdose •ziehen, da Feuergefahr besteht! Das Heißluftgebläse vom Kundendienst reparieren lassen.
Der Motor läuft nicht, aber er heizt Unterbrechung im Stromkreis.•
Den Netzstecker aus der Steckdose •ziehen, da Feuergefahr besteht! Das Heißluftgebläse vom Kundendienst reparieren lassen.
FunktionsstörungenSollten Fehler oder Störungen im Betrieb auftreten, die nicht zuvor beschrieben sind, z.B. durch Verschleiß eines Teils, nehmen Sie bitte Kontakt mit unserem Kundendienst (siehe Garantiekarte) auf. Das Gerät enthält keine vom Benutzer austauschbaren Teile. Am Ende dieses Handbuchs finden Sie eine Liste der Ersatzteile, die bestellt werden können, sowie eine Explosionsdarstellung des Geräts.
5. entsoRGUnG & GeWÄHRleistUnG
UmweltschutzUm Schäden beim Transport zu vermeiden, wird das Gerät in einer stabilen Verpackung geliefert, die größtenteils aus wiederverwertbaren Materialien besteht. Wir bitten Sie deshalb, die Möglichkeiten zum Recyceln der Verpackung zu nutzen.
Entsorgen Sie Elektrogeräte nicht über den Hausmüll.Gemäß europäischer Richtlinie
2002/96/EG über Elektro-und Elektronik-Altgeräte und Umsetzung in nationales Recht müssen verbrauchte Elektrogeräte getrennt gesammelt werden und einer umweltgerechten Wiederverwertung zugeführt werden.Recycling-Alternative zur Rücksendeaufforderung: Der Eigentümer des Elektrogerätes ist alternativ anstelle der Rücksendung zur Mitwirkung bei der sachgerechten Verwertung im Falle der Eigentumsaufgabe verpflichtet. Das Altgerät kann hierfür auch einer Rücknahmestelle überlassen werden, die eine Beseitigung im Sinne des nationalen Kreislaufwirtschafts und Abfallgesetzes durchführt.Nicht betroffen sind den Altgeräten beigefügte Zubehörteile und Hilfsmittel ohne Elektrobestandteile.
GarantieDie Garantiebestimmungen können der mitgelieferten Garantiekarte entnommen werden.
Reinigung & Wartung / Entsorgung & Gewährleistung
HAM6005 Ma-E # 0902-24.indd 34 2/24/09 4:11:11 PM

DE/AT 35
6. KonFoRMitÄtseRKlÄRUnG / HeRstelleR CE
Wir, Ferm BV, Lingenstraat 6, 8028PM Zwolle, Niederlande, erklären hiermit für dieses Produkt die Übereinstimmung mit folgenden EG-Richtlinien und harmonisierten Normen:
niederspannungsrichtlinie (2006/95/eG)
Richtlinie zur elektromagnetischen Verträglichkeit (2004/108/eG)
EN 60335-1, EN 60335-2-45, EN 55014-1, EN 55014-2, EN 61000-3-2, EN 61000-3-3,
EN62233
typ / Gerätebezeichnung:Parkside Heißluftgebläse PHG-2000
ab 01-11-2008ZWolle nl
J.A. Bakker - van IngenCEO Ferm BV
J.F.J. StrikkersSenior Quality Manager Ferm BV
Technische Änderungen im Sinne der Weiterentwicklung sind vorbehalten.
Konformitätserklärung / Hersteller CE
HAM6005 Ma-E # 0902-24.indd 35 2/24/09 4:11:11 PM
36
7. lista De PieZas De RecaMBio
nº. Descripción Posición 408800 Motor, completo 2 a 7 408801 Elemento de calentamiento, completo 8 a 10 408802 Interruptor 11
7. elenco Di PaRti Di RicaMBio
n. Descrizione Posizione 408800 Motore, completo da 2 a 7 408801 Elemento riscaldante, completo da 8 a 10 408802 Interruttore 11
7. list oF RePlaceMent PaRts
no. Description Position 408800 Motor, complete 2 to 7 408801 Heating element, complete 8 to 10 408802 Switch 11
7. eRsatZteilliste
no. Umschreibung Position 408800 Motor komplett 2 bis 7 408801 Heizelement komplett 8 bis 10 408802 Schalter 11
HAM6005 Ma-E # 0902-24.indd 36 2/24/09 4:11:11 PM

37
Exploded view
HAM6005 Ma-E # 0902-24.indd 37 2/24/09 4:11:12 PM

38
HAM6005 Ma-E # 0902-24.indd 38 2/24/09 4:11:12 PM