za pack tyxia 540 / 545 - 123alarme.fr utilisation pack... · • posibilidad de alargar hasta 10 m...
TRANSCRIPT
*2703462_Rev.3*
www.deltadore.com
4
2
1 3
Association / Association / Einlernen / Associazione / Asociación / Przypisanie / Koppeling
1 2 3
OFF
OFF
230V~50 Hz
ON
ON
... ... ...
230V~50 Hz
OK
> 3s
> 3s
> 3s
> 3s
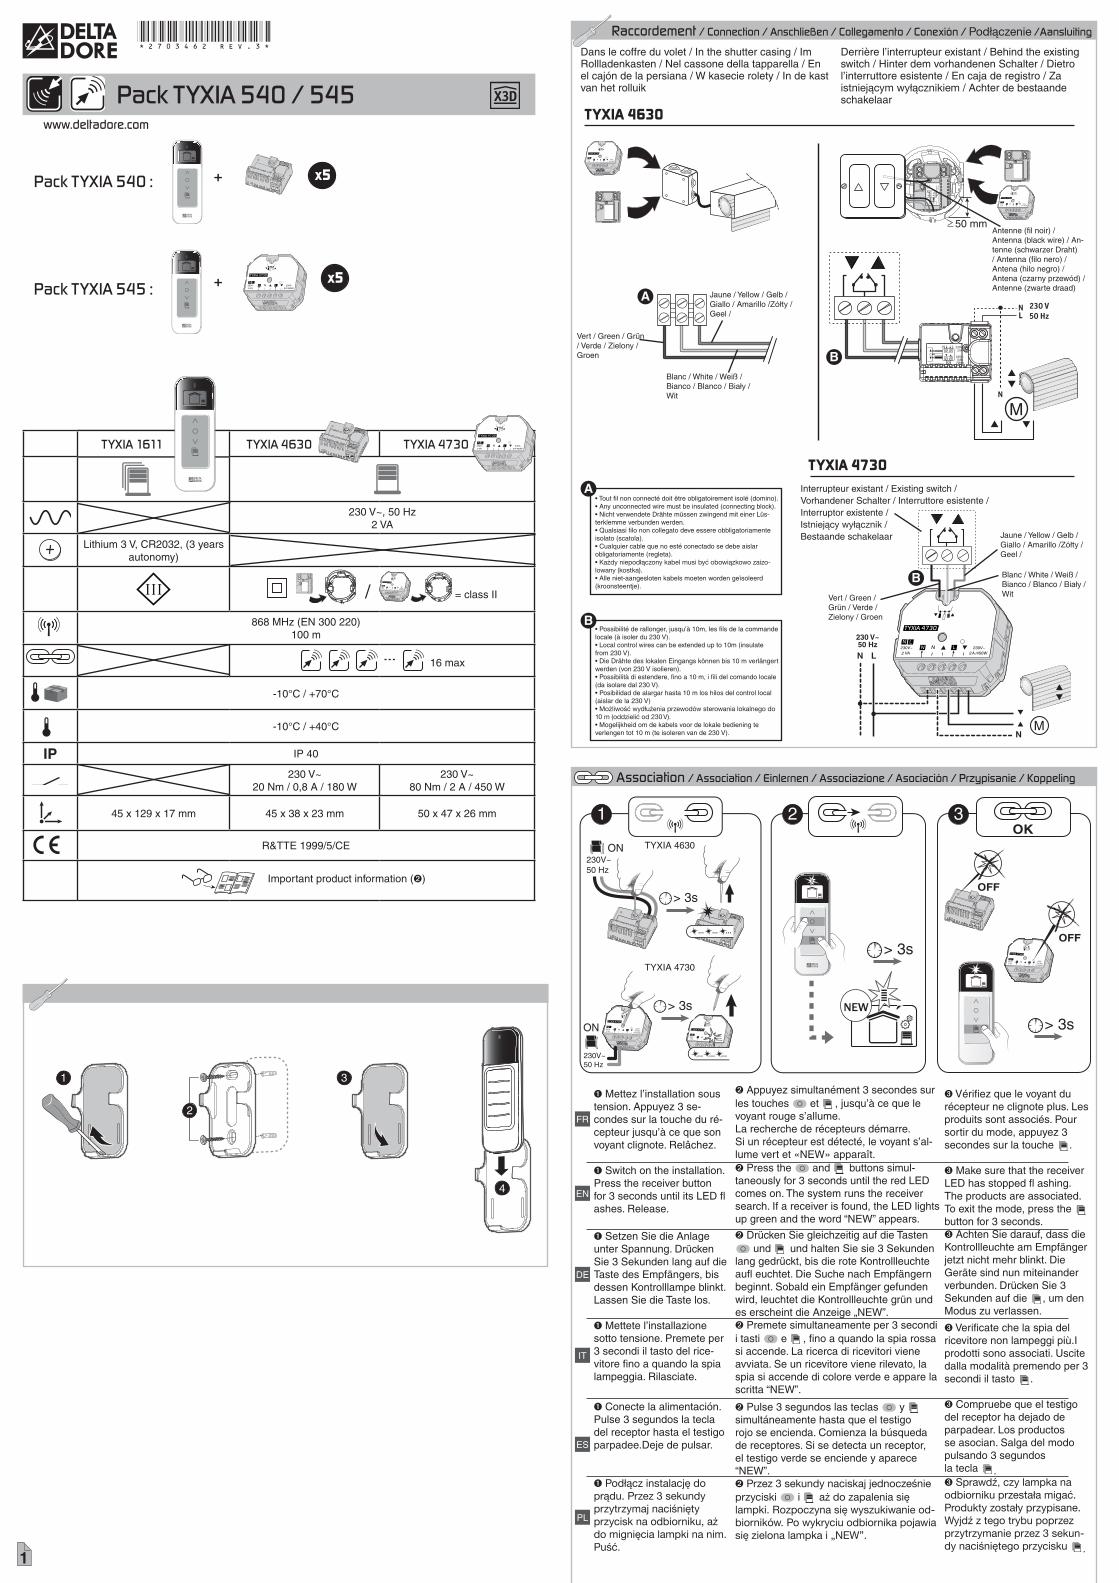
Ê Mettez l’installation sous tension. Appuyez 3 se-condes sur la touche du ré-cepteur jusqu’à ce que son voyant clignote. Relâchez.
Ê Switch on the installation. Press the receiver button for 3 seconds until its LED fl ashes. Release.
Ê Setzen Sie die Anlage unter Spannung. Drücken Sie 3 Sekunden lang auf die Taste des Empfängers, bis dessen Kontrolllampe blinkt. Lassen Sie die Taste los.
Ê Mettete l’installazione sotto tensione. Premete per 3 secondi il tasto del rice-vitore fi no a quando la spia lampeggia. Rilasciate.
Ê Conecte la alimentación. Pulse 3 segundos la tecla del receptor hasta el testigo parpadee.Deje de pulsar.
Ê Pod³¹cz instalacjê do pr¹du. Przez 3 sekundy przytrzymaj naciśniêty przycisk na odbiorniku, a¿ do migniêcia lampki na nim. Puśæ.
Ê Zet de installatie onder spanning. Druk gedurende 3 seconden op de toets van de ontvanger tot het lampje knippert. Laat de toets los.
Ë Appuyez simultanément 3 secondes sur les touches et , jusqu’à ce que le voyant rouge s’allume.La recherche de récepteurs démarre.Si un récepteur est détecté, le voyant s’al-lume vert et «NEW» apparaît.Ë Press the and buttons simul-taneously for 3 seconds until the red LED comes on. The system runs the receiver search. If a receiver is found, the LED lights up green and the word “NEW” appears.
Ë Drücken Sie gleichzeitig auf die Tasten und und halten Sie sie 3 Sekunden
lang gedrückt, bis die rote Kontrollleuchte aufl euchtet. Die Suche nach Empfängern beginnt. Sobald ein Empfänger gefunden wird, leuchtet die Kontrollleuchte grün und es erscheint die Anzeige „NEW”. Ë Premete simultaneamente per 3 secondi i tasti e , fi no a quando la spia rossa si accende. La ricerca di ricevitori viene avviata. Se un ricevitore viene rilevato, la spia si accende di colore verde e appare la scritta “NEW”.
Ë Pulse 3 segundos las teclas y simultáneamente hasta que el testigo rojo se encienda. Comienza la búsqueda de receptores. Si se detecta un receptor, el testigo verde se enciende y aparece “NEW”.Ë Przez 3 sekundy naciskaj jednocześnie przyciski i a¿ do zapalenia siê lampki. Rozpoczyna siê wyszukiwanie od-biorników. Po wykryciu odbiornika pojawia siê zielona lampka i „NEW”.
Ë Druk 3 seconden gelijktijdig op de toetsen en totdat het rode lampje oplicht. De ontvanger wordt nu opgespoord. Wanneer de ontvanger wordt gedetecteerd, licht het lampje groen op en verschijnt “NEW” op het scherm.
Ì Vérifi ez que le voyant du récepteur ne clignote plus. Les produits sont associés. Pour sortir du mode, appuyez 3 secondes sur la touche .
Ì Make sure that the receiver LED has stopped fl ashing. The products are associated. To exit the mode, press the button for 3 seconds.Ì Achten Sie darauf, dass die Kontrollleuchte am Empfänger jetzt nicht mehr blinkt. Die Geräte sind nun miteinander verbunden. Drücken Sie 3 Sekunden auf die , um den Modus zu verlassen.
Ì Verifi cate che la spia delricevitore non lampeggi più.Iprodotti sono associati. Uscite dalla modalità premendo per 3 secondi il tasto .
Ì Compruebe que el testigodel receptor ha dejado deparpadear. Los productos se asocian. Salga del modo pulsando 3 segundos la tecla .Ì Sprawdź, czy lampka naodbiorniku przesta³a migaæ.Produkty zosta³y przypisane. Wyjdź z tego trybu poprzezprzytrzymanie przez 3 sekun-dy naciśniêtego przycisku .
Ì Controleer of het controle-lampje van de ontvanger niet meer knippert. De producten zijn met elkaar verbonden. Verlaat de modus door 3 seconden lang op de knop te drukken.
FR
EN
DE
IT
ES
PL
NL
Créer un groupe / Create a group / Erstellen einer Gruppe / Creare un gruppo / Crear un grupo / Tworzenie grupy / Een groep aanmaken
Ê Appuyez 3 secondes sur la touche ,
jusqu’à ce que le symbole clignote.
Ê Press the button for 3 seconds
until the symbol fl ashes.
Ê Drücken Sie 3 Sekunden lang auf die , bis das Symbol blinkt.
Ê Premete per 3 secondi il tasto , fi no a quando il simbolo lampeggia.
Ê Pulse 3 segundos la tecla hasta que el
símbolo parpadee.
Ê Przez 3 sekundy przytrzymaj naciśniêty przycisk a¿ zacznie migaæ symbol.
Ê Druk gedurende 3 seconden op de toets
totdat het symbool knippert.
Ë Par appuis successifs sur la touche , sélectionnez le groupe à créer
(ex: 2).
Ë Press the buttonseveral times to select the group tocreate (e.g.: 2).
Ë Wählen Sie durch mehrfacheBetätigung der die Gruppe, die angelegt werden soll (z.B. 2).
Ë Premendo ripetutamente il tasto , selezionate il gruppo da creare
(es.: 2).
Ë Pulsando varias veces seguidas latecla , seleccione el grupo que desea crear (ej.: 2).
Ë Poprzez kolejne naciśniêcia przy-cisku wybierz grupê, któr¹chcesz utworzyæ (np.: 2).
Ë Selecteer de groep die u wiltaanmaken (bv.: 2) door meermaals op de toets te drukken.
Ì Pour ajouter/enlever un récepteur à un groupe :Par appuis successifs sur la touche , sélectionnez le(s) récepteur(s). Son voyant clignote et l’élément commandé s’actionne (volet).Í Sélectionnez par les touches et :«IN» pour l’ajouter, «OUT» pour l’enlever.Recommencer pour chaque récepteur.
Ì To add/remove a receiver to or from a group :Press the button several times to select the receiver(s).The LED fl ashes and the controlled element is actuated (roller shutter).Í Select using the and buttons: “IN” to add, “OUT” to remove.Repeat the procedure for each receiver.
Ì Hinzufügen/Entfernen eines Empfängers zu/von einer Gruppe :Wählen Sie durch mehrfache Betätigung der Taste den/die Empfänger. Die entsprechendeKontrollleuchte blinkt und das angesteuerte Element wird eingeschaltet (Rollladen).Í Auswahl über die Tasten und : Hinzufügen mit „IN”, Entfernen mit „OUT”.Wiederholen Sie den Vorgang für jeden Empfänger.
Ì Per aggiungere a/rimuovere un ricevitore da un gruppo :Premendo ripetutamente il tasto , selezionate il o i ricevitori.La spia relativa lampeggia e l’elemento comandato si aziona (tapparella).Í Selezionate usando i tasti e : “IN” per aggiungerlo, “OUT” per rimuoverlo.Ripetete per ogni ricevitore.
Ì Para agregar/quitar un receptor de un grupo :Pulsando varias veces la tecla , seleccione el/los receptor(es).La luz parpadea y el elemento de control se activa (persiana).Í Seleccione mediante las teclas y : “IN” para agregar, “OUT” para quitar.Volver a comenzar por cada receptor.
Ì Dodawanie odbiornika do grupy/usuwanie odbiornika z grupy :Poprzez kolejne naciśniêcia przycisku wybierz odbiornik(i).Lampka na odbiorniku miga i uruchomiony zostaje sterowany element (roleta).Í Wybierz przyciski i : „IN”, by dodaæ, „OUT”, by usun¹æ.Powtórz te czynności dla ka¿dego odbiornika.
Ì Om een ontvanger aan een groep toe te voegen/uit een groep te verwijderen :Selecteer de ontvanger(s) door meermaals op de toets te drukken.Het lampje knippert en de bediende component wordt geactiveerd (rolluik).Í Selecteer via de toetsen en : “IN” om toe te voegen, “OUT” om te verwijderen.Doe dit voor elke ontvanger.
Ì Sortez du mode en appuyant 3 secondes sur la touche .
Ì To exit the mode, press the button for 3 seconds.
Ì Drücken Sie 3 Sekunden auf die Taste, um den Modus zu verlassen.
Ì Uscite dalla modalità pre-mendo per 3 secondi il tasto
.
Ì Salga del modo pulsando 3 segundos la tecla .
Ì Wyjdź z tego trybu poprzezprzytrzymanie przez 3 sekundynaciśniêtego przycisku .
Ì Verlaat de modus door 3 seconden lang op de knop te drukken.
FR
EN
DE
IT
ES
PL
NL
1
4
x 2> 3s
> 3s
1 2 4 53
1
Pack TYXIA 540 / 545
Pack TYXIA 540 : +
+ 230V~2 VA
N L
TYXIA 4730
230V~2A /450W
LN NPack TYXIA 545 :
Raccordement / Connection / Anschließen / Collegamento / Conexión / Pod³¹czenie /Aansluiting
230 V~50 Hz 230V~
2 VA
N L
TYXIA 4730
230V~2A /450W
LN N
Derrière l’interrupteur existant / Behind the existingswitch / Hinter dem vorhandenen Schalter / Dietrol’interruttore esistente / En caja de registro / Za istniej¹cym wy³¹cznikiem / Achter de bestaande schakelaar
Interrupteur existant / Existing switch /Vorhandener Schalter / Interruttore esistente / Interruptor existente / Istniej¹cy wy³¹cznik /Bestaande schakelaar
Dans le coffre du volet / In the shutter casing / ImRollladenkasten / Nel cassone della tapparella / Enel cajón de la persiana / W kasecie rolety / In de kastvan het rolluik
TYXIA 4630
TYXIA 4730
M27
2128
3 R
ev3
230
V~
2VA
230
V~
1A m
ax
50 mm
LN
N
230 V50 Hz
230V~2 VA
N L
TYXIA 4730
230V~2A /450W
LN N
230V~2 VA
N L
TYXIA 4730
230V~2A /450W
LN N
Jaune / Yellow / Gelb / Giallo / Amarillo /Zó³ty /Geel /
Jaune / Yellow / Gelb / Giallo / Amarillo /Zó³ty / Geel /
Blanc / White / Weiß / Bianco / Blanco / Bia³y / Wit
Blanc / White / Weiß / Bianco / Blanco / Bia³y / Wit
Vert / Green / Grün / Verde / Zielony / Groen
Antenne (fi l noir) /Antenna (black wire) / An-tenne (schwarzer Draht) / Antenna (fi lo nero) / Antena (hilo negro) / Antena (czarny przewód) / Antenne (zwarte draad)
Vert / Green / Grün / Verde / Zielony / Groen
A
B
• Tout fi l non connecté doit être obligatoirement isolé (domino).• Any unconnected wire must be insulated (connecting block).• Nicht verwendete Drähte müssen zwingend mit einer Lüs-terklemme verbunden werden.• Qualsiasi fi lo non collegato deve essere obbligatoriamente isolato (scatola).• Cualquier cable que no esté conectado se debe aislar obligatoriamente (regleta).• Ka¿dy niepod³¹czony kabel musi byæ obowi¹zkowo zaizo-lowany (kostka).• Alle niet-aangesloten kabels moeten worden geïsoleerd (kroonsteentje).
A
• Possibilité de rallonger, jusqu’à 10m, les fi ls de la commande locale (à isoler du 230 V).• Local control wires can be extended up to 10m (insulate from 230 V).• Die Drähte des lokalen Eingangs können bis 10 m verlängert werden (von 230 V isolieren).• Possibilità di estendere, fi no a 10 m, i fi li del comando locale (da isolare dal 230 V).• Posibilidad de alargar hasta 10 m los hilos del control local (aislar de la 230 V)• Mo¿liwośæ wyd³u¿enia przewodów sterowania lokalnego do 10 m (oddzieliæ od 230 V).• Mogelijkheid om de kabels voor de lokale bediening te verlengen tot 10 m (te isoleren van de 230 V).
B
B
TYXIA 4630
TYXIA 4730
x5
x5
TYXIA 1611 TYXIA 4630 TYXIA 4730
2 x
1 x
+230 V~, 50 Hz2 VA
Lithium 3 V, CR2032, (3 years autonomy)
/ = class II
868 MHz (EN 300 220)100 m
16 max
-10°C / +70°C
-10°C / +40°C
IP IP 40
230 V~20 Nm / 0,8 A / 180 W
230 V~80 Nm / 2 A / 450 W
45 x 129 x 17 mm 45 x 38 x 23 mm 50 x 47 x 26 mm
R&TTE 1999/5/CE
Important product information (Ë)
230V~2 VA
N L
TYXIA 4730
230V~2A /450W
LN N
1
2

*2703462_Rev.3*
www.deltadore.com
4
2
1 3
Association / Association / Einlernen / Associazione / Asociación / Przypisanie / Koppeling
1 2 3
OFF
OFF
230V~50 Hz
ON
ON
... ... ...
230V~50 Hz
OK
> 3s
> 3s
> 3s
> 3s
Ê Mettez l’installation sous tension. Appuyez 3 se-condes sur la touche du ré-cepteur jusqu’à ce que son voyant clignote. Relâchez.
Ê Switch on the installation. Press the receiver button for 3 seconds until its LED fl ashes. Release.
Ê Setzen Sie die Anlage unter Spannung. Drücken Sie 3 Sekunden lang auf die Taste des Empfängers, bis dessen Kontrolllampe blinkt. Lassen Sie die Taste los.
Ê Mettete l’installazione sotto tensione. Premete per 3 secondi il tasto del rice-vitore fi no a quando la spia lampeggia. Rilasciate.
Ê Conecte la alimentación. Pulse 3 segundos la tecla del receptor hasta el testigo parpadee.Deje de pulsar.
Ê Pod³¹cz instalacjê do pr¹du. Przez 3 sekundy przytrzymaj naciśniêty przycisk na odbiorniku, a¿ do migniêcia lampki na nim. Puśæ.
Ê Zet de installatie onder spanning. Druk gedurende 3 seconden op de toets van de ontvanger tot het lampje knippert. Laat de toets los.
Ë Appuyez simultanément 3 secondes sur les touches et , jusqu’à ce que le voyant rouge s’allume.La recherche de récepteurs démarre.Si un récepteur est détecté, le voyant s’al-lume vert et «NEW» apparaît.Ë Press the and buttons simul-taneously for 3 seconds until the red LED comes on. The system runs the receiver search. If a receiver is found, the LED lights up green and the word “NEW” appears.
Ë Drücken Sie gleichzeitig auf die Tasten und und halten Sie sie 3 Sekunden
lang gedrückt, bis die rote Kontrollleuchte aufl euchtet. Die Suche nach Empfängern beginnt. Sobald ein Empfänger gefunden wird, leuchtet die Kontrollleuchte grün und es erscheint die Anzeige „NEW”. Ë Premete simultaneamente per 3 secondi i tasti e , fi no a quando la spia rossa si accende. La ricerca di ricevitori viene avviata. Se un ricevitore viene rilevato, la spia si accende di colore verde e appare la scritta “NEW”.
Ë Pulse 3 segundos las teclas y simultáneamente hasta que el testigo rojo se encienda. Comienza la búsqueda de receptores. Si se detecta un receptor, el testigo verde se enciende y aparece “NEW”.Ë Przez 3 sekundy naciskaj jednocześnie przyciski i a¿ do zapalenia siê lampki. Rozpoczyna siê wyszukiwanie od-biorników. Po wykryciu odbiornika pojawia siê zielona lampka i „NEW”.
Ë Druk 3 seconden gelijktijdig op de toetsen en totdat het rode lampje oplicht. De ontvanger wordt nu opgespoord. Wanneer de ontvanger wordt gedetecteerd, licht het lampje groen op en verschijnt “NEW” op het scherm.
Ì Vérifi ez que le voyant du récepteur ne clignote plus. Les produits sont associés. Pour sortir du mode, appuyez 3 secondes sur la touche .
Ì Make sure that the receiver LED has stopped fl ashing. The products are associated. To exit the mode, press the button for 3 seconds.Ì Achten Sie darauf, dass die Kontrollleuchte am Empfänger jetzt nicht mehr blinkt. Die Geräte sind nun miteinander verbunden. Drücken Sie 3 Sekunden auf die , um den Modus zu verlassen.
Ì Verifi cate che la spia delricevitore non lampeggi più.Iprodotti sono associati. Uscite dalla modalità premendo per 3 secondi il tasto .
Ì Compruebe que el testigodel receptor ha dejado deparpadear. Los productos se asocian. Salga del modo pulsando 3 segundos la tecla .Ì Sprawdź, czy lampka naodbiorniku przesta³a migaæ.Produkty zosta³y przypisane. Wyjdź z tego trybu poprzezprzytrzymanie przez 3 sekun-dy naciśniêtego przycisku .
Ì Controleer of het controle-lampje van de ontvanger niet meer knippert. De producten zijn met elkaar verbonden. Verlaat de modus door 3 seconden lang op de knop te drukken.
FR
EN
DE
IT
ES
PL
NL
Créer un groupe / Create a group / Erstellen einer Gruppe / Creare un gruppo / Crear un grupo / Tworzenie grupy / Een groep aanmaken
Ê Appuyez 3 secondes sur la touche ,
jusqu’à ce que le symbole clignote.
Ê Press the button for 3 seconds
until the symbol fl ashes.
Ê Drücken Sie 3 Sekunden lang auf die , bis das Symbol blinkt.
Ê Premete per 3 secondi il tasto , fi no a quando il simbolo lampeggia.
Ê Pulse 3 segundos la tecla hasta que el
símbolo parpadee.
Ê Przez 3 sekundy przytrzymaj naciśniêty przycisk a¿ zacznie migaæ symbol.
Ê Druk gedurende 3 seconden op de toets
totdat het symbool knippert.
Ë Par appuis successifs sur la touche , sélectionnez le groupe à créer
(ex: 2).
Ë Press the buttonseveral times to select the group tocreate (e.g.: 2).
Ë Wählen Sie durch mehrfacheBetätigung der die Gruppe, die angelegt werden soll (z.B. 2).
Ë Premendo ripetutamente il tasto , selezionate il gruppo da creare
(es.: 2).
Ë Pulsando varias veces seguidas latecla , seleccione el grupo que desea crear (ej.: 2).
Ë Poprzez kolejne naciśniêcia przy-cisku wybierz grupê, któr¹chcesz utworzyæ (np.: 2).
Ë Selecteer de groep die u wiltaanmaken (bv.: 2) door meermaals op de toets te drukken.
Ì Pour ajouter/enlever un récepteur à un groupe :Par appuis successifs sur la touche , sélectionnez le(s) récepteur(s). Son voyant clignote et l’élément commandé s’actionne (volet).Í Sélectionnez par les touches et :«IN» pour l’ajouter, «OUT» pour l’enlever.Recommencer pour chaque récepteur.
Ì To add/remove a receiver to or from a group :Press the button several times to select the receiver(s).The LED fl ashes and the controlled element is actuated (roller shutter).Í Select using the and buttons: “IN” to add, “OUT” to remove.Repeat the procedure for each receiver.
Ì Hinzufügen/Entfernen eines Empfängers zu/von einer Gruppe :Wählen Sie durch mehrfache Betätigung der Taste den/die Empfänger. Die entsprechendeKontrollleuchte blinkt und das angesteuerte Element wird eingeschaltet (Rollladen).Í Auswahl über die Tasten und : Hinzufügen mit „IN”, Entfernen mit „OUT”.Wiederholen Sie den Vorgang für jeden Empfänger.
Ì Per aggiungere a/rimuovere un ricevitore da un gruppo :Premendo ripetutamente il tasto , selezionate il o i ricevitori.La spia relativa lampeggia e l’elemento comandato si aziona (tapparella).Í Selezionate usando i tasti e : “IN” per aggiungerlo, “OUT” per rimuoverlo.Ripetete per ogni ricevitore.
Ì Para agregar/quitar un receptor de un grupo :Pulsando varias veces la tecla , seleccione el/los receptor(es).La luz parpadea y el elemento de control se activa (persiana).Í Seleccione mediante las teclas y : “IN” para agregar, “OUT” para quitar.Volver a comenzar por cada receptor.
Ì Dodawanie odbiornika do grupy/usuwanie odbiornika z grupy :Poprzez kolejne naciśniêcia przycisku wybierz odbiornik(i).Lampka na odbiorniku miga i uruchomiony zostaje sterowany element (roleta).Í Wybierz przyciski i : „IN”, by dodaæ, „OUT”, by usun¹æ.Powtórz te czynności dla ka¿dego odbiornika.
Ì Om een ontvanger aan een groep toe te voegen/uit een groep te verwijderen :Selecteer de ontvanger(s) door meermaals op de toets te drukken.Het lampje knippert en de bediende component wordt geactiveerd (rolluik).Í Selecteer via de toetsen en : “IN” om toe te voegen, “OUT” om te verwijderen.Doe dit voor elke ontvanger.
Ì Sortez du mode en appuyant 3 secondes sur la touche .
Ì To exit the mode, press the button for 3 seconds.
Ì Drücken Sie 3 Sekunden auf die Taste, um den Modus zu verlassen.
Ì Uscite dalla modalità pre-mendo per 3 secondi il tasto
.
Ì Salga del modo pulsando 3 segundos la tecla .
Ì Wyjdź z tego trybu poprzezprzytrzymanie przez 3 sekundynaciśniêtego przycisku .
Ì Verlaat de modus door 3 seconden lang op de knop te drukken.
FR
EN
DE
IT
ES
PL
NL
1
4
x 2> 3s
> 3s
1 2 4 53
1
Pack TYXIA 540 / 545
Pack TYXIA 540 : +
+ 230V~2 VA
N L
TYXIA 4730
230V~2A /450W
LN NPack TYXIA 545 :
Raccordement / Connection / Anschließen / Collegamento / Conexión / Pod³¹czenie /Aansluiting
230 V~50 Hz 230V~
2 VA
N L
TYXIA 4730
230V~2A /450W
LN N
Derrière l’interrupteur existant / Behind the existingswitch / Hinter dem vorhandenen Schalter / Dietrol’interruttore esistente / En caja de registro / Za istniej¹cym wy³¹cznikiem / Achter de bestaande schakelaar
Interrupteur existant / Existing switch /Vorhandener Schalter / Interruttore esistente / Interruptor existente / Istniej¹cy wy³¹cznik /Bestaande schakelaar
Dans le coffre du volet / In the shutter casing / ImRollladenkasten / Nel cassone della tapparella / Enel cajón de la persiana / W kasecie rolety / In de kastvan het rolluik
TYXIA 4630
TYXIA 4730
M27
2128
3 R
ev3
230
V~
2VA
230
V~
1A m
ax
50 mm
LN
N
230 V50 Hz
230V~2 VA
N L
TYXIA 4730
230V~2A /450W
LN N
230V~2 VA
N L
TYXIA 4730
230V~2A /450W
LN N
Jaune / Yellow / Gelb / Giallo / Amarillo /Zó³ty /Geel /
Jaune / Yellow / Gelb / Giallo / Amarillo /Zó³ty / Geel /
Blanc / White / Weiß / Bianco / Blanco / Bia³y / Wit
Blanc / White / Weiß / Bianco / Blanco / Bia³y / Wit
Vert / Green / Grün / Verde / Zielony / Groen
Antenne (fi l noir) /Antenna (black wire) / An-tenne (schwarzer Draht) / Antenna (fi lo nero) / Antena (hilo negro) / Antena (czarny przewód) / Antenne (zwarte draad)
Vert / Green / Grün / Verde / Zielony / Groen
A
B
• Tout fi l non connecté doit être obligatoirement isolé (domino).• Any unconnected wire must be insulated (connecting block).• Nicht verwendete Drähte müssen zwingend mit einer Lüs-terklemme verbunden werden.• Qualsiasi fi lo non collegato deve essere obbligatoriamente isolato (scatola).• Cualquier cable que no esté conectado se debe aislar obligatoriamente (regleta).• Ka¿dy niepod³¹czony kabel musi byæ obowi¹zkowo zaizo-lowany (kostka).• Alle niet-aangesloten kabels moeten worden geïsoleerd (kroonsteentje).
A
• Possibilité de rallonger, jusqu’à 10m, les fi ls de la commande locale (à isoler du 230 V).• Local control wires can be extended up to 10m (insulate from 230 V).• Die Drähte des lokalen Eingangs können bis 10 m verlängert werden (von 230 V isolieren).• Possibilità di estendere, fi no a 10 m, i fi li del comando locale (da isolare dal 230 V).• Posibilidad de alargar hasta 10 m los hilos del control local (aislar de la 230 V)• Mo¿liwośæ wyd³u¿enia przewodów sterowania lokalnego do 10 m (oddzieliæ od 230 V).• Mogelijkheid om de kabels voor de lokale bediening te verlengen tot 10 m (te isoleren van de 230 V).
B
B
TYXIA 4630
TYXIA 4730
x5
x5
TYXIA 1611 TYXIA 4630 TYXIA 4730
2 x
1 x
+230 V~, 50 Hz2 VA
Lithium 3 V, CR2032, (3 years autonomy)
/ = class II
868 MHz (EN 300 220)100 m
16 max
-10°C / +70°C
-10°C / +40°C
IP IP 40
230 V~20 Nm / 0,8 A / 180 W
230 V~80 Nm / 2 A / 450 W
45 x 129 x 17 mm 45 x 38 x 23 mm 50 x 47 x 26 mm
R&TTE 1999/5/CE
Important product information (Ë)
230V~2 VA
N L
TYXIA 4730
230V~2A /450W
LN N
1
2
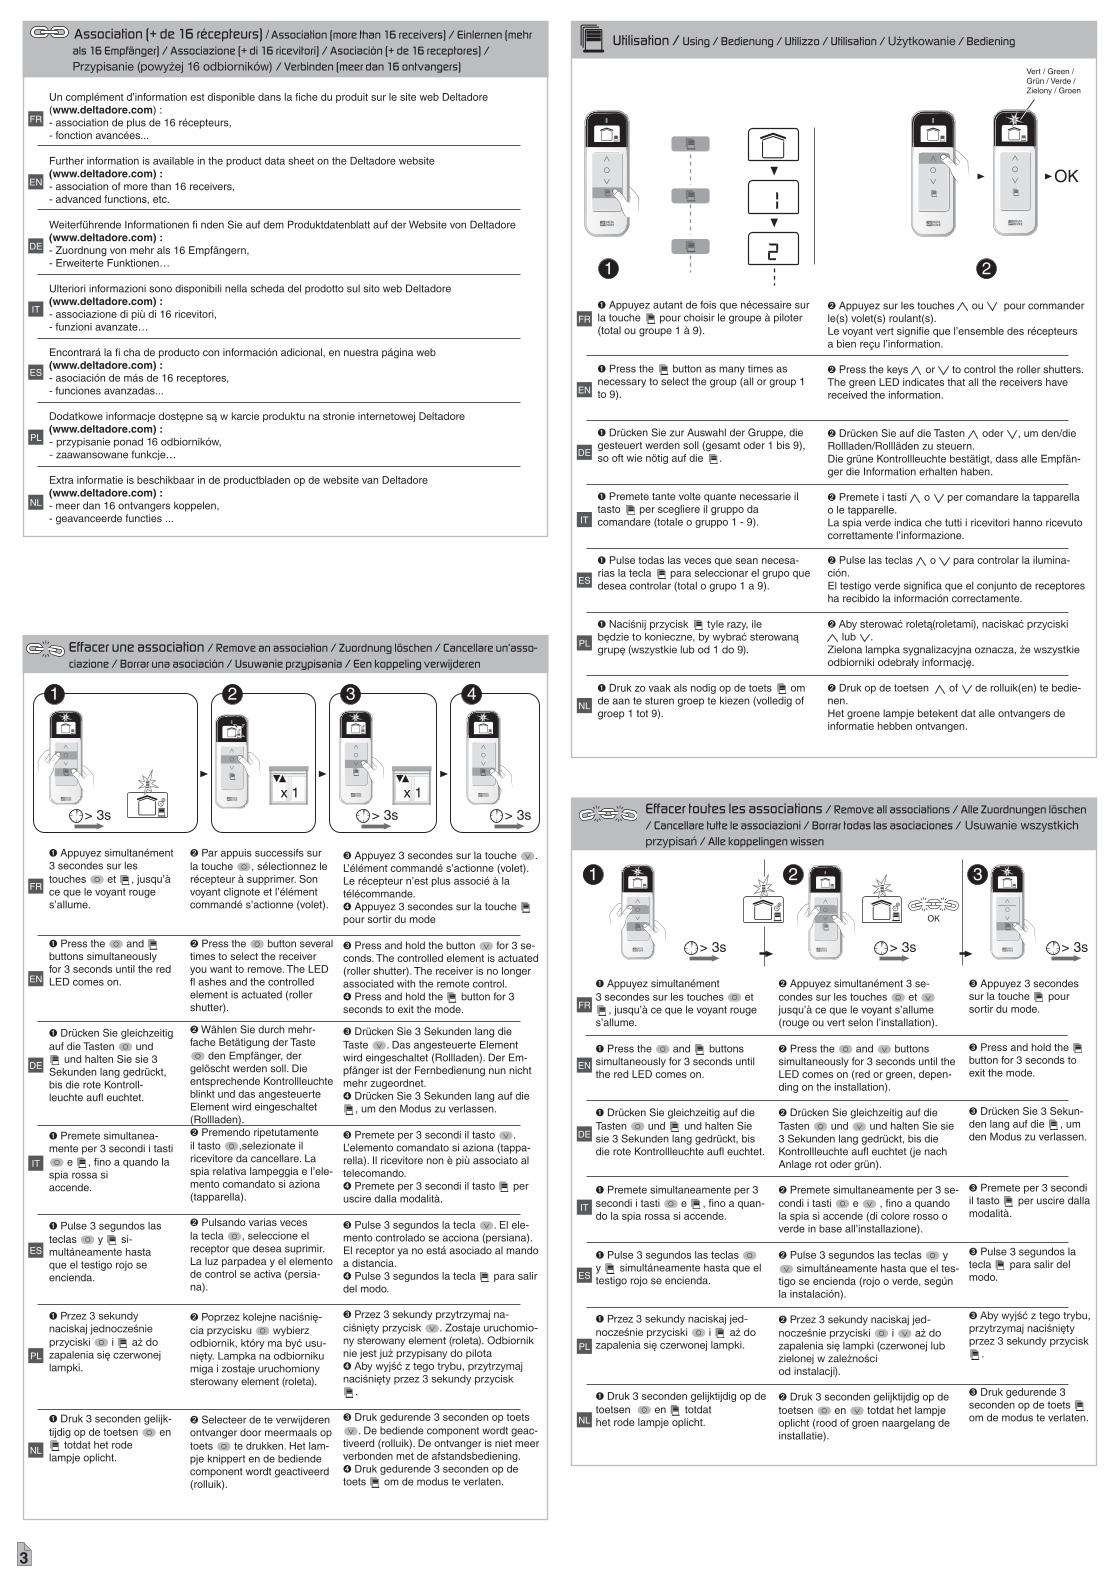
Utilisation / Using / Bedienung / Utilizzo / Utilisation / U¿ytkowanie / Bediening
OK
1 2
Ê Appuyez autant de fois que nécessaire sur la touche pour choisir le groupe à piloter (total ou groupe 1 à 9).
Ê Press the button as many times as necessary to select the group (all or group 1 to 9).
Ê Drücken Sie zur Auswahl der Gruppe, diegesteuert werden soll (gesamt oder 1 bis 9), so oft wie nötig auf die .
Ê Premete tante volte quante necessarie il tasto per scegliere il gruppo dacomandare (totale o gruppo 1 - 9).
Ê Pulse todas las veces que sean necesa-rias la tecla para seleccionar el grupo que desea controlar (total o grupo 1 a 9).
Ê Naciśnij przycisk tyle razy, ilebêdzie to konieczne, by wybraæ sterowan¹ grupê (wszystkie lub od 1 do 9).
Ê Druk zo vaak als nodig op de toets om de aan te sturen groep te kiezen (volledig of groep 1 tot 9).
Un complément d’information est disponible dans la fi che du produit sur le site web Deltadore(www.deltadore.com) :- association de plus de 16 récepteurs, - fonction avancées...
Further information is available in the product data sheet on the Deltadore website(www.deltadore.com) :- association of more than 16 receivers,- advanced functions, etc.
Weiterführende Informationen fi nden Sie auf dem Produktdatenblatt auf der Website von Deltadore(www.deltadore.com) :- Zuordnung von mehr als 16 Empfängern,- Erweiterte Funktionen…
Ulteriori informazioni sono disponibili nella scheda del prodotto sul sito web Deltadore(www.deltadore.com) :- associazione di più di 16 ricevitori,- funzioni avanzate…
Encontrará la fi cha de producto con información adicional, en nuestra página web(www.deltadore.com) :- asociación de más de 16 receptores,- funciones avanzadas...
Dodatkowe informacje dostêpne s¹ w karcie produktu na stronie internetowej Deltadore(www.deltadore.com) :- przypisanie ponad 16 odbiorników,- zaawansowane funkcje…
Extra informatie is beschikbaar in de productbladen op de website van Deltadore(www.deltadore.com) :- meer dan 16 ontvangers koppelen,- geavanceerde functies ...
Ë Appuyez sur les touches ou pour commander le(s) volet(s) roulant(s).Le voyant vert signifi e que l’ensemble des récepteurs a bien reçu l’information.
Ë Press the keys or to control the roller shutters.The green LED indicates that all the receivers have received the information.
Ë Drücken Sie auf die Tasten oder , um den/die Rollladen/Rollläden zu steuern. Die grüne Kontrollleuchte bestätigt, dass alle Empfän-ger die Information erhalten haben.
Ë Premete i tasti o per comandare la tapparella o le tapparelle.La spia verde indica che tutti i ricevitori hanno ricevuto correttamente l’informazione.
Ë Pulse las teclas o para controlar la ilumina-ción.El testigo verde signifi ca que el conjunto de receptoresha recibido la información correctamente.
Ë Aby sterowaæ rolet¹(roletami), naciskaæ przyciski lub .
Zielona lampka sygnalizacyjna oznacza, ¿e wszystkie odbiorniki odebra³y informacjê.
Ë Druk op de toetsen of de rolluik(en) te bedie-nen.Het groene lampje betekent dat alle ontvangers de informatie hebben ontvangen.
FR
FR
EN
EN
DE
DE
IT
IT
ES
ES
PL
PL
NL
NL
Vert / Green /Grün / Verde /Zielony / Groen
Association (+ de 16 récepteurs) / Association (more than 16 receivers) / Einlernen (mehrals 16 Empfänger) / Associazione (+ di 16 ricevitori) / Asociación (+ de 16 receptores) /Przypisanie (powy¿ej 16 odbiorników) / Verbinden (meer dan 16 ontvangers)
x 1 x 1
> 3s> 3s > 3s
1 2 3 4
1 2 3
> 3s > 3s > 3s
OK
Ê Appuyez simultanément 3 secondes sur les touches et , jusqu’à ce que le voyant rouge s’allume.
Ê Press the and buttons simultaneously for 3 seconds until the red LED comes on.
Ê Drücken Sie gleichzeitigauf die Tasten und
und halten Sie sie 3 Sekunden lang gedrückt, bis die rote Kontroll-leuchte aufl euchtet.
Ê Premete simultanea-mente per 3 secondi i tasti
e , fi no a quando la spia rossa siaccende.
Ê Pulse 3 segundos lasteclas y si-multáneamente hasta que el testigo rojo se encienda.
Ê Przez 3 sekundy naciskaj jednocześnie przyciski i a¿ dozapalenia siê czerwonejlampki.
Ê Druk 3 seconden gelijk-tijdig op de toetsen en
totdat het rodelampje oplicht.
Ê Appuyez simultanément 3 secondes sur les touches et
, jusqu’à ce que le voyant rouge s’allume.
Ê Press the and buttons simultaneously for 3 seconds untilthe red LED comes on.
Ê Drücken Sie gleichzeitig auf die Tasten und und halten Sie sie 3 Sekunden lang gedrückt, bis die rote Kontrollleuchte aufl euchtet.
Ê Premete simultaneamente per 3secondi i tasti e , fi no a quan-do la spia rossa si accende.
Ê Pulse 3 segundos las teclas y simultáneamente hasta que el testigo rojo se encienda.
Ê Przez 3 sekundy naciskaj jed-nocześnie przyciski i a¿ dozapalenia siê czerwonej lampki.
Ê Druk 3 seconden gelijktijdig op detoetsen en totdathet rode lampje oplicht.
Ë Par appuis successifs sur la touche , sélectionnez le récepteur à supprimer. Son voyant clignote et l’élément commandé s’actionne (volet).
Ë Press the button several times to select the receiver you want to remove. The LED fl ashes and the controlled element is actuated (roller shutter).
Ë Wählen Sie durch mehr-fache Betätigung der Taste
den Empfänger, der gelöscht werden soll. Die entsprechende Kontrollleuchte blinkt und das angesteuerte Element wird eingeschaltet (Rollladen).Ë Premendo ripetutamente il tasto ,selezionate il ricevitore da cancellare. La spia relativa lampeggia e l’ele-mento comandato si aziona (tapparella).
Ë Pulsando varias vecesla tecla , seleccione elreceptor que desea suprimir. La luz parpadea y el elemento de control se activa (persia-na).
Ë Poprzez kolejne naciśniê-cia przycisku wybierz odbiornik, który ma byæ usu-niêty. Lampka na odbiorniku miga i zostaje uruchomiony sterowany element (roleta).
Ë Selecteer de te verwijderen ontvanger door meermaals op toets te drukken. Het lam-pje knippert en de bediendecomponent wordt geactiveerd (rolluik).
Ì Appuyez 3 secondes sur la touche pour sortir du mode.
Ì Press and hold the button for 3 seconds to exit the mode.
Ì Drücken Sie 3 Sekun-den lang auf die , um den Modus zu verlassen.
Ì Premete per 3 secondi il tasto per uscire dalla modalità.
Ì Pulse 3 segundos la tecla para salir del modo.
Ì Aby wyjśæ z tego trybu,przytrzymaj naciśniêty przez 3 sekundy przycisk
.
Ì Druk gedurende 3seconden op de toets om de modus te verlaten.
Ì Appuyez 3 secondes sur la touche . L’élément commandé s’actionne (volet).Le récepteur n’est plus associé à la télécommande.Í Appuyez 3 secondes sur la touche pour sortir du mode
Ì Press and hold the button for 3 se-conds. The controlled element is actuated (roller shutter). The receiver is no longer associated with the remote control.Í Press and hold the button for 3 seconds to exit the mode.
Ì Drücken Sie 3 Sekunden lang die Taste . Das angesteuerte Element wird eingeschaltet (Rollladen). Der Em-pfänger ist der Fernbedienung nun nichtmehr zugeordnet.Í Drücken Sie 3 Sekunden lang auf die
, um den Modus zu verlassen.
Ì Premete per 3 secondi il tasto . L’elemento comandato si aziona (tappa-rella). Il ricevitore non è più associato al telecomando.Í Premete per 3 secondi il tasto per uscire dalla modalità.
Ì Pulse 3 segundos la tecla . El ele-mento controlado se acciona (persiana). El receptor ya no está asociado al mando a distancia. Í Pulse 3 segundos la tecla para salir del modo.
Ì Przez 3 sekundy przytrzymaj na-ciśniêty przycisk . Zostaje uruchomio-ny sterowany element (roleta). Odbiornik nie jest ju¿ przypisany do pilota Í Aby wyjśæ z tego trybu, przytrzymajnaciśniêty przez 3 sekundy przycisk
.
Ì Druk gedurende 3 seconden op toets . De bediende component wordt geac-
tiveerd (rolluik). De ontvanger is niet meer verbonden met de afstandsbediening.Í Druk gedurende 3 seconden op de toets om de modus te verlaten.
Ë Appuyez simultanément 3 se-condes sur les touches et jusqu’à ce que le voyant s’allume (rouge ou vert selon l’installation).
Ë Press the and buttons simultaneously for 3 seconds until the LED comes on (red or green, depen-ding on the installation).
Ë Drücken Sie gleichzeitig auf die Tasten und und halten Sie sie 3 Sekunden lang gedrückt, bis die Kontrollleuchte aufl euchtet (je nach Anlage rot oder grün).
Ë Premete simultaneamente per 3 se-condi i tasti e , fi no a quando la spia si accende (di colore rosso o verde in base all’installazione).
Ë Pulse 3 segundos las teclas y
simultáneamente hasta que el tes-tigo se encienda (rojo o verde, según la instalación).
Ë Przez 3 sekundy naciskaj jed-nocześnie przyciski i a¿ do zapalenia siê lampki (czerwonej lub zielonej w zale¿nościod instalacji).
Ë Druk 3 seconden gelijktijdig op detoetsen en totdat het lampje oplicht (rood of groen naargelang de installatie).
FR
FR
EN
ENDE
DE
IT
IT
ES
ES
PLPL
NL
NL
Effacer une association / Remove an association / Zuordnung löschen / Cancellare un’asso-ciazione / Borrar una asociación / Usuwanie przypisania / Een koppeling verwijderen
Effacer toutes les associations / Remove all associations / Alle Zuordnungen löschen / Cancellare tutte le associazioni / Borrar todas las asociaciones / Usuwanie wszystkich przypisañ / Alle koppelingen wissen
Changement de la pile / Changing the batteries / Batteriewechsel / Sostituzione della batteria / Cambio de la pila / Wymiana baterii / Batterij vervangen
Les associations sont conservées.
Associations are kept.
Die Zuordnungen bleiben erhalten.
Le associazioni vengono conservate.
Las asociaciones se conservan.
Przypisania pozostan¹ zachowane.
De koppelingen blijven behouden.
FR
EN
DE
ES
PL
NL
IT
CR 2032
1
2 3
3
4