manual no. zz213esg copyright©...
TRANSCRIPT


MANUAL NO. ZZ213ESGSETUP INSTRUCTIONS, LIST OF PARTS AND PNEUMATIC DIAGRAMS FOR
2213ESG6609, 2213ESG6702, 2213ESG6810Automatic Two Needle Hemmer (Pegasus)
COPYRIGHT© 2000-2003ATLANTA ATTACHMENT COMPANY, INC.
ALL RIGHTS RESERVED IN ALL COUNTRIES
THIS DEVICE IS COVERED BY ONE OR MOREU.S. AND/OR FOREIGN PATENTS
The sale of this product does not sell or otherwise transfer any license or other rights under U.S. Patents5,159,889 or 5,203,270 or under any corresponding foreign patents.
ATLANTA ATTACHMENT CO., INC. LAWRENCEVILLE, GEORGIA 30045(770) 963-7369 • FAX (770) 963-7641
PRINTED IN U.S.A.
Last Updated 02-12-03
This equipment is protected by one or more of the following patents: US patents:4,038,933; 4,280,421; 4,432,294; 4,466,367; 4,644,883; 4,886,005; 5,134,947; 5,159,889; 5,203,270; 5,307,750; 5,373,798; 5,437,238; 5,522,332; 5,524,563; 5,562,060; 5,634,418; 5,647,293; 5,657,711; 5,743,202; 5,865,135; 5,899,159; 5,915,319; 5,918,560; 5,924,376; 5,979,345, 6,035,794
Foreign patents - 2,084,055; 2,076,379; 2,177,389; 2,210,569; 4-504,742; 8-511,916; 9-520,472; 0,537,323; 92,905,522.6; 95,935,082.8;
96,936,922.2.
Other U.S. and Foreign Patents Pending. 2000 Atlanta Attachment Company.
! I M P O R T A N T! I M P O R T A N T
It is important to read and understand the information contained within thismanual before attempting to operate the machine. Atlanta Attachment Co., Inc.shall not be held liable for damage resulting from misuse of the informationpresented within, and reserves the right to change the information containedwithin, without prior notification.

Table Of Contents
Operation .......................................................................................................................................................................................................... 1Operación .......................................................................................................................................................................................................... 1Operating Instructions ....................................................................................................................................................................................... 3Instrucciones De Operación .............................................................................................................................................................................. 3Possible Machine Errors: .................................................................................................................................................................................. 9Errores Posibles ................................................................................................................................................................................................ 9Conveyor Speed Control ................................................................................................................................................................................. 12Footlift Setting ................................................................................................................................................................................................ 12Electric Eye Sensor Adjustment .....................................................................................................................................................................12Control de Velocidad del Transportador ........................................................................................................................................................ 12Posición del Alzaprensatelas .......................................................................................................................................................................... 12Ajuste del Sensor Fotoeléctrico ...................................................................................................................................................................... 12Thread Break Detectors .................................................................................................................................................................................. 13Detectores de Rotura del Hilo ......................................................................................................................................................................... 13Adjustments to the Material Edge Trimming Guide System .......................................................................................................................... 14Ajustes a la Guía de la Recortadora de Borde ................................................................................................................................................ 14Adjustment to the Thread Chain Puller and Speed Control ............................................................................................................................16Height Adjustment .......................................................................................................................................................................................... 16Ajustes al Tiracadeneta y al Control de Velocidad. ........................................................................................................................................ 16Ajuste de la Altura .......................................................................................................................................................................................... 16Level Adjustment ............................................................................................................................................................................................ 17Ajuste del Nivelado ........................................................................................................................................................................................ 17Thread Trimmer Adjustment Instructions ......................................................................................................................................................18Instrucciones Para Ajustar El Cortacadeneta .................................................................................................................................................. 18Troubleshooting ..............................................................................................................................................................................................19Problemas y Soluciones .................................................................................................................................................................................. 19Sewing Head Maintenance ............................................................................................................................................................................. 22Mantenimiento del Cabezal ............................................................................................................................................................................22Assembly Drawings & Parts Lists2213ESGXXXX ............................................................................................................................................................................................. 27213E-200 Frame & Table Assembly (Panasonic) .......................................................................................................................................... 29213E-205 Frame & Table Assembly (Efka) ................................................................................................................................................... 31013-G6605B Free Standing Conveyor Assembly .......................................................................................................................................... 33211-162 Indexing Table Assembly .................................................................................................................................................................34211-G6606C Folder Assembly ....................................................................................................................................................................... 35211-G6607F Top Conveyor Assembly ........................................................................................................................................................... 37211-171 Conveyor Sub-Assembly .................................................................................................................................................................. 39311-011 Stacker Assembly ............................................................................................................................................................................. 41311-017A Lower Conveyor Assembly ........................................................................................................................................................... 43311-018 Stacker Assembly ............................................................................................................................................................................. 45016-014A Material Clamp Assembly ............................................................................................................................................................. 46016-023 Clamp Opener Assembly .................................................................................................................................................................. 47010-047 Belt Idler Assembly .......................................................................................................................................................................... 48311-018D Clamp Sub-Assembly .................................................................................................................................................................... 49013-123 Stacker Actuator Assembly .............................................................................................................................................................. 50013-G6606 Pusher Assembly ......................................................................................................................................................................... 51211-121A Edge Trimmer Assembly ............................................................................................................................................................... 53213E-201 Frame Assembly ............................................................................................................................................................................551278-6010 Start/Stop Button Assembly ......................................................................................................................................................... 56314-Y6607 Coelescent Regulator Assembly .................................................................................................................................................. 570411-1300 Waste Container Assembly ..........................................................................................................................................................58311-001A Feed Wheel Assembly ................................................................................................................................................................... 59311-002 Main Drive Assemblyl .....................................................................................................................................................................60211-G6602 Drive Train Assembly .................................................................................................................................................................61211-034 Transfer Drive Assembly .................................................................................................................................................................62213E-202 Bottom Side Assembly ................................................................................................................................................................... 65213-203 Electronics Assembly ....................................................................................................................................................................... 670411-1903 Foot Switch Assembly .................................................................................................................................................................. 68013G6605WD Stacker Wiring Diagram ......................................................................................................................................................... 69013G605WD1 Stacker Wiring Diagram ......................................................................................................................................................... 70213-SWD Wiring Diagram (Panasonic) ......................................................................................................................................................... 71213ES-WD Wiring Diagram (Efka) ............................................................................................................................................................... 72213-SPD Pnuematic Diagram ......................................................................................................................................................................... 73


Technical Manual 2213ES Two Needle Hemmer
DescriptionThe Atlanta Attachment Company’s high
speed automatic Two Needle cover stitch hemming workstation is a combination unit for sleeves and bodies complete with stacking capability for all.
The 2213ES is a versatile unit for hemming sleeves and bodies. It is available with two stackers, return conveyor and fold in half stacker.
The modular design of AAC’s Two Needle Hemmer allows the flexibility of picking the combination of components to design a custom system best suited to the need.
DescriptionAn electronically controlled workstation consisting of a conveyorized downturn hemming apparatus with two needle bottom cover stitch sewing head, electronic motor, automatic edge trim and cut part. (Top cover stitch is also available)
OperationThe operator places material on the conveyor at the edge guide. Sewing is initiated when the material is moved over the reflective tape causing a sensor to go dark. Sewing will continue as long as material pieces are placed on the conveyor within a specific distance. The sew cycle will stop if the operator fails to position the next piece. This is to reduce the amount of thread waste. Average production on sleeves is 350 - 400 dozen pair per 8 hour day.
vluct
deta
dfcm
DEedmra
OEiceeoép3h
Atlanta Attach770-963-7369 Fa
DescripciónLa máquina dobladilladora de alta
elocidad de Dos agujas e hilo de recubrir de a Compañía Atlanta Attachment es una nidad combinación de mangas y cuerpos ompletos con capacidad de apilado para odos.
La 2213ES es una unidad versátil para obladillar mangas y cuerpos. Esta unidad stá disponible con apilador automático, ransportador de retorno y doblador apilador utomático.
El diseño modular de la Dobladilladora e Dos Agujas de la AAC permite la lexibilidad de escoger la combinación de omponentes para diseñar un sistema que ás se acomode a sus necesidades.
escripcións una estación de trabajo controlada lectrónicamente que consiste de un aparato obladillador con transportador, cabezal de áquina de coser de dos agujas e hilo de
ecubrir inferior,motor electrónico, cortador utomático de borde.
peraciónl operario coloca las partes a una guía e
nicia la costura. La unidad continuará osiendo mientras que partes sean colocadas n el transportador dentro de una distancia specífica. El ciclo de costura parará si el perario falla en poner la siguiente parte, de sta forma reduciendo el gasto de hilo. La roducción promedio de mangas es de 50 - 400 docenas de pares por un día de 8 oras de trabajo.
ment Companyx: 770-963-7641
1

Technical Manual2213ES Two Needle Hemmer
CAUTIONThere are cloth and thread
trimming knives on this machine. These knives cut auto-
matically. DO NOT put fingers or hands in or around
these knives.All adjustments made to the
Sewing machine head or knives should be made with power
“OFF”.
Atlanta Attach770-963-7369 Fa
2
PRECAUCIÓNEn este equipo hay cuchillas para cortar hilo y material.
Estas cuchillas cortan automáticamente. NO ponga los dedos o las manos en o alrededor
de estas cuchillas.Todos los ajustes hechos al
cabezal de la máquina de coser o a las cuchillas deben hacerse con
la electricidad a la máquina “APAGADA”.
ment Companyx: 770-963-7641

Technical Manual 2213ES Two Needle Hemmer
Operating InstructionsREAD ALL THESE INSTRUCTIONS BEFORE OPERATING MACHINE!
Wire the power cord to 208-230 VAC, 1 phase.
Connect (1)1/4" and (1)3/8” air line to the air input connectors with 10CFM. Check regulators for proper PSI. The regulator should be set to 70 PSI. Two seperate lines are recommended. Don not use a “T”.
There is a control box mounted below the sewing head. This box controls the stepping motor that drive the conveyors and the Chain Puller. The three thumbwheels on the top-right of the box are set to synchronize the two conveyors to the sewing machine. If you change the sewing stitch length, it will be necessary to adjust these numbers to re-synchronize the conveyors to the sewing machine. Decreasing the number makes the conveyors go slower. For example, if you changed the stitch length from 10 SPI to 11 SPI, you would need to decrease the number in the thumbwheels by 10% to match the 10% shorter stitch length. There is also a “Jog” button on the top box. Pressing this button will run the conveyors when the sewing machine is not running. On the back of the box, there is a fuse holder and an on/off switch. Leave the switch on, except to do maintenance on the stepper motors or conveyors. The three thumb wheels on the top-left of the box control the chain puller speed. The speed needs to be slightly faster than the linear
Cv
dCdE
dctsscasDtPddec
mai(mt
Atlanta Attach770-963-7369 Fa
Instrucciones De Operación¡LEA TODAS ESTAS
INSTRUCCIONES ANTES DE OPERAR LA MAQUINA!
onecte a una corriente de 208-230 de oltaje de Corriente Alterna, de 1 fase.
Conecte la maguera de 1/4" al conector e entrada de aire con 10 Pies Cub. Por Min. hequeé los reguladores por el PSI (Libras e presión por pulgada cuadrada) correcto. l regulador debe ser fijado a 70 PSI.
La caja de control está montada debajo el cabezal (vea página 1-). Esta caja ontrola el motor que mueve los ransportadores y el Tiracadeneta. Los tres electores en la caja de arriba son para incronizar los dos transportadores. Si ambia el largo de la puntada tiene que justar estos números para volver a incronizar los transportadores a la máquina. isminuir el número hace que los
ransportadores se muevan más lentamente. or ejemplo, si cambia el largo de la puntada e 10 PPP (Puntadas por pulgada) a 11 PPP, ebe disminuir el número en los selectores n 10% para igualar el 10% de puntada más orta. También hay un botón “PRUEBA
MANUAL/AJUSTE” en la caja de arriba. Cuando hunde este botón los transportadores se mueven cuando la
áquina no está funcionando. En la parte de tras de la caja de arriba, hay un fusible y un nterruptor. Deje el interruptor en encendido ON), excepto cuando va a hacer el antenimiento al motor paso a paso o a los
ransportadores.
ment Companyx: 770-963-7641
3

Technical Manual2213ES Two Needle Hemmer
speed of the chain. If the puller is turning too fast, the chain will break.
213 Ready Screen
1. Setup: This button takes you to a setup screen where options and settings can be accessed.
2. Start: Pressing button starts the machine in automatic mode.
3. Pieces: This button takes you to a screen which allows users to set the method of counting, reset the piece count, change the bundle size and view other options.
4. Manual: Pressing this button lets you manually activate each function of the machine.
5. Style: Once the machine is adjusted for a particular type sleeve or material the style settings may be saved and recalled at a later time. Mechanic security level is required to save styles, operators may recall styles.
6. Reset: This button is seen throughout the different screens. When pressed, it resets the unit and takes you back to the Ready screen.
7. Language: This button takes you to the Language screen which allows you to switch to any language listed on the screen.
8. Clock: This button takes you to a screen where the time and date can be set.
Atlanta Attach770-963-7369 Fa
4
Primera Página de la Pantalla
1. Configuraciones: Este boton lo lleva alas funciones de la pantalla, donde le permiten acceso a opciones y ajustes.
2. Comenzar: Comienza la maquina en automatico y continua funcionando mientras las mangas sean cargadas.
3. Piezas: Este boton lo lleva ala pantalla, cual le permite a los operadores, a recomenzar el contador de piezas, cambio de tamano de grupos y otras opciones.
4. Manual: Precionando este boton lo deja manualmente, activar cada funcion de la maquina.
5. Estilo: Una vez la máquina ha sido configurada para un estilo de manga o material el estilo se puede guardar para recuperarlo después. Requiere seguridad de mecánico para guardar estilo, el operador puede recuperar los estilos.
6. Reset: Este boton es visto atravez de diferentes pantallas, cuando es procionado, recomienza la union y lo lleva ala pantalla primera.
7. Lenguaje: lo lleva a la pantalla que le permite cambiar a cualquier lenguaje que esté listado en la pantalla.
ment Companyx: 770-963-7641

Technical Manual 2213ES Two Needle Hemmer
Setup Screen1. Lead Edge Chain: Allows users to
adjust the time from the sew eye seeing the leading edge of the sleeve till the chain cutter cuts.
2. Trail Edge Chain: Allows users to adjust the time from the sew eye seeing the trailing edge of the sleeve till the chain cutter cuts.
3. Advanced Setup: This button takes users to the advanced settings.
4. Statistics: This button takes you to the Statistics screen which displays statistical information on the operation of the machine. Resetting the statistics requires a supervisor security level.
5. Stacker Options: Allows users to choose from 3 stacker options.
6. Advanced Manual: This button takes you to the Manual Input Test screen which allows you to test the input devices on the machine, such as: photoelectric eyes and switches. Mechanic security level required.
7. System Information: This button takes you to a screen that displays various information about the machine, such as: serial number or software revision number.
8. Security: Allows you to change your current level of security or change the password for your security level or any level below you. Appropriate security level required.
9. Contrast: Allows users to change the contrast of the screen for best viewing.
10. Exit: Pressing the button takes you back to the previous screen.
11. Home: Pressing this button will take users back to the main screen without resetting the machine.
dDp
dDp
f
ellS
ee
od
ldn
nsid
op
l
lp
Atlanta Attach770-963-7369 Fa
Adjustes de La Pantalla1. Cadeneta Borde Delantero: Tiempo
esde que el Sensor de Coser de la obladilladora ve el borde delantero de la ieza hasta que la cadeneta se cortada.
2. Cadeneta Borde Trasero: Tiempo esde que el Sensor de Coser de la obladilladora ve el borde trasero de la ieza hasta que la cadeneta es cortada.
3. Funciones Tecnicas: Este lo lleva a unciones tecnicas.
4. Estadisticas: Lo lleva a la pantalla de stadísticas que muestra las estasdísticas de a operación de la máquina. Para recomenzar as estadísticas se requiere nivel de upervisor
5. Opciones del Apilador: Precionando ste boton, le permitira a los operadores, legir las 3 opciones del apilador.
6. Manual Avansado: Permite al perador manualmente activar cada funcion e la maquina.
7. Informacion del Sistema: Lo lleva a a pantalla que muestra la información acera e la máquina, como: Número de série y el úmero de la revisión.
8. Seguridad: Le permite cambiar el ivel de seguridad o cambiar el codigo para u nivel de seguridad o para cualquier nivel nferior al suyo. Require el nivel apropiado e seguridad.
9. Contraste: Le permite a los peradores, a cambial la iluminacion de la antalla para una mejor vista.
10. Salida: Precionando este boton, lo leva a la pantalla anterior.
11. La Pagina: Precionando este boton, levara a los operadores aregresar a la antalla, primera sin recomenzar la maquina.
ment Companyx: 770-963-7641
5

Technical Manual2213ES Two Needle Hemmer
Advanced Settings 1Note: All objects on Advanced Settings screens 1, 2 and 3 are buttons that take you to a setting screen that will allow you to adjust the setting an will give a brief description of how the setting works.
1. Setup Page Display Mode: Selects the content of the Operator’s setup page.
2. Piece Count Display Mode: Selects the way Piece Count is displayed on the Ready and Run pages.
3. Foot Down Delay: Time from the sew eye seeing the leading edge of the sleeve till the presser foot drops. The foot should drop at the first stitch in the sleeve. If set too early it will cause thread breaks.
4. Foot Up Delay: Time from the sew eye seeing the trailing edge of the sleeve till the presser foot lifts to allow chaining, and pressure is applied to the chain puller. The foot should lift at the last stitch in the sleeve. If set too late it will cause thread breaks.
5. Chain Puller Delay: Time from the sew eye seeing the leading edge of the sleeve till the puller goes into idle mode for chaining. The downward pressure should be removed at the first stitch in the sleeve. The chain puller only applies downward pressure when in chaining mode.
6. Leading Edge Chain Cut Delay: Time from the sew eye seeing the leading edge of the sleeve till the chain cutter cuts.
7. Trailing Edge Chain Cut Delay: Time from the sew eye seeing the trailing edge of the sleeve till the chain cutter cuts.
8. Head Stop Delay: Time from the sew eye seeing the trailing edge of the sleeve till the head stops sewing.
Atlanta Attach770-963-7369 Fa
6
Funciones de Avanzadas 1 Nota: Todos los botones en las pantallas Configuración 1 y 2 los lleva a una pantalla que le permite ajustar la configuración y dar una breve descripción de como funciona.
1. Modo de Mostrar Configuraciones: Seleccione el contenido de la pantalla de configuraciones del operador.
2. Contador de Piezas: Seleccione la forma como las piezas son contadas en las paginas Primera Pagina Y Fucinando.
3. Retardo de Bajada del Prensatela: Tiempo desde que el Sensor de Coser de la Dobladilladora ve el borde delantero de la pieza hasta que el prensatela baja.
4. Retardo de Alzado del Prensatela: Tiempo desde que el Sensor de Coser de la Dobladilladora ve el borde trasero de la pieza hasta que el prensatela es alzado para permitir hacer codenata y aplicar Presion al Tirador.
5. Retardo del Tirador ala Modo de Coser: Tiempo desde que el Sensor de Coser de la Dobladilladora ve el borde delantero de la pieza hasta que el tirador cambia al modo flotante para coser.
6. Retardo Corte Borde Delantero: Tiempo desde que el Sensor de Coser de la Dobladilladora ve el borde delantero de la pieza hasta que la cadeneta es cortada.
7. Retardo Corte Borde Trasero: Tiempo desde que el Sensor de Coser de la Dobladilladora ve el borde trasero de la pieza hasta que la cadeneta es cortada.
8. Retardo de Parar Cabezal: Tiemp desde que el Sensor de Coser de la Dobladilladora ve el borde trasero de la pieza hasta que el cabezal para de coser.
ment Companyx: 770-963-7641

Technical Manual 2213ES Two Needle Hemmer
Advanced Settings 29. Chop On Time: Cutter Knife down
time. Too small prevents the knife from cutting reliably, too large causes the leading edge chain to wad up in front of the knife.
10. Chop Gap Time: Time of gap from the ends of the trailing and leading edge chains. If gap is smaller than this setting, only the leading edge cut will occur. A single cut between sleeves is preferred.
11. Conveyor Jog Off Delay: Time the conveyor runs after hemming is finished.
12. Stacker Options: Allows users to choose from 3 stacker options.
13. Stacker Return Delay: Controls how long the stacker clamp stays open to release the sleeve.
14. Bundle Size: Allows users to change the size of the bundles.
15. Outside Thread Detector Delay: Number of stitches from the time the foot drops till the Outside thread detector is expected to provide valid thread information.
16. Inside Thread Detector Delay: Number of stitches from the time the foot drops till the Inside thread detector is expected to provide valid thread information.
17. Looper Thread Detector Delay: Number of stitches from the time the foot drops till the Looper thread detector is expected to provide valid thread information.
Ta
Ec
Tsd
Tp
ea
APa
EPa
Atlanta Attach770-963-7369 Fa
Funciones de Avanzadas 29. Corta Cadeneta Tempo Activado:
iempo que el cortas cadeneta permanece ctivado.
10. Minimo Espacio Para Doble Corte: spacio entre las cadenetas de dos piezas onsecutivas.
11. Tiempo de Parado del ransportador: Tiempo que el trasportador
ique funcionando despues de que el obladillo es terminado.
13. Retardo del Retorno del Apilador: iempo que la prensa permanece abierta ara soltar la manga.
14. Bundle Size: 15. Dobladilladora: Puntadas desde que
l Prensatelas baja hasta que la computadora sume que la senal del sensor ed correcta.
16. Dobladilladora Sensor de Hilo guja Derecha: Puntadas desde que el rensatelas baja hasta que la computadora sume que la neal del sensor es correcta.
17. Dobladilladora Sensor de Hilo ngasador: Puntadas desde que el rensatelas baja hasta que la computadora sume que la senal del sensor es correcta.
ment Companyx: 770-963-7641
7

Technical Manual2213ES Two Needle Hemmer
Advance Settings 318. Jam Detect Time: Time from the
sew eye seeing the leading edge of the sleeve till the sleeve should have arrived under the stacker eye.
19. Sew Eye Timeout: Time that the Sew Eye may see continuous fabric without causing a jam error.
20. Stacker Eye Timeout: Time that the Stacker Eye may see continuous fabric without causing a jam error.
21. Stacker Out Timeout: Maximum expected time from Stacker Carriage sent out till the Stacker Switch should get activated.
22. Stacker Switch Timeout: Time that the stacker switch can be engaged without causing a jam error.
23. Body Pusher On Time: Time allowed for the body pusher to position the body in the body stacker clamp.
24. Body Uncurler On Time: Time from the conveyor eye seeing the leading edge of the body till the body uncurler turns off.
25. Small Stacker Delay: Time from the stack eye seeing the leading edge of the sleeve till the small stacker cycle starts.
26. Body Stacker Delay: Time from the stack eye seeing the leading edge of the body till the body stacker cycle starts.
Atlanta Attach770-963-7369 Fa
8
Funciones de Avanzadas 318. Detector de Bloqueo
Dobladilladora al Apilador: Tiempo permitido para que el Borde Delantero de la pieza viaje desde que el Sensor de Coser hasta el Sensor del Apilador.
19. Detector de Blaqueo Maximo Tiempo de Costura: Tiempo que el sensor de coser puede ver material continuamente sin generar un error.
20. Detector de Bloqueo Sensor del Apilador: Tiempo que el sensor del Apilador puede ver material continuamente sin generar un error.
21. Detector de Bloqueo Sensor de Fin de Carrera del Apilador: Tiempo desde que el cilindro del Apilador es activado hasta que el sensor de fin de carrera del Apilador ve el actuador sin generar un error.
22. Detector de Bloqueo Sensor del Apilador Activado: Tiempo que el sensor de fin de carrera del Apilador puede permanecer activado sin generar un error.
23. Elevador del Cuerpo Tiempo Activad: Tiempo Elevador del Cuerpo permanece activado.
24. Alisador Tiempo Activado: Tiempo desde que el Sensor del transportador ve el borde delantero de la pieza hasta que el asisador es apagoado.
25. Retardo activar Apilador de Piezas Pequenas: Tiempo desde que el Sensor del Apilador de Piezas Pequenas ve el borde delantero de la pieza el ciclo del apilador es comenzado.
ment Companyx: 770-963-7641

Technical Manual 2213ES Two Needle Hemmer
Possible Machine Errors: 1. Thread break on outside needle.
Possible Solutions:A. Check thread and replace if broken.B. Make sure thread is routed properly
through sensor.C. Adjust tension on sensor.D. Replace or re-program sensor.
2. Thread break on inside needle.Possible Solutions:
A. Check thread and replace if broken.B. Make sure thread is routed properly
through sensor.C. Adjust tension on sensor.D. Replace or re-program sensor.
3. Thread break on looper.Possible Solutions:
A. Check thread and replace if brokenB. Make sure thread is routed properly
through sensor.C. Adjust Sensitivity of sensor (Light
goes off as thread moves through it).D. Replace sensor.
4. Low air pressure detected.Possible Solutions:
A. Air shutoff valve is closed.B. Air line is disconnected from
machine.C. Air supply pressure is below 60
PSI.D. Air regulator is adjusted below 60
PSI.E. Air pressure switch is disconnected.
CAdc
S
n
e
S
n
e
S
n
e
(t
S
Atlanta Attach770-963-7369 Fa
26. Retardo activar el Apipador de uerpos: Tiempo desde que el Sensor del pilador de Cuerpos ve el borde delantero e la pieza el ciclo del apilador es omenzado.
Errores Posibles1. Hilo roto, aguja exterior.
oluciones posibles.A. Revise el hilo y reemplace si es
ecesario.B. Asugúrese que el hilo está
nhebrado correctamente a través del sensor.C. Ajuste la tensión en el sensor.D. Reemplace o reprograme el sensor.
2. Hilo roto, aguja interior.oluciones posibles.
A. Revise el hilo y reemplace si es ecesario.
B. Asugúrese que el hilo está nhebrado correctamente a través del sensor.
C. Ajuste la tensión en el sensor.D. Reemplace o reprograme el sensor.
3. Hilo roto, engazador.oluciones posibles.
A. Revise el hilo y reemplace si es ecesario.
B. Asugúrese que el hilo está nhebrado correctamente a través del sensor.
C. Ajuste la sensibilidad del sensor. La luz se apaga cuando el hilo se mueve a ravés)
D. Reemplace el sensor.4. Error, poca presión de aire.
oluciones posibles.A. El registro principal está cerrado.B. Suministro de aire desconectado.C. Presión de aire menos de 60 PSI.
ment Companyx: 770-963-7641
9

Technical Manual2213ES Two Needle Hemmer
F. Air pressure switch is needs adjustment.
G. Air pressure switch has failed.H. Module #5 has failed.
5. Possible sleeve jam. Relative setting: Jam Detect TimePossible Causes:
A. Sleeve is jammed under the presser foot.
B. Sleeve is jammed under the conveyor.
6. Stacker bypassed return limit switch. Relative setting: Stacker Switch Timeout.Possible Causes:
A. Stacker switch timeout setting set to low.
B. Possible defective limit switch.7. Foot pedal pressed at power up or
Reset.Possible Causes:
A. Something is pressing down on the switch.
B. Possible defective foot pedal.8. Stacker limit switch has been
engaged too long. Relative setting: Stacker Switch Jam Timeout.Possible Causes:
A. Stacker is jammed at switch.B. Possible defective limit switch.
9. Sew eye is covered at automatic startup.Possible Causes:
A. The sew eye is prevented from seeing the reflective tape. All eyes must be clear to start the machine in automatic mode. Manual can be use to remove material from under the foot. Restart in Automatic starts
Atlanta Attach770-963-7369 Fa
10
D. El regulador de presión está a menos de 60 PSI.
E. El sensor de presión está desconectado.
F. El sensor de presión necesita ser ajustado.
G. El sensor de presión está fallando.H. El módulo # 5 está fallando.
5. Parámetro detector de bloqueo. Posiblemente manga atascada.Causas posibles.
A. Pieza atascada debajo del prensatelas.
B. Pieza atascada debajo de transportador.
6. Detector de bloqueo del apilador. El sensor de carrera no fue activado.Causas posibles.
A. Tiempo en el parámetro muy cortoB. Sensor dañado.
7. Pedal activado al encender o recomenzar la máquina.Causas posibles.
A. Algo presiona el pedal.B. El pedal puede estar dañado.
8. Sensor de bloqueo fin de carrera de apilador. Sensor activado mucho tiempo.Causas posibles.
A. Apilador bloqueado al final de la carrera
B. El sensor dañado.9. Ojo de coser cubierto al prender la
máquina.Causas posibles.
A. El sensor de costura no ve la cinta reflectora. Para comenzar en automático todos los sensores deben estar desactivados. Use coser manual para remover el material del prensatelas. Recomenzar en Automático
ment Companyx: 770-963-7641

Technical Manual 2213ES Two Needle Hemmer
the machine as if it were in the middle of a sleeve.
B. Possible defective sew eye.
10. Sew eye has been covered too long. Relative setting: Sew Eye Timeout.Possible Causes:
A. The sew eye is prevented from seeing the reflective tape.
B. The conveyor has stopped.C. Possible jam under sew eye.D. Possible defective sew eye.
11. Stacker eye has been covered too long. Relative setting: Stacker Eye Timeout.Possible Causes:
A. The stacker eye is prevented from seeing the reflective tape.
B. The conveyor has stopped.C. Possible jam under stacker eye.
D. Possible defective stacker eye.12. Thread break on center needle (If
running top cover stitch)Possible Solutions:
A. Check thread and replace if broken.B. Make sure thread is routed properly
through sensor.C. Adjust tension on sensor.D. Replace or re-program sensor.
em
mC
r
aC
r
Atlanta Attach770-963-7369 Fa
s como si comenzara en la mitad de una anga.
B. Sensor de costura dañado.10. Parámetro: Detector de bloqueo
áx. tiempo de costura.ausas posibles.
A. El sensor no está viendo la cinta eflectora.
B. El transportador se paró.C. Pieza atascada debajo del cabezal.D. Sensor dañado.
11. Detector de bloqueo sensor del pilador. Sensor activado demasiado.ausas posibles.
A. El sensor no está viendo la cinta eflectora.
B. El transportador se paró.C. Pieza atascada en el apilador.D. Sensor dañado.
ment Companyx: 770-963-7641
11

Technical Manual2213ES Two Needle Hemmer
Conveyor Speed ControlSuggested setting for the conveyor speed
control for 8SPI - 300. To synchronize with the head increase conveyor speed until the material pleats then decrease until pleating stops. If stitch length is changed repeat above procedure.
Footlift SettingThe height the foot
lifts during chainoff (Approx. 1/32") is adjusted with the stud screw located behind the sewing head next to the handwheel and below the footlift cylinders.
Electric Eye Sensor AdjustmentTo adjust the sensor, first remove the
clear plastic cover from the end of the sensor. There are two adjusting screws under the cover. One is labeled “GAIN” and is used to set the sensitivity of the sensor. The other screw is labeled “DO & LO” and should always be fully clockwise.
With the end of the sensor pointing at the center of the reflective tape, turn the “GAIN” screw counter-clockwise until the red L.E.D. indicator is not on. Then turn the “GAIN” screw clockwise until the L.E.D. indicator comes on. Then turn the “GAIN” screw one full turn clockwise. The L.E.D. indicator should be blinking slowly. Cover the eye so that the sensor cannot see the reflective tape and the L.E.D. should go out.
Atlanta Attach770-963-7369 Fa
12
Control de Velocidad del TransportadorEl Número sugerido de velocidad del transportador para 8 Puntadas Por Pulgada
es 300. Para sincronizar con el cabezal aumente la velocidad del transportador hasta que el material se pliegue, después disminúyala hasta que deje de plegar. Si se cambia el largo de la puntada repita el procedimiento.
Posición del Alzaprensatelas
La altura a la que el pie se levanta durante encadenado (Aprox. 1/32") es ajustada con el tornillo descabezado situado detrás del cabezal de la máquina al lado del volante y debajo de los cilindros del alzaprensatelas.
Ajuste del Sensor FotoeléctricoPara ajustar el sensor, primero quite la
cubierta plástica transparente al final del sensor. Debajo de la cubierta hay dos tornillos para ajustar. Uno es rotulado “GAIN” y sirve para fijar la sensibilidad del sensor. El dice “DO & LO” y tienen que estar totalmente atornillado en el sentido de las agujas del reloj.
Con el final del sensor apuntando al centro de la cinta reflectora, gire el tornillo “GAIN” en el sentido contrario a las manecillas del reloj hasta que el indicador de luz roja [L.E.D] se apaga. Después dé vuelta
ment Companyx: 770-963-7641

Technical Manual 2213ES Two Needle Hemmer
Thread Break DetectorsA. Adjustment and function of
looper thread break detector.This type of thread detector monitors the consistent movement of thread at a 5 degree angle over a ceramic surface. With the unit running in manual mode, the LED on the detector must not be on. The presence of a red light indicates thread breakage or misadjustment, thus causing the unit to stop.
B. Looper thread break detector adjustment procedure.To adjust thread detector, switch control panel to manual. Depress the chain switch to make unit run and chain-off. Take precaution that the chain is under chain puller before running. Looking at the face of the thread detector with unit running in manual chaining mode, turn blue nylon screw counterclockwise until you see the LED light up. Turn screw clockwise until LED goes out. Turn 1/16" more CW.
C. Needle thread break detectors.These detectors require no adjustments. They are programmed at
aa[“d
rEcsueUil
Atlanta Attach770-963-7369 Fa
l tornillo “GAIN” en el sentido de las gujas del reloj hasta que el indicador L.E.D] se enciende. Ahora dé al tornillo GAIN” una vuelta completa en el sentido e las agujas del reloj. El indicador [L.E.D]
debe que encenderse intermitentemente muy despacio. Cubra el ojo fotoeléctrico de forma que el sensor no pueda ver la cinta reflectiva, el indicador [L.E.D] debe apagarse.
Detectores de Rotura del Hilo
A. Ajuste y función del detector de hilo otodel engazador.ste tipo de monitor detecta el movimiento onstante del hilo en un ángulo de 5 grados obre una superficie de cerámica. Con la nidad funcionando en manual, los tres LED n los detectores tienen que estar apagados. na luz roja en cualquier de los detectores
ndica rotura del hilo o desajuste, y hace que a la unidad se pare.
B. Ajuste del detector de rotura del hilo.Para ajustar el detector del hilo, ponga en manual el tablero de control. Seleccione cadeneta para encadenar. Asegurese que
ment Companyx: 770-963-7641
13

Technical Manual2213ES Two Needle Hemmer
the factory. The only requirement is that the thread passes thru them correctly.
Adjustments to the Material Edge Trimming GuideSystem
The Material Guide Roller Should Be Adjusted In three Dimensions
1. The material guide roller should be located vertically to be the thickness (1) (Fig. 1) of the sewn material above the lower fixed knife. This is accomplished by loosening the two 1/4-20 bolts attaching the material guide roller support block to the frame of the upper conveyor. Care should be taken to keep the support block moved to the right as it is also used to tension the drive belt. Once the adjustment is made, tighten the two 1/4-20 bolts securely. The material guide spring (3) (Fig. 1) should be adjusted to be only slightly above the lower fixed knife. The material guide spring is only used to exert light pressure to hold the sewn material against the material guide roller. Excessive pressure will cause the sewn material to drag and premature wear to the material guide spring.
Fig. 1
Atlanta Attach770-963-7369 Fa
14
la cadeneta está debajo del tira-cadeneta antes de hacerla funcionar. Con la maquina encadenando en Manual dé vuelta al tornillo azul de nilón en sentido contrario a las manecillas del reloj hasta que la luz LED se enciende. Dé vuelta al tornillo en el sentido de las agujas del reloj hasta que el LED se
apaga. Dé vuelta 1/16" más en sentido de las agujas del reloj.
Ajustes a la Guía de la
Recortadora de BordeEl Rodillo Guía de Material Debe Ajustarse En Tres Dimensiones
1. El rodillo guía de material debe colocarse de forma que la distancia entre el rodillo y la cuchilla fija de abajo sea igual al grueso del material a coser. Ésto se consigue aflojando los dos pernos 1/4-20 que fijan el bloque soporte del rodillo al armazón del transportador superior. Se debe tener cuidado de mantener el bloque soporte hacia la derecha porque también es usado para tensionar la correa transportadora. Una vez el ajuste es hecho, apriete bien los pernos. El resorte del guía de material debe ser ajustado para que esté solo un poco por encima de la cuchilla fija. El resorte de la guía de material se usa sólo para ejercer una ligera presión sobre el material que se cose contra el rodillo guía. Presión excesiva
ment Companyx: 770-963-7641

Technical Manual 2213ES Two Needle Hemmer
2. The material guide roller should be adjusted along the sewing plane so as to be centered at the right 1/3 (Fig. 2) of the cutting edge of the upper movable knife blade. This is accomplished by loosening the two 1/4-20 bolts located in the slotted holes of the upper conveyor mounting bracket. After locating the material guide roller properly, tighten the two 1/4-20 bolts securely.
3. The material guide roller should be adjusted along the drive shaft to leave 1/16" clearance between the roller and the upper movable knife blade. This is accomplished by loosening the set screws (5) (Fig. 3) in the material guide roller and moving the roller along the shaft until the desired 1/16" clearance is reached. Tighten the set screws.
c
laprD
tret
Fig. 2
Atlanta Attach770-963-7369 Fa
ausará arrastre del material y desgaste prematuro al resorte del guía de material.
2. El rodillo de la guía de material debe ser ajustado a lo largo del plano de costura de forma que este centrado en el 1/3 de la derecha de
a hoja afilada de la cuchilla movible de rriba. Ésto se consigue aflojando los dos ernos 1/4-20 situados en los agujeros de anura del soporte del transportador superior. espués de situar el rodillo en el lugar
apropiado, apriete bien los dos pernos.
3. El rodillo de guía de material debe ser ajustado a lo largo del eje de trasmisión de forma que se deje un espacio libre de 1/16" entre el rodillo y la cuchilla movible de arriba. Ésto se consique aflojando los
ornillos en el rodillo guía y moviendo el odillo por el eje hasta que se consigue el spacio libre deseado de 1/16". Apriete los ornillos.
Fig. 3
ment Companyx: 770-963-7641
15
Technical Manual2213ES Two Needle Hemmer
Adjustment to the Thread Chain Puller and Speed
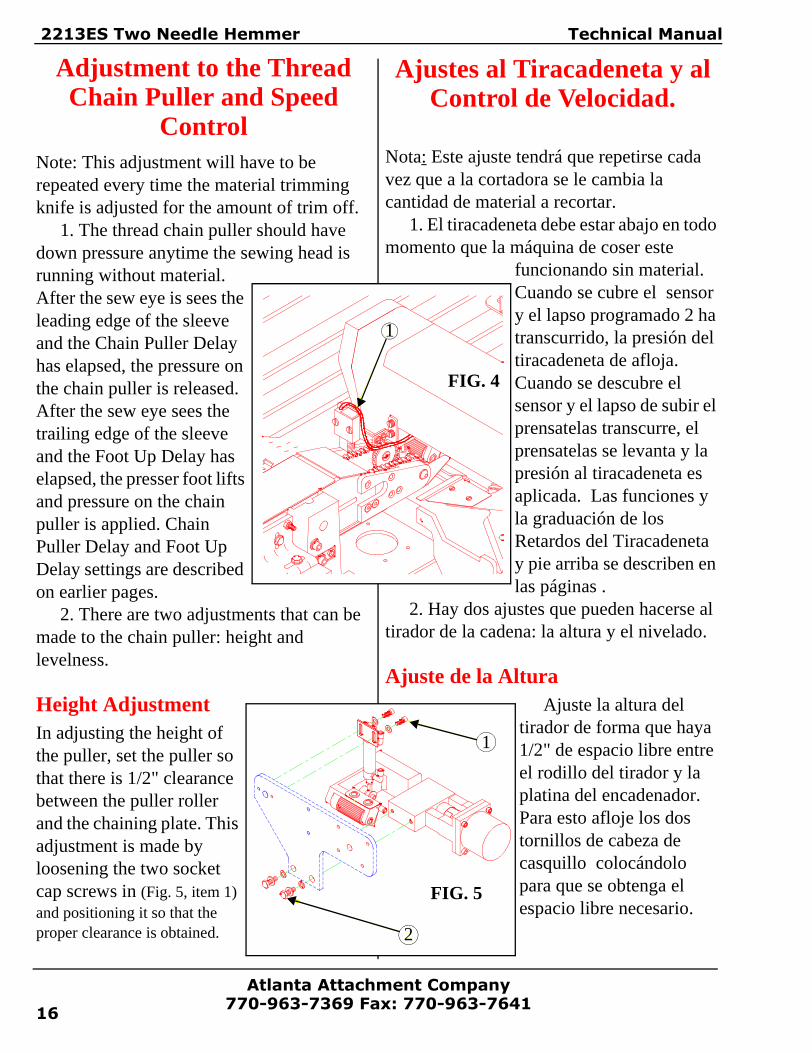
ControlNote: This adjustment will have to be repeated every time the material trimming knife is adjusted for the amount of trim off.
1. The thread chain puller should have down pressure anytime the sewing head is running without material. After the sew eye is sees the leading edge of the sleeve and the Chain Puller Delay has elapsed, the pressure on the chain puller is released. After the sew eye sees the trailing edge of the sleeve and the Foot Up Delay has elapsed, the presser foot lifts and pressure on the chain puller is applied. Chain Puller Delay and Foot Up Delay settings are described on earlier pages.
2. There are two adjustments that can be made to the chain puller: height and levelness.
Height AdjustmentIn adjusting the height of the puller, set the puller so that there is 1/2" clearance between the puller roller and the chaining plate. This adjustment is made by loosening the two socket cap screws in (Fig. 5, item 1) and positioning it so that the proper clearance is obtained.
Atlanta Attach770-963-7369 Fa
16
Ajustes al Tiracadeneta y al Control de Velocidad.
Nota: Este ajuste tendrá que repetirse cada vez que a la cortadora se le cambia la cantidad de material a recortar.
1. El tiracadeneta debe estar abajo en todo momento que la máquina de coser este
funcionando sin material. Cuando se cubre el sensor y el lapso programado 2 ha transcurrido, la presión del tiracadeneta de afloja. Cuando se descubre el sensor y el lapso de subir el prensatelas transcurre, el prensatelas se levanta y la presión al tiracadeneta es aplicada. Las funciones y la graduación de los Retardos del Tiracadeneta y pie arriba se describen en las páginas .
2. Hay dos ajustes que pueden hacerse al tirador de la cadena: la altura y el nivelado.
Ajuste de la AlturaAjuste la altura del
tirador de forma que haya 1/2" de espacio libre entre el rodillo del tirador y la platina del encadenador. Para esto afloje los dos tornillos de cabeza de casquillo colocándolo para que se obtenga el espacio libre necesario.
1
FIG. 4
1
2
FIG. 5
ment Companyx: 770-963-7641

Technical Manual 2213ES Two Needle Hemmer
Level AdjustmentAfter the proper height adjustments have been made the roller must be set so that it is level with the chaining plate. This adjustment should be made with the power OFF. Care should be taken in making this adjustment, as an improper adjustment may cause thread breakage and skipped stitches during the chaining process.Loosen the two 5/16-18 hex cap bolts (Fig. 5, item 2) that secure the puller to the mounting bracket. It may or may not be necessary to raise or remove the presser foot to make this adjustment. When the roller is level with the chaining plate tighten the two hex cap bolts.
A
asphdacd
5Pprec
Atlanta Attach770-963-7369 Fa
juste del NiveladoDespués que los ajustes necesarios a la
ltura han sido hechos el rodillo tienen que er fijado para que esté nivelado con la latina del encadenador. Estos ajustes deben acerse con la electricidad desconectada. Se ebe tener mucho cuidado al hacer este juste, porque un ajuste mal hecho puede ausar rotura del hilo y salto de puntadas urante el proceso de encadenado.
Afloje los dos pernos de cabeza exagonal /16-18 que aseguran el tirador al soporte. uede o no ser necesario levantar o quitar el rensatelas para hacer este ajuste. Cuando el odillo esté nivelado con la platina del ncadenador, apriete los dos pernos de abeza exagonal.
ment Companyx: 770-963-7641
17

Technical Manual2213ES Two Needle Hemmer
Thread Trimmer Adjustment Instructions
Atlanta Attach770-963-7369 Fa
18
Instrucciones Para Ajustar El Cortacadeneta
ment Companyx: 770-963-7641

Technical Manual 2213ES Two Needle Hemmer
Troubleshooting1. Chain cutter knife not cutting.
A. Manually activate solenoid valve and check operation of air cylinder.
B. Disconnect air pressure and check hardware for mechanical problems.
C. Check cutting blades for proper adjustment.
D. Check cables and wiring for loose connections.
E. Check Chop On time Delay.F. Lightly lubricate upper blade shaft
with sewing machine oil.2. Sewing Head will not run.
A. Check if Emergency switch is ON.B. Check cable at computer “B” socket
and at motor socket. Refer to Wiring Diagram on page 79.
C. Check eye in front of foot.3. Edge trimming knife not cutting cleanly.
A. Check sharpness of knives.B. Check knife adjustment.C. Check top conveyor alignment. Right
conveyor belt must be parallel to line of feed and aligned with edge of fabric at edge of folder.
D. Plastic roller must be kept close to top knife blade. See “adjustment to material edge trimming guide system” on page 14.4. Foot does not raise and drop at edge of sleeve.
A. Check Foot delay settings.B. Check electric eye adjustment at front
of foot.C. Check reflective tape.
5. Machine skipping or breaking thread.A. Check needle thread tension too tight
or too loose.
1
c
cm
c
C2
e
c
p3c
tdlf
ml4m
A
f
Atlanta Attach770-963-7369 Fa
Problemas y Soluciones. El cortacadeneta no corta.
A. Active manualmente la válvula y hequee la operación del cilindro.
B. Desconecte la presión de aire y hequee componentes por problemas ecánicos.
C. Chequee el ajuste de las cuchillas de la ortadora.(Pág. -)
D. Chequee los cables y las conecciones.E. Chequee Retardo de Activación
ortadora. El cabezal no funciona.
A. Chequee si el conmutador de mergencia está encendido.
B. Chequee el cable del enchufe “B” de la omputadora al enchufe del motor.
C. Chequee el sensor en frente del rensatelas.. La recortadora del borde de la tela no orta limpiamente.
A. Chequee el filo de las cuchillas.B. Chequee el ajuste de la cuchilla.C. Chequee el alineamiento del
ransportador de arriba. La correa derecha ebe estar paralela a la linea de alimento de a tela y alineada con el borde del tejido al ilo del doblador.
D. El rodillo de Plástico tiene que antenerse cerca de la hoja de la cuchilla de
a parte de arriba.. El Pie no se levanta y cae al borde de la anga.A. Chequee configuración de Retardo Pie
bajo.B. Chequee el ajuste del sensor
otoeléctrico en el frente del prensatelas.C. Chequee la cinta reflectora.
ment Companyx: 770-963-7641
19

Technical Manual2213ES Two Needle Hemmer
B. In case of thread breaking during chaining, check the levelness of the puller to the chaining plate. This is very critical to proper chaining.
C. Chaining must be checked in “MANUAL MODE”, using “CHAIN” button, not “SEW” button.6. Thread chain wraps around roller.
A. Check air jets on puller bracket.B. Check that the trimmer venturi is
working.C. Check roller for wear or burrs.
7. Machine stops while front electric eye remains covered.
A. Check adjustment of front eye.B. Check for thread breaks.C. Check sew eye time out setting.
8. Thread break sensor tripping without broken thread.
A. Adjust thread break detectors per manual 9. Machine runs-away when power is turned on.
A. Be sure power is turned on to all control boxes.
B. Disconnect remote treadle plug at sewing motor and apply power. If machine runs-away then replace defective Motor.
C. If machine runs-away when remote treadle cable is plugged back in then replace defective AAC control box.
D. Sew pedal is jammed in sewing position.10. Stepping motor will not run in automatic, JOG, or runs backwards.
A. Check the socket at the stepping motor for broken or bent pins.
B. Check the stepping motor cable and plugs for loose connections.
Atlanta Attach770-963-7369 Fa
20
5. La máquina salta puntadas o rompe el hilo.
A. Chequee la tensión del hilo de la aguja por si esta demasiado apretada o demasiado floja.
B.Si el hilo se rompe durante el encadenado, verifique el nivelado del tirador a la plancha del encadenador.Esto es crítico para un encadenado correcto. Vea la Página 1- para el ajuste del nivelado.
C. El encadenado tiene que ser chequeado en “MANUAL”.6. La cadeneta se envuelve alrededor del rodillo.
A. Chequee los chorros de aire en el soporte del tirador.
B. Chequee que el cortador venturi funciona.
C. Chequee el rodillo por desgaste o rebaba.7. La máquina se para cuando el sensor fotoeléctrico del frente permanece cubierto.
A. Chequee el ajuste del sensor del frente.B. Chequee por rotyura dxe hilos.C. Chequee Sensor de coser Máx. tiempo
de costura.8. El sensor de hilo roto se acciona sin que el hilo se halla roto.
A. Ajuste los detectores de la rotura del hilo por el manual (página ).9. La máquina funciona descontrolada cuando se enciende.
A. Asegurese que todas las cajas de controles estan encendidas.
B. Desconecte el enchufe del pedal del motor y encienda la máquina. Si la máquina funciona descontrolada reemplace el motor.
ment Companyx: 770-963-7641

Technical Manual 2213ES Two Needle Hemmer
C. Check pulleys and belts.D. With power turned off and the
stepping motor still plugged in, turn the stepping motor shaft by hand. Moderate resistance to turning indicates a defective stepper motor control box or shorted cable. Make this test again with the other end of the cable disconnected at the stepper motor control box to see if it is the control box or cable.
apc
d1am
p
e
tciuodp
Atlanta Attach770-963-7369 Fa
C. Si la máquina sigue malfuncionando ún cuando se vuelve a enchufar el cable del edal entonces reemplace la caja de ontroles defectiva AAC.
D. El pedal esta atascado en la posición e coser.0. El motor paso a paso no funciona en utomático, o en PRUEBA / AJUSTE, o se ueve al revés.A. Chequee el enchufe en el motor paso a
aso por alfileres rotos o doblados.B. Chequee el cable del motor y los
nchufes por conexiones sueltas.C. Chequee las poleas y las correas.D. Con la máquina apagada y el motor
odavía enchufado,dé vuelta al asta del motor on la mano.Resistencia moderada a voltear ndica daño en la caja de control del motor o n cable con corto circuito. Haga esta prueba tra vez con el otro extremo del cable esconectado de la caja de control del motor ara ver si es la caja de control o el cable.
ment Companyx: 770-963-7641
21

Technical Manual2213ES Two Needle Hemmer
Sewing Head Maintenance
1. Oil LevelAlways keep enough
oil in the machine so that the oil level is between two lines H and L of oil gauge (item 1).
2. Manual OilingBefore starting machine for
the first time, or if the machine is idle for more than a couple of weeks, manually lubricate needle bar (item 2).
3. Oil ChangeChange oil after the first
month in operation. After that, change oil every 6 months. Note: Be sure to change oil because dirty oil can cause excess wear on moving parts and shorten the life of the machine.
4. To Drain OilTake out drain plug
(item 3) and drain oil from here.
2
2
Atlanta Attach770-963-7369 Fa
22
Mantenimiento del Cabezal
1. Nivel del AceiteSiempre mantenga
suficiente aceite en la máquina para que el nivel del aceite esté entre las dos líneas H y L del indicador del nivel del aceite.(artículo 1)
2. Aceitado ManualAntes de poner en marcha
la máquina por la primera vez, o si la máquina no ha sido utilizada por más de un par de semanas, engrase manualmente la barra de agujas. (artículo 2)
3. Cambio de AceiteCambie el aceite después
del primer mes en operación. Después, cambie el aceite cada 6 meses.
Nota: Asegúrese de cambiar el aceite porque un aceite sucio puede causar excesivo desgaste de las partes móviles y acorta la vida de la máquina.
4. Para Drenar el Aceite. Saque el tapón de
drenaje (artículo 3) y vacíe el aceite por allí.
ment Companyx: 770-963-7641

Technical Manual 2213ES Two Needle Hemmer
5. Checking and Replacing Oil FilterIf oil filter (item 4) is clogged, normal
lubrication cannot be kept. Check and clean it every 6 months at the time of the regular oil change.
Refer to the Operational Manual that came with your sewing head
for more details regarding threading and operation of the
sewing head.
5A
onar
d
Atlanta Attach770-963-7369 Fa
. Chequeo y Remplazo del Filtro de ceite
Si el filtro de aceite (artículo 4) está bstruido, no puede haber una lubricación ormal. Chequeélo y limpielo cada 6 meses l mismo tiempo del cambio de aceite egular.
Consulte el Manual de Operacion que viene con la maquina de coser para mas
etalles con respeto a enebrado y operacion de la maquina de
coser.
ment Companyx: 770-963-7641
23

Technical Manual2213ES Two Needle Hemmer
Atlanta Attach770-963-7369 Fa
24
ment Companyx: 770-963-7641

2213ESGXXXX Assembly Drawings
Assembly Drawings and Parts Lists
Atlanta Attachment Company770-963-7369 Fax: 770-963-7641
25

2213ESGXXXX Assembly Drawings
Atlanta Attachment Company770-963-7369 Fax: 770-963-7641
26

2213ESGXXXX Assembly Drawings
2213ESGXXXX
Part # Description Qty Pg Part # Description Qty Pg1 213E-200 FRAME & TABLE 1 11 7 211-G6607F TOP CONVEYOR 1 192 211-162 INDEXING TABLE 1 16 8 211-2R SEW HEAD 13 013-G6605B CONVEYOR, 9’ 1 15 9 211-G6606C HEMMING FOLD ASSY 1 174 311-011 PICK & STACK 1 23 10 213-SPD PNEUMATIC DIAGRAM AR 555 311-018 STACKER ASSY 1 27 11 213-SWD WIRING DIAGRAM AR 536 311-017A LOWER CONVEYOR ASSY 1 25 12 ZZ213ESG TECHNICAL MANUAL AR
AAC Drawing Number 192409C Rev. 0
Atlanta Attachment Company770-963-7369 Fax: 770-963-7641
27

2213ESGXXXX Assembly Drawings
Atlanta Attachment Company770-963-7369 Fax: 770-963-7641
28

2213ESGXXXX Assembly Drawings
213E-200 Frame & Table Assembly (Panasonic)
Part # Description Qty Pg Part # Description Qty Pg1 211-121A EDGE TRIMMER 1 35 15 28201 CROSS BLOCK 12 311-020 COVER PLATE 1 16 40-112A TOUCH SCREEN MOUNT 13 SSPS90040 SCREW, PAN HEAD 4 17 0411-1300 WASTE CAN 1 404 213E-201 TABLE ASSEMBLY 1 37 18 010-122 DOOR 15 WWL6 LOCK WASHER 4 19 MM40450010 SLIDE LATCH 16 SSSC80032 SCREW, SOCKET CAP 4 20 4080-003 SERIAL BUS CONTROLLER 17 SSZS93032 SCREW, SHEET METAL 13 21 011-149 THREAD STAND
8 SSHC01048 SCREW, HEX CAP 2 22 011-136 THREAD STAND
9 WWF1/4 FLAT WASHER 2 23 ZX3840 V BELT 110 WWL1/4 LOCK WASHER 2 24 011-084 CONDUIT COVER 111 1278-6010 START/STOP BUTTON ASSY 1 38 25 AP-28-800NN STEPPER BOX 112 211-098 MOTOR COVER 1 26 SSPS90032 SCREW, PAN HEAD 413 314-Y6607 REGULATOR ASSEMBLY 1 39 27 WWF8 FLAT WASHER 414 211-126-2 ROD 1 28 CCCL12F CLAMP COLLAR 1
AAC Drawing Number 192179C Rev. 3
Atlanta Attachment Company770-963-7369 Fax: 770-963-7641
29

2213ESGXXXX Assembly Drawings
Atlanta Attachment Company770-963-7369 Fax: 770-963-7641
30

2213ESGXXXX Assembly Drawings
213E-205 Frame & Table Assembly (Efka)
Part # Description Qty Pg Part # Description Qty Pg1 211-121A EDGE TRIMMER 1 35 15 28201 CROSS BLOCK 12 311-020 COVER PLATE 1 16 40-112A TOUCH SCREEN MOUNT 13 SSPS90040 SCREW, PAN HEAD 4 17 0411-1300 WASTE CAN 1 404 213E-204 TABLE ASSEMBLY 1 18 010-122 DOOR 15 WWL6 LOCK WASHER 4 19 MM40450010 SLIDE LATCH 16 SSSC80032 SCREW, SOCKET CAP 4 20 4080-001 SERIAL BUS CONTROLLER 17 SSZS93032 SCREW, SHEET METAL 13 21 011-149 THREAD STAND
8 SSHC01048 SCREW, HEX CAP 2 22 011-136 THREAD STAND
9 WWF1/4 FLAT WASHER 2 23 ZX3840 V BELT 110 WWL1/4 LOCK WASHER 2 24 011-084 CONDUIT COVER 111 1278-6010 START/STOP BUTTON ASSY 1 38 25 AP-28-800NN STEPPER BOX 112 211-098 MOTOR COVER 1 26 SSPS90032 SCREW, PAN HEAD 413 314-Y6607 REGULATOR ASSEMBLY 1 39 27 WWF8 FLAT WASHER 414 211-126-2 ROD 1 28 CCCL12F CLAMP COLLAR 1
AAC Drawing Number 192782C Rev. 0
Atlanta Attachment Company770-963-7369 Fax: 770-963-7641
31

2213ESGXXXX Assembly Drawings
Atlanta Attachment Company770-963-7369 Fax: 770-963-7641
32

2213ESGXXXX Assembly Drawings
013-G6605B Free Standing Conveyor Assembly
Part # Description Qty Pg Part # Description Qty Pg1 GG150L050 GEAR BELT 1 25 013-029 END SLOTTED PLATE 22 MM1756A3 DROP LEAF SUPPORT 4 26 013-030 IDLER AXLE 13 WWF5/16 FLAT WASHER 18 27 013-031 ROLLER 24 NNK1/4-20 KEP NUT 12 28 211-057 PULLEY 15 NNK10-32 KEP NUT 8 29 013-033A PULLEY 16 SSHC01048 SCREW, HEX CAP 4 30 013-034 DRIVE AXLE 17 SSHC01064 SCREW, HEX CAP 8 31 013-035A MOTOR GUARD 18 013-078 U BRACKET 2 32 EET8967 PLUG 19 SSHC01192 SCREW, HEX CAP 4 33 013-049 BUNDLE SHELF ASSY 210 MM130-10A TEFLON TAP 108” 34 013-072 TUBE 211 SSHC10192 SCREW, HEX CAP 9 35 FF19510 CABLE 12’12 SSHC45064 SCREW, HEX CAP 4 36 EE24F163 FOOT SWITCH 113 WWL5/16 LOCK WASHER 9 37 23218D MOTOR 114 K-235 ROMAX CONNECTOR 2 38 013-118 BELT 115 MMJB4444 RUBBER FOOT 4 39 K-234 COVER 116 SSTS98040 SCREW, TRUSS SLOTTED 8 40 K-233 RECEPTACLE BOX 117 WWFS1/4 FLAT WASHER 20 41 SSTS80016 SCREW, TRUSS SLOTTED 2618 SSSC25112 SCREW, SOCKET CAP 1 42 011-088 DEFLECTOR TAPE 119 WWL1/4 LOCK WASHER 8 43 EE16-3 WIRE 11’20 013-084 WELDMENT TOP TUBE 1 44 SSZS93032 SCREW, SHEET METAL 221 013-025 TUBE, BELT SUPPORT 1 45 013G6605WD WIRING DIAGRAM AR 5122 NNH5/16-18 HEX NUT 9 46 013G605WD1 WIRING DIAGRAM AR 5223 013-027 TENSION ADJUSTOR 1 47 013-028L MOTOR MOUNT PLATE 124 013-028R MOTOR MOUNT PLATE 1
AAC Drawing Number 190500C Rev. 26
Atlanta Attachment Company770-963-7369 Fax: 770-963-7641
33

2213ESGXXXX Assembly Drawings
211-162 Indexing Table Assembly
Part # Description Qty Pg Part # Description Qty Pg1 211-162-1 TABLE TOP 1 11 AATP5/32 AIRLINE 20’2 211-162B8 LEG WELDMENT 2 12 NNH1/2-13 HEX NUT 43 211-162B7 STAND WELDMENT 1 13 SSSC01096 SCREW, SOCKET CAP 14 AA192-100A FOOT SWITCH 1 14 SSHC01080 SCREW, HEX CAP 25 016-049 INDEXER 1 15 NNE5/16-18 ELASTIC LOCK NUT 16 211-162A FORK 2 16 NNH1/4-20 HEX NUT 37 AAC6DP-6 AIR CYLINDER 1 17 SSAS024024 SCREW, ALLEN SHOULDER 18 AA198RA508 FLOW CONTROL 2 18 WWF1/4 FLAT WASHER 29 AAFCT-11 CLEVIS 1 19 WWL1/4 LOCK WASHER 210 MMFB4444 RUBBER FOOT 4 20 SSBC45096 SCREW, BUTTON CAP 4
AAC Drawing Number 191010B Rev. 4
Atlanta Attachment Company770-963-7369 Fax: 770-963-7641
34

2213ESGXXXX Assembly Drawings
211-G6606C Folder Assembly
Part # Description Qty Pg Part # Description Qty Pg1 NNH10-24 HEX NUT 3 8 011-012A FOLDER TONGUE 12 SSPS95024 SCREW, PAN SLOTTED 6 9 011-013A EDGE GUIDE, RIGHT 13 TTCL1BPPK1 KNOB 2 10 011-060 FOLDER SUPPORT 14 WWFS10 FLAT WASHER 7 11 WWB10S BRASS WASHER 25 010-022A MOUNT BRACKET 1 12 WWL10 LOCK WASHER 16 211-042 BRACKET BASE 1 13 010-022B FOLDER MOUNT 17 011-011 EDGE GUIDE 1 14 311-085A EDGE GUIDE SPACER AR
AAC Drawing Number 190185B Rev. 6
Atlanta Attachment Company770-963-7369 Fax: 770-963-7641
35

2213ESGXXXX Assembly Drawings
Atlanta Attachment Company770-963-7369 Fax: 770-963-7641
36

2213ESGXXXX Assembly Drawings
211-G6607F Top Conveyor Assembly
Part # Description Qty Pg Part # Description Qty Pg1 211-171 TOP CONVEYOR 1 21 22 SSPS90032 SCREW, PAN HEAD 22 211-020 EYE MOUNT 1 23 WWFS6 FLAT WASHER 93 011-046A COVER 1 24 SSPP80032 SCREW,PAN PHILLIPS 54 211-138 EYE MOUNT 1 25 2112-602 SUPPORT BLOCK 15 011-048 EYE BRACKET 1 26 2112-601 UNCURLER TUBE 16 211-064 NUT PLATE 1 27 2112-603 UNCURLER CLAMP BLOCK 17 WWL6 LOCK WASHER 4 28 AAQMC-5-8 QUICK MALE CONNECTOR 18 F201-113 NUT PLATE 1 29 AAF1/8 CLAMP 19 311-091 AIR JET MOUNT 1 30 211-174 UNCURLER TUBE 110 WW25DW WASHER PLATE 1 31 AAQUY-5-5 QUICK MALE Y 111 1975-412A NUT PLATE 1 32 AA2000F-03 FLOW CONTROL 112 NNE1/4-20 ELASTIC LOCK NUT 1 33 WWF10 FLAT WASHER 213 AAF1/4 CLAMP 1 34 211-178 UNCURLER TUBE REF14 211-023 FOLDER HOLDER 1 35 FFSM312LVQ ELECTRIC EYE 115 SSPS98024 SCREW, PAN HEAD 2 36 SSPS80064 SCREW, PAN HEAD 216 SSRS70048 SCREW, ROUND SLOTTED 2 37 NNE6-32 ELASTIC LOCK NUT 217 SSPS90024 SCREW, PAN HEAD 2 38 SSBC01032 SCREW, BUTTON CAP 118 SSTP80016 SCREW, TRUSS PHILLIPS 8 39 WWL8 LOCK WASHER 219 SSPS98032 SCREW, PAN HEAD 1 40 211-135 SKID PLATE 120 SSBC80032 SCREW, BUTTON CAP 2 41 211-136 SKID MOUNT 121 WWF8 FLAT WASHER 4
AAC Drawing Number 192134C Rev. 2
Atlanta Attachment Company770-963-7369 Fax: 770-963-7641
37

2213ESGXXXX Assembly Drawings
Atlanta Attachment Company770-963-7369 Fax: 770-963-7641
38

2213ESGXXXX Assembly Drawings
211-171 Conveyor Sub-Assembly
Part # Description Qty Pg Part # Description Qty Pg1 011-050 ADJUSTMENT BRKT 1 23 211-003 SIDE PLATE 12 NNH10-32 HEX NUT 2 24 211-049 IDLER SPROCKET 33 011-052 CONVEYOR MOUNT 1 25 011-037 IDLER SPROCKET 24 011-051 MOUNT BRACKET 1 26 011-039 DRIVE SPROCKET 15 011-049 SPACER 2 27 011-040 IDLER SPROCKET 16 311-002 MAIN DRIVE 1 42 28 MM66A-13 DRIVE SPROCKET 27 211-008 PIN PLATE 2 29 IIS008X048 SPRING PIN 48 WWFS10 FLAT WASHER 3 30 AA2000F-03 FLOW CONTROL 29 011-041 SPROCKET STUD 5 31 TTH32416 THREADED HANDLE 110 SSSS98048H SCREW, SOCKET CAP 2 32 WWF1/4 FLAT WASHER 511 SSSC98048 SCREW,SOCKET CAP 2 33 SSPS80096 SCREW, PAN SLOTTED 212 211-005 DRIVE AXLE 1 34 BBTRA411 THRUST WASHER 913 SSPP80024 SCREW, PAN PHILLIPS 4 35 SSFC98048 SCREW, FLAT CAP 214 SSHC01056 SCREW, HEX CAP 4 36 RRLC024C10 SPRING 415 WWP032 WASHER PLATE 1 37 CCCL4F CLAMP COLLAR 116 011-154 EDGE UNCURLER 1 38 MM25CCF210 CHAIN 217 011-032A SPACER 3 39 SSFC98032 SCREW, FLAT CAP 1218 011-032B SPACER 1 40 SSBC98048 SCREW, BUTTON CAP 519 211-007 PRESSURE PLATE 1 41 311-001A FEED WHEEL ASSY 1 4120 211-006 PRESSURE PLATE 1 42 MM66A-10 SPROCKET 121 211-004 NOSE PIECE 1 43 MM25CCF040 CHAIN 122 211-002 SIDE PLATE 1 44 AATP5/32 AIRLINE .85
AAC Drawing Number 191359C Rev. 5
Atlanta Attachment Company770-963-7369 Fax: 770-963-7641
39

2213ESGXXXX Assembly Drawings
Atlanta Attachment Company770-963-7369 Fax: 770-963-7641
40

2213ESGXXXX Assembly Drawings
311-011 Stacker Assembly
Part # Description Qty Pg Part # Description Qty Pg1 AAC3PS-1/2 AIR CYLINDER 1 18 311-011C CYLINDER BRKT 12 AAVSQE1 EXHAUST VALVE 2 19 311-011A CYLINDER MOUNT 13 AACSRLM032 AIR CYLINDER 1 20 311-059 STACKER GUARD 14 AAQMC-4-8 QUICK MALE ELBOW 4 21 MMU002A MUFFLER 25 AA3000F-07 FLOW CONTROL 1 22 SSSC95040 SCREW, SOCKET CAP 46 AAQME-4-8 QUICK MALE ELBOW 1 23 311-011B BUMPER 17 FF31F1033 2 PIN FEMALE CONNECTOR 1 24 SSSC90048 SCREW, SOCKET CAP 18 FF59F1802 2 PIN MALE CONNECTOR 1 25 311-013 NUT PLATE 19 029-016 CABLE 1 26 SSHC01128 SCREW, HEX CAP 210 SSM5X.8X40 SCREW, SOCKET CAP 4 27 SSSC98032 SCREW, SOCKET CAP 211 SSHC01048 SCREW, HEX CAP 4 28 AAQMC-5-10 QUICK MALE CONNECTOR 112 016-014A MATERIAL CLAMP 1 28 29 SSHC01064 SCREW, SOCKET CAP 413 016-023 CLAMP OPENER 1 29 30 WWFS1/4 FLAT WASHER 414 016-034A CYLINDER MOUNT 2 31 311-013A SPACER 115 029-017 ROD 2 32 FFSM312LVQ ELECTRIC EYE 116 AAQPR-5-4 QUICK REDUCER 1 33 MM3088A434 SHIM 217 AAQMT-4-8 QUICK MALE T 1 34 WWSW3/4 SPRING WASHER 1
AAC Drawing Number 190895C Rev. 8
Atlanta Attachment Company770-963-7369 Fax: 770-963-7641
41

2213ESGXXXX Assembly Drawings
Atlanta Attachment Company770-963-7369 Fax: 770-963-7641
42

2213ESGXXXX Assembly Drawings
311-017A Lower Conveyor Assembly
Part # Description Qty Pg Part # Description Qty Pg1 010-047 BELT IDLER ASSY 1 30 26 SSHC10064 HEX CAP 22 350254 THREADED ROD 9 27 211-036 FOLDER MOUNT PLATE 13 23055 ROLLER 2 28 AAQME-5-8 QUICK MALE ELBOW 2
3.1 SSSS01024 SCREW, SOCKET SET 4 29 AAVMJTV-3 VALVE 14 311-044 EDGE GUIDE 1 30 211-037 SWITCH HOLDER 15 010-049 ROLLER 1 31 211-038 NUT PLATE 1
5.1 SSSS01032 SCREW, SOCKET SET 2 32 SSPS90048 SCREW, PAN HEAD 26 010-145 ROD END BRKT 1 33 NNK8-32 KEP NUT 27 211-055 GEAR PULLEY 1 34 SSPS98016 SCREW, PAN HEAD 28 010-052 SHAFT 4 35 010-146 ROD END BRKT 19 013-007 ROLLER 1 36 211-056 SPACER 1
9.1 SSSS01032 SCREW, SOCKET SET 4 37 011-004 TENSIONER 110 013-006 ROLLER 1 38 WWFE016 FENDER WASHER 1
10.1 SSSS01032 SCREW, SOCKET SET 4 39 A-2014-7 CAM FOLLOWER 111 K-102-21 THREADED ROD 3 40 SSFC01080 SCREW, FLAT CAP 212 213-006 URETHANE BELT 8 41 SSHC01080 SCREW, HEX CAP 113 213-007 URETHANE BELT 1 42 SSFC01096 SCREW, FLAT CAP 614 NNM103 NUT 12 43 SSTS95160 SCREW, TRUSS SLOTTED 215 MM741-3 HINGE 1 44 311-029 MATERIAL ARM 116 TTCL1BPPK1 KNOB 2 45 311-036 EMERGENCY STOP BUTTON 117 SSFC98096 SCREW, FLAT CAP 3 46 311-046 KNIFE PLATE 118 311-014A SUPPORT PLATE 1 47 SSWFP06080 SCREW, WOOD 119 311-009B TABLE TOP 1 48 311-051A SUPPORT PLATE 120 NNH5/16-18 HEX NUT 5 49 WWFS10 FLAT WASHER 221 WWL5/16 LOCK WASHER 5 50 213-007B URETHANE BELT 122 WWFS5/16 FLAT WASHER 4 51 SSFC98032 SCREW, FLAT CAP 423 SSHC01032 SCREW, HEX CAP 6 52 213-011 TABLE EXTENSION 124 WWFS1/4 FLAT WASHER 15 53 010-145C ROD END BRKT 225 NNK1/4-20 KEP NUT 7 AAC Drawing Number 191115C Rev. 11
Atlanta Attachment Company770-963-7369 Fax: 770-963-7641
43

2213ESGXXXX Assembly Drawings
Atlanta Attachment Company770-963-7369 Fax: 770-963-7641
44

2213ESGXXXX Assembly Drawings
311-018 Stacker Assembly
Part # Description Qty Pg Part # Description Qty Pg1 AA6805 NEEDLE VALVE 3 40 111-LAB2 LABEL 22 AACSRLM060 AIR CYLINDER 1 41 013-126A AIR JET LABEL 13 016-067 REED SWITCH 2 42 013-064 CYLINDER MOUNT BRKT 14 029-017 ROD 2 43 311-038 STACKER GUARD 15 AAQMC-4-8 QUICK MALE CONNECTOR 3 44 SSSC80024 SCREW, SOCKET CAP 16 AAQME-4-4 QUICK MALE ELBOW 7 45 013-078 U BRKT 17 AAQUT-4-4 QUICK UNION T 1 46 SSFC95032 SCREW, FLAT CAP 48 SSHC10048 SCREW, HEX CAP 2 47 013-089 GUARD 19 AAVBG35A COIL HOSE 1 48 311-032 STACKER FRAME 110 WWF1/4 FLAT WASHER 18 49 016-034 CYLINDER MOUNT 211 AAVSQE1 VALVE 2 50 AAE711C24D AIR SOLENOID 112 FF31F1033 2 PIN FEMALE CONNECTOR 2 51 311-018E RAMP 213 FF59F1802 2 PIN MALE CONNECTOR 4 52 SSPS98048 SCREW, PAN HEAD 214 029-016 CABLE 1 53 WWF10 FLAT WASHER 215 013-011 ROD MOUNT 1 54 013-112 ROD MOUNT 116 MM427-3RB RUBBER CASTER 1 55 WWF5/16 FLAT WASHER 217 MMU002A MUFFLER 2 56 SSHC01192 SCREW, HEX CAP 218 SSM5X.8X40 SCREW, SOCKET CAP 8 57 NNH1/4-20 HEX NUT 419 TTH32415 THREADED HANDLE 1 58 SSHC01048 SCREW, HEX CAP 1020 013-114 ROD 1 59 SSSC01096 SCREW, SOCKET CAP 421 11200A BUMPER 2 60 NNJ5/16-24 JAM NUT 622 013-018 CYLINDER MOUNT BRKT 1 61 SSHC01024 SCREW, HEX CAP 623 SSW#1/4 WING KNOB 4 62 AAQMC-4-4 QUICK MALE CONNECTOR 224 311-033 CYLINDER MOUNT BRKT 1 63 013-126 STACKER SPEED LABEL 125 311-018D MATERIAL CLAMP 1 31 64 WWL5/16 LOCK WASHER 226 013-043 THREADED STUD 2 65 AAQME-4-8 QUICK MALE ELBOW 327 013-045 OPENER BRKT 1 66 013-113 ROD MOUNT TOP 228 013-046 OPENER BRKT 1 67 SSSC80048 SCREW, SOCKET CAP 229 013-047 OPENER PLATE 1 68 SSPS98032 SCREW, PAN HEAD 130 013-048 OPENER PLATE 1 69 AAF1/4 CLAMP 131 311-018B BEAM CLAMP STABALIZER 1 70 SSTS80016 SCREW TRUSS SLOTTED 132 013-054 COVER 1 71 SSSS01016 SCREW, SOCKET SET 433 013-054A COVER 1 72 SSSC01064 SCREW, SOCKET CAP 434 013-055 ROD 1 73 013G6606 PUSHER ASSEMBLY 1 3335 311-037 STACKER GUARD 1 74 013-123 STACKER BLOW DOWN 1 3236 013-058 CLAMP 2 75 FFSM312LVQ ELECTRIC EYE 137 013-059 WIRE GUIDE MOUNT 1 76 MM3088A434 SHIM 238 013-060 BLOWER ASSY 1 77 WWSW3/4 SPRING WASHER 139 013-061 BLOWER ASSY 1 78 AATP4-1 AIRLINE 5’
AAC Drawing Number 190902C Rev. 9
Atlanta Attachment Company770-963-7369 Fax: 770-963-7641
45

2213ESGXXXX Assembly Drawings
016-014A Material Clamp Assembly
Part # Description Qty Pg Part # Description Qty Pg1 IID016X192 DOWEL PIN 1 14 WWSI8 INT TOOTH WASHER 82 NNK10-32 KEP NUT 1 15 016-015 CLAMP BRKT 13 RRLC055J-7 SPRING 1 16 016-016 BASE PLATE 14 RRLE024B-6 SPRING 1 17 016-017 BOTTOM CLAMP 15 SSFC90024 SCREW, FLAT CAP 2 18 016-018 SIDE SUPPORT 26 SSM18-931 SCREW, SHOULDER 1 19 013-040 WHEEL 27 SSSC80024 SCREW, SOCKET CAP 2 20 016-020B TRIP LEVER 18 SSBC90016 SCREW, BUTTON CAP 8 21 016-021 TIRP LEVER MOUNT 19 SSPS98032 SCREW, PAN HEAD 8 22 016-022B CLAMP JAW 110 A-2206A THREADED ROD 1 23 CCCL4F CLAMP COLLAR 411 WWFS1/4 FLAT WASHER 6 24 SSSP01016 SCREW, PAN HEAD 212 WWSI10 INT TOOTH WASHER 8 25 016-022A STIFFNER 113 016-022C CLAMP JAW 1 AAC Drawing Number 190681C Rev. 11
Atlanta Attachment Company770-963-7369 Fax: 770-963-7641
46

2213ESGXXXX Assembly Drawings
016-023 Clamp Opener Assembly
Part # Description Qty Pg Part # Description Qty Pg1 016-067 REED SWITCH 1 8 016-026 LEFT SIDE OPENER 12 SSHC01064 SCREW, HEX CAP 4 9 016-027 RIGHT SIDE OPENER 13 SSSC80016 SCREW, SOCKET CAP 2 10 016-028 REED SWITCH 14 TTH32415 THREADED HANDLE 1 11 016-066 OPENER RAMP 25 WWL1/4 LOCK WASHER 4 12 SSFC95032 SCREW, FLAT CAP 46 016-024 OPENER BRKT TOP 1 13 WWFS1/4 FLAT WASHER 47 016-025 PRESSURE PLATE 1
AAC Drawing Number 190306B Rev. 3
Atlanta Attachment Company770-963-7369 Fax: 770-963-7641
47

2213ESGXXXX Assembly Drawings
010-047 Belt Idler Assembly
Part # Description Qty Pg Part # Description Qty Pg1 010-047D ROLLER YOKE 1 6 AAF01 SOFFIE JET 12 211-109C BELT PLATE 1 7 SSBC98024 SCREW, BUTTON CAP 23 010-047C ROLLER 1 8 WWFS10 FLAT WASHER 24 010-047B SHAFT 1 9 AA198RR510 FLOW CONTROL 15 UUFF609-01 BRONZE BEARING 2
AAC Drawing Number 290014B Rev. 11
Atlanta Attachment Company770-963-7369 Fax: 770-963-7641
48

2213ESGXXXX Assembly Drawings
311-018D Clamp Sub-Assembly
Part # Description Qty Pg Part # Description Qty Pg1 311-018DA WELDMENT 1 6 311-018C CLAMP MOUNT PLATE 12 RRLE020B-7 SPRING 4 7 SSFC98016 SCREW, FLAT CAP 23 CCCL4F CLAMP COLLAR 2 8 NNK10-32 KEP NUT 24 013-063 OPENER BRKT ASSY 1 9 SSSC98016 SCREW, SOCKET CAP 45 013-062 OPENER BRKT ASSY 1 10 013-040 ROLLER 2
AAC Drawing Number 290807C Rev. 3
Atlanta Attachment Company770-963-7369 Fax: 770-963-7641
49

2213ESGXXXX Assembly Drawings
013-123 Stacker Actuator Assembly
Part # Description Qty Pg Part # Description Qty Pg1 AA2000F-03 FLOW CONTROL 1 8 AAV41-PP HUMPHREY VAVLE 12 AAQBT-4-8 QUICK BRANCH T 1 9 MM4554K11 PIPE PLUG 13 AAQMC-4-8 QUICK MALE CONN. 1 10 NNH1/4-20 HEX NUT 34 AAQMC-5-8 QUICK MALE CONN. 1 11 SSZH#6096 SCREW, SHEET METAL 35 AAQMT-4-8 QUICK MALE T 1 12 AAQPR-5-4 QUICK REDUCER 16 AAV341AR08 PILOT VALVE 1 13 AATP5/32 AIRLINE 3.25’7 AAV341AS08 PILOT VALVE 1
AAC Drawing Number 290135B Rev. 3
Atlanta Attachment Company770-963-7369 Fax: 770-963-7641
50

2213ESGXXXX Assembly Drawings
013-G6606 Pusher Assembly
Part # Description Qty Pg Part # Description Qty Pg1 AA198RA408 FLOW CONTROL 2 8 SSBC98016 SCREW, BUTTON CAP 42 AAC6DP-3B AIR CYLINDER 1 9 WWFS10 FLAT WASHER 43 013-019 PUSHER BLADE 1 10 NNJ5/16-24 JAM NUT 14 013-020 CYLINDER MOUNT 1 11 WWSI5/16 INT TOOTH WASHER 15 013-021 PUSHER BLADE MOUNT 1 12 273-4-503 LEATHER WASHER 16 CCCL5F CLAMP COLLAR 1 13 SSBK01160 CARRIAGE BOLT 47 WWFS1/4 FLAT WASHER 4 14 NNK1/4-20 KEP NUT 4
AAC Drawing Number 190368C Rev. 7
Atlanta Attachment Company770-963-7369 Fax: 770-963-7641
51

2213ESGXXXX Assembly Drawings
Atlanta Attachment Company770-963-7369 Fax: 770-963-7641
52

2213ESGXXXX Assembly Drawings
211-121A Edge Trimmer Assembly
Part # Description Qty Pg Part # Description Qty Pg1 CC192024 COLLAR 1 26 255510 CLAMP 12 EEMS221005C MOTOR 1 27 SSBC01032 SCREW, BUTTON CAP 23 211-172 CABLE 1 28 WWFS1/4 FLAT WASHER 14 CCSC41/4 SET COLLAR 1 29 WWL1/4 LOCK WASHER 15 NNH8-32 HEX NUT 2 30 255508-2 SHAFT 16 RR306105 SPRING 1 31 010-027 ECCENTRIC ASSY 17 SSFC90032 SCREW, FLAT CAP 4 32 010-029A1 MOTOR MOUNT 18 SSM207045 WASHER 1 33 010-029B1 MOTOR MOUNT 19 SSM255513 SCREW 1 34 010-031 MOTOR MOUNT 110 SSM4547 SCREW, SOCKET SET 35 010-032 MOTOR ADJ BLOCK 111 SSM5109 SCREW 1 36 010-036A GUARD PLATE 112 SSM7010 SCREW 1 37 010-042 SPRING CUTTER PLATE 113 SSM7028 SCREW 1 38 255507-91 UPPER CUTTER HOLDER 114 SSM7036 SCREW 1 39 255509 LOWER CUTTER HOLDER 115 SSMW00241 SCREW, SLOTTED SET 1 40 202522 RING 116 SSPS80032 SCREW, PAN HEAD 4 41 204351 LOWER CUTTER 117 SSSC01040 SCREW, SOCKET CAP 2 42 240099 NEEDLE BEARING 218 SSSC01064 SCREW, SOCKET CAP 1 43 255506 CUTTER BRKT 119 SSSC95040 SCREW, SOCKET CAP 4 44 TTK32315 KNOB 120 SSSS90032 SCREW, SOCKET SET 2 45 MMFELT FELT PAD 121 255511 GUIDE 1 46 010-037A COUNTER BALANCE 122 SSTS85008 SCREW, TRUSS SLOTTED 2 47 211-137 COVER 123 WWB5/32 BRASS WASHER 2 48 SSPS80024 SCREW, PAN HEAD 324 306394 UPPER CUTTER 1 49 WWFS6 FLAT WASHER 325 SSSC05128F SCREW, SOCKET CAP 1
AAC Drawing Number 192051C Rev. 3
Atlanta Attachment Company770-963-7369 Fax: 770-963-7641
53

2213ESGXXXX Assembly Drawings
Atlanta Attachment Company770-963-7369 Fax: 770-963-7641
54

2213ESGXXXX Assembly Drawings
213E-201 Frame Assembly
Part # Description Qty Pg Part # Description Qty Pg1 211-G6602 DRIVE MOTOR 1 43 15 SSZH#10064 SCREW, SHEET METAL 42 211-053 MOTOR SPACER 1 16 211-030 TOP COVER 13 GG600L050 GEAR BELT 1 17 211-029 TOP CONVEYOR MOUNT 14 SSHC01040 SCREW, HEX CAP 7 18 011-054 SHIM 15 WWL1/4 LOCK WASHER 7 19 SSHC01160 SCREW, HEX CAP 26 WWFS1/4 FLAT WASHER 15 20 SSHC01056 SCREW, HEX CAP 27 AAQBU-4-4 BULKHEAD UNION 1 21 211-034 TRANSFER DRIVE ASSY 1 448 AP-1721 BASE STAND 0 22 SSHC01128 SCREW, HEX CAP 79 TTCL1BPPK1 KNOB 4 23 213E-202 BOTTOM SIDE ASSY 1 4710 311-008K EYE MOUNT 1 24 213-SPD PNEUMATIC DIAGRAM AR 5511 010-058 HINGE BRACKET 2 25 213-SWD WIRING DIAGRAM AR 5312 010-089 BUNDLE SHELF 1 26 211-208 CONTROL BOX MOUNT 113 0411-1903 FOOT SWITCH ASSY 1 50 27 SSZH#10096 SCREW, SHEET METAL 414 011-129 CONVEYOR MOUNT 1 28 AAQBU-3-3 BULKHEAD UNION 1
AAC Drawing Number 192180C Rev. 3
Atlanta Attachment Company770-963-7369 Fax: 770-963-7641
55

2213ESGXXXX Assembly Drawings
1278-6010 Start/Stop Button Assembly
Part # Description Qty Pg Part # Description Qty Pg1 EEPCB65GM ENCLOSURE MOD. 1 5 EE3X01 CONTACT BLOCK N.C. 12 EEPMTS44 E-STOP BUTTON 1 6 EE3X10 CONTACT BLOCK N.O. 13 EEPF3 START BUTTON 1 7 EE15Y LEGEND PLATE 14 EEA3L MOUNTING LATCH 2 8 FF3210 STRAIN RELIEF 1
AAC Drawing Number 191058B Rev. 1
Atlanta Attachment Company770-963-7369 Fax: 770-963-7641
56

2213ESGXXXX Assembly Drawings
314-Y6607 Coelescent Regulator Assembly
Part # Description Qty Pg Part # Description Qty Pg1 AA198-5110 REGULATOR 1 8 WWFS10 FLAT WASHER 22 26237ALAB1 LABEL 1 9 WWL10 LOCK WASHER 23 AA198-5 REGULATOR 1 10 AAQME-4-4 QUICK MALE ELBOW 14 013-124 LABEL, 70-80 PSI 1 11 MM4554K11 PIPE PLUG 15 013-105 FILTER PANEL 1 12 AAQME-4-8 QUICK MALE ELBOW 26 013-124 LABEL, 40 PSI 1 13 AAQME-3-4 QUICK MALE ELBOW 17 SSPP98032 SCREW, PAN PHILLIPS 2 14 AAQME-4-4 QUICK MALE ELBOW 1
AAC Drawing Number 191076C Rev. 2
Atlanta Attachment Company770-963-7369 Fax: 770-963-7641
57

2213ESGXXXX Assembly Drawings
0411-1300 Waste Container Assembly
Part # Description Qty Pg Part # Description Qty Pg1 MMTC32GTAN WASTE CAN 1 8 26282 FILTER HOLDER 22 MM5415K16 HOSE CLAMP 2 9 26285A FILTER 13 MM16300 TUBE CLAMP 1 10 SSPS90024 SCREW, PAN HEAD 44 MMRPL150 PLAIN ELBOW 1 11 MMFH150 FLEX HOSE 6’5 MMTC32GLN CONDUIT LOCK NUT 1 12 SSHC01032 SCREW, HEX CAP 16 MMTC32GR REDUCER 1 13 WWF1/4 FLAT WASHER 17 NNK1/4-20 KEP NUT 1 14 NNK8-32 KEP NUT 4
AAC Drawing Number 191225C Rev. 8
Atlanta Attachment Company770-963-7369 Fax: 770-963-7641
58

2213ESGXXXX Assembly Drawings
311-001A Feed Wheel Assembly
Part # Description Qty Pg Part # Description Qty Pg1 011-036 NUT PLATE 1 6 BBTT601 BRONZE BEARING 22 011-033 FEED WHEEL MOUNT 1 7 MM66A-10 DRIVE SPROCKET 13 010-015 FEED WHEEL 1 8 WWFS1/4 FLAT WASHER 24 CCCL4F CLAMP COLLAR 1 9 SSHC01096 SCREW, HEX CAP 25 011-042 SHAFT 1
AAC Drawing Number 192024B Rev. 1
Atlanta Attachment Company770-963-7369 Fax: 770-963-7641
59

2213ESGXXXX Assembly Drawings
311-002 Main Drive Assemblyl
Part # Description Qty Pg Part # Description Qty Pg1 IID016X112 DOWEL PIN 1 12 211-075 BELT GUARD 12 BBTT601 TRUST BEARING 2 13 211-077 TENSIONER 13 211-014 PULLEY 1 14 211-076 SHAFT TOP DRIVE 14 211-013 GEAR 1 15 SSAS016048 SCREW, ALLEN SHOULDER 15 SSFC90040 SCREW, FLAT CAP 3 16 WWFS10 FLAT WASHER 56 GG120XL037 GEAR BELT 1 17 WWL10 LOCK WASHER 57 211-078 PULLEY 1 18 SSSC98032 SCREW, SOCKET CAP 38 PP22XLB037 PULLEY 1 19 SSSC98192 SCREW, SOCKET CAP 19 NNH10-24 HEX NUT 1 20 SSSC98080 SCREW, SOCKET CAP 110 211-016 NUT PLATE 1 21 BBTRA411 THRUST WASHER 111 211-074 PIVOT 1
AAC Drawing Number 190255B Rev. 7
Atlanta Attachment Company770-963-7369 Fax: 770-963-7641
60

2213ESGXXXX Assembly Drawings
211-G6602 Drive Train Assembly
Part # Description Qty Pg Part # Description Qty Pg1 211-025 GEAR PULLEY 1 8 MM2X897 PILLOW BLOCK 12 SSPS98032 SCREW, PAN HEAD 4 9 211-045 GEAR 13 WWSI10 INT TOOTH WASHER 4 10 211-051 SPACER 14 011-018 MOTOR BRACKET 1 11 211-069 NUT PLATE 15 011-020 STEPPER MOTOR 1 12 SSHC10160 SCREW, HEX CAP 26 A-2010U U-JOINT 1 13 WWF5/16 FLAT WASHER 27 211-026 SHAFT 1 14 WWL5/16 LOCK WASHER 2
AAC Drawing Number 190182B Rev. 4
Atlanta Attachment Company770-963-7369 Fax: 770-963-7641
61

2213ESGXXXX Assembly Drawings
211-034 Transfer Drive Assembly
Part # Description Qty Pg Part # Description Qty Pg1 MM2X897 PILLOW BLOCK 2 7 211-057 PULLEY 12 SSFC90048 SCREW, FLAT CAP 3 8 211-028 DRIVE PLATE 13 SSHC20048 SCREW, HEX CAP 4 9 211-047 GEAR ADAPTOR 14 WWF5/16 FLAT WASHER 4 10 211-048 DRIVE ROD 15 WWL5/16 LOCK WASHER 4 11 211-051 PILLOW SPACER 26 211-013 DRIVE GEAR 1 12 GG540L050 GEAR BELT 1
AAC Drawing Number 290131B Rev. 8
Atlanta Attachment Company770-963-7369 Fax: 770-963-7641
62

2213ESGXXXX Assembly Drawings
Notes
Atlanta Attachment Company770-963-7369 Fax: 770-963-7641
63

2213ESGXXXX Assembly Drawings
Atlanta Attachment Company770-963-7369 Fax: 770-963-7641
64

2213ESGXXXX Assembly Drawings
213E-202 Bottom Side Assembly
Part # Description Qty Pg Part # Description Qty Pg1 MM427-3RB RUBBER CASTER 5 23 WWF3/8 FLAT WASHER 42 SSHC01032 SCREW, HEX CAP 15 24 WWL3/8 LOCK WASHER 43 011-111 BUMPER 4 25 AA2000F-03 FLOW CONTROL 14 311-010 MAIN TABLE 1 26 MM5415K16 HOSE CLAMP 25 311-007 FRAME WELDMENT 1 27 SSPS95128 SCREW, PAN HEAD 46 WWFS10 FLAT WASHER 4 28 EEDE2X2 WIRING CONDUIT 1’7 MMYSB1.5X1 TUBE, Y 1 29 EEDC2X2 CONDUIT COVER 1’8 MM16300 TUVE CLAMP 2 30 4059-D7-NS PANASONIC MOTOR 19 SSZH#10048 SCREW, SHEET METAL 2 31 213-203 ELECTRONIC ASSY 1 4910 MM16314G1 FUNNEL 1 32 MMFH150 FLEX HOSE 1’11 26239 PILOT VALVE 1 33 AAVBG35B COIL HOSE 212 26284 PILOT VALVE 1 34 SSZH#10128 SCREW, SHEET METAL 1213 SSZH#10032 SCREW, SHEET METAL 12 35 NNJ1/2-20 JAM NUT 414 TTIW1/4-20 WOOD INSERT 4 36 0411-1057 WASTE VENTURI ASSY 115 011-099 CLAMP BRACKET 2 37 SSZS93032 SCREW, SHEET METAL 416 013-091 MOTOR MOUNT PLATE 1 38 211-195 EDGE TRIMMER MOUNT 117 011-098 SLIDE RAIL 2 39 213-SPD PNEUMATIC DIAGRAM AR 5518 211-124A ISOLATOR POST 4 40 213-SWD WIRING DIAGRAM AR 5319 211-132A ADAPTOR 1 41 WWF5/16 FLAT WASHER 220 NNH10-24 HEX NUT 4 42 WWL5/16 LOCK WASHER 221 SSHC10128 SCREW, HEX CAP 2 43 211-208 CONTROL BOX MOUNT 122 SSHC25160 SCREW, HEX CAP 4
AAC Drawing Number 192181C Rev. 2
Atlanta Attachment Company770-963-7369 Fax: 770-963-7641
65

2213ESGXXXX Assembly Drawings
Atlanta Attachment Company770-963-7369 Fax: 770-963-7641
66

2213ESGXXXX Assembly Drawings
213-203 Electronics Assembly
Part # Description Qty Pg Part # Description Qty Pg1 AAVF51FM1B AIR PRESSURE SWITCH 1 26 EE17518 POWER CORD 22 AAQME-4-8 QUICK MALE ELBOW 3 27 EECA491024 MINI CONTACTOR 13 211-204 ELECTRICAL PANEL 1 28 EEDC2X2 DUCT COVER 4.4’4 213-204 CABLE PACKAGE 1 29 EEDF2X2 WIRE DUCT 4.4’5 AAE711C24D VALVE SOLENOID 1 30 FF100F2202 2 PIN CONNECTOR 66 213-SPD PNEUMATIC DIAGRAM AR 55 31 FF1724 STRAIN RELIEF 87 213-SWD WIRING DIAGRAM AR 53 32 FF19510 CABLE 20’8 40-320 DISCONNECT 1 33 FF264-341 TERMINAL BLOCK 99 4080-110 QUAD IN MODULE 3 34 FF264-347 TERMINAL BLOCK 310 4080-130 OPTO OUT MODULE 1 35 FF264-371 TERMINAL END 311 4080-140 QUAD OUT MODULE 3 36 FF3077-28 WIRE, 16GA 212 4080-150 PROGRAM MODULE 1 37 FF3077-6 WIRE, 16GA 2’13 4080-160 SINGLE OUT MODULE 1 38 FF3077-7 WIRE, 16GA 2’14 4080-970 MEMORY MODULE 1 39 FFRAV781BW TVS MODULE 115 4080-980 CONTROLLER MODULE 1 40 FFSC10002 STRAIN RELIEF COVER 616 4080-990 POWER SUPPLY 1 41 SSSC70024 SCREW, SOCKET CAP 217 AAE213-8 SOLENOID ASSY 1 42 TTSRBS82908 TERMINAL RING 218 AAQME-5-10 QUICK MALE ELBOW 1 43 WWF8 FLAT WASHER 1819 AAQPR-5-4 QUICK REDUCER 1 44 NNK8-32 KEP NUT 220 AAQUT-4-4 QUICK UNION T 1 45 MM100-1/8 DOOR TRIM 1’21 AAQUY-4-4 QUICK UNION Y 2 46 SSPS90016 SCREW, PAN HEAD 1422 AATP4-1 AIRLINE 1’ 47 SSPS90024 SCREW, PAN HEAD 723 AATP5/32 AIRLINE 1’ 48 EET8966 RECEPTACLE 224 SSPS90080 SCREW, PAN HEAD 2 49 FF19510 CABLE 4’25 EE16-3C2406 CABLE 8’
AAC Drawing Number 192130C Rev. 1
Atlanta Attachment Company770-963-7369 Fax: 770-963-7641
67

2213ESGXXXX Assembly Drawings
0411-1903 Foot Switch Assembly
Part # Description Qty Pg Part # Description Qty Pg1 EE24F163 FOOT SWITCH 1 3 TTAA5267 FASTON CONNECTOR 22 FF1772 4 COND. WIRE 14’ 4 FF100F2403 3 PL CONNECTOR 1
AAC Drawing Number 125310A Rev. 6
Atlanta Attachment Company770-963-7369 Fax: 770-963-7641
68

2213ESGXXXX Assembly Drawings
013G6605WD Stacker Wiring Diagram
Atlanta Attachment Company770-963-7369 Fax: 770-963-7641
69

2213ESGXXXX Assembly Drawings
013G605WD1 Stacker Wiring Diagram
Atlanta Attachment Company770-963-7369 Fax: 770-963-7641
70

2213ESGXXXX Assembly Drawings
213-SWD Wiring Diagram (Panasonic)
Atlanta Attachment Company770-963-7369 Fax: 770-963-7641
71

2213ESGXXXX Assembly Drawings
213ES-WD Wiring Diagram (Efka)
Atlanta Attachment Company770-963-7369 Fax: 770-963-7641
72

2213ESGXXXX Assembly Drawings
213-SPD Pnuematic Diagram
Atlanta Attachment Company770-963-7369 Fax: 770-963-7641
73

2213ESGXXXX Assembly Drawings
Atlanta Attachment Company770-963-7369 Fax: 770-963-7641
74

