servidor web
TRANSCRIPT
Curso: Introducción a las Aplicaciones y Servicios de Internet bajo Linux.
________________________________________________________________________________CFIE 2 Valladolid. Febrero-Marzo 2004. Módulo 4. Servidor Páginas Web. Pág 1
SERVIDOR DE PÁGINAS WEB (Apache). La World Wide Web (WEB) es el servicio de Internet, que sin duda alguna ha sufrido el mayor crecimiento de todos cuantos pueblan esta inmensa red de araña que hoy es la red. Es más, casi el 70 % del ancho de banda total se debe a accesos a través de páginas web (formato html) o derivados de éstas. La forma en que se visualiza la información no tiene parangón con ninguno de los otros formatos, y por si esto fuera poco lasa perspectivas que abre el comercio electrónico creando una nueva relación entre el/la client@ virtual y la empresa aún más virtual, hace que el futuro sea desconocido en el viejo arte de la compra y la venta de objetos, o sea del mercado “único” y la globalización del mercado. Como es de esperar en todo hay sus buenas y sus malas razones de ser, sólo depende de l@s usuari@s de estos sistemas, el buen o mal uso de los mismos. En este módulo aprenderemos a configurar el servidor Web Apache en nuestros servidores. Cada uno de los ficheros que intervienen en la configuración son en si mismos pequeños mundos que nos llevarían probablemente a dedicarles tanto tiempo como dura el curso entero, pero como eso no es posible, si intentaremos descifrar de ellos lo que nos interesa y lo demás lo dejaremos para el futuro cuando estos ficheros, a veces tan grandes, no sean ya un misterio para nosotr@s. Tratar con un servidor que es capaz de hacer muchas cosas y sobre todo ser el servidor web más utilizado del mundo conlleva un tanto de respeto y mucha humildad por nuestra parte, por lo que trataremos de ir pasito a pasito y con buena letra ¿eh? Nuestra versión de RedHat 9 incluye también otro servidor llamado TUX, que seguramente será algo más sencillo, pero desde luego no tan popular como Apache, eso seguro. Como en todos los servidores vistos hasta ahora, suponemos que el servidor está instalado en el momento de la instalación de RedHat Linux 9, y por lo tanto no es necesario hacer mucho más allá en ese respecto. Si esto es así también se encontrará funcionando en el sistema cada vez que este arranque. Por ahí comenzaremos a trabajar, lo primero es ver cómo arrancar/parar el servidor, cómo decirle que arranque en el momento de inicio del sistema y decirle que funcione en los niveles de ejecución 3 y 5 de nuestro sistema ¿lo recordáis? Por si acaso no ¡vamos a ello! VER SI EL SERVIDOR ESTÁ INSTALADO Para ver si efectivamente está instalado nuestro servidor, lo podemos ver de varias formas, la primera y más sencilla es ejecutar el comando rpm para que nos lo diga el propio gestor de aplicaciones: [root@casiopea /root]# rpm –qa|grep httpd Este comando nos devolverá todos los paquetes instalados cuyos nombres tengan la palabra httpd. Esto es muy útil ya que más adelante necesitaremos instalar 3 programas dependientes de httpd que el servidor no instala por defecto para configurar un servidor https:// ó seguro. Además esto nos proporciona la posibilidad de ver la versión de los programas instalados. Nosotr@s trabajaremos con la versión de apache 2.0.47. Otra forma de verlo, es invocando al gestor gráfico de paquetes rpm mediante el comando: [root@casiopea /root]# redhat-config-packages Este gestor ya le conocemos por haberlo utilizado previamente, es sencillo, gráfico y nos permite ver si efectivamente apache está instalado. Para gustos los se hicieron los colores ☺. A mi me parece más potente el rpm –q pero depende para qué, uno es más rápido y funciona mejor….

Curso: Introducción a las Aplicaciones y Servicios de Internet bajo Linux.
________________________________________________________________________________CFIE 2 Valladolid. Febrero-Marzo 2004. Módulo 4. Servidor Páginas Web. Pág 2
INICIO / PARO DEL SERVIDOR Iniciar y parar el servidor es algo tan sencillo y que tendremos que hacer tantas veces hasta que el fichero de configuración esté afinado, que nos va a parecer mentira con la soltura que iniciaremos y pararemos el servidor… pero no preocuparse que, siempre que se haga correctamente, a él no le duele lo más absoluto ☺ El inicio del servidor, se puede hacer igualmente de mil maneras pero yo voy directamente al grano esta vez y lo apago desde un lugar y lo enciendo desde otro ¿vale? [root@casiopea /root]# /sbin/service httpd stop y ya estaría apagado. [root@casiopea /root]# /etc/rc.d/init.d/httpd start y ya estaría funcionando, aunque nada más. También se le puede rearrancar mediante: [root@casiopea /root]# /sbin/service httpd restart y lo apaga y lo enciende a la vez… Si no hay ningún problema más (o sea en los ficheros de configuración) veréis que todo va a las mil maravillas y el servidor hace lo que le pedís. Bueno pararlo casi siempre lo hace de todos modos, el problema es arrancarlo si algo no anda bien, y a veces os aseguro que ocurrirá… ARRANQUE EN EL INICIO y EN NIVELES 3 y 5 Esto también lo hemos visto en los anteriores servicios de Internet, aunque yo pesadito de mi, os lo seguiré comentando por si acaso. Necesitamos que los servidores, y sólo ellos tengan un demonio httpd funcionado y lo hagan en los niveles 3 y 5 de Linux. Esto ya lo conté antes y bla, bla, bla. Pero no necesitamos que los clientes tengan un servidor funcionando si no lo van a utilizar ¿no? Así que aquí la tarea, al igual que en los servidores vistos ya, es necesario parar y no arrancar en el inicio el servidor Apache. ¿Cómo se hace esto? 1. Arranque en el Inicio del Servidor /Apagado del cliente
[root@casiopea /root]# chkconfig httpd on / off
2. Funcionamiento en el nivel 3 de Linux (Texto multiusuario)/ Apagado del cliente
[root@casiopea /root]# chkconfig -- level 3 httpd on /off 3. Funcionamiento en el nivel 5 de Linux (Gráfico multiusuario) / Apagado del cliente
[root@casiopea /root]# chkconfig --level 5 httpd on /off
4. Por último, la comprobación de que todo va bien
[root@casiopea /root]# chkconfig -- list httpd Todo ha ido perfectamente hasta aquí y nuestro servidor se encuentra en el estado que le corresponde estar ¿si? Perdonad que sea tan plasta con esto, pero realmente es importante. En este momento, el servidor ya está listo para ser configurado, y como es novedad desde la versión de Apache 2.0 en adelante, los ficheros de configuración necesarios para poner en marcha el servidor han pasado de ser varios (srm.conf, httpd.conf y access.conf a parte de en cada directorio del sitio web del .htaccess

Curso: Introducción a las Aplicaciones y Servicios de Internet bajo Linux.
________________________________________________________________________________CFIE 2 Valladolid. Febrero-Marzo 2004. Módulo 4. Servidor Páginas Web. Pág 3
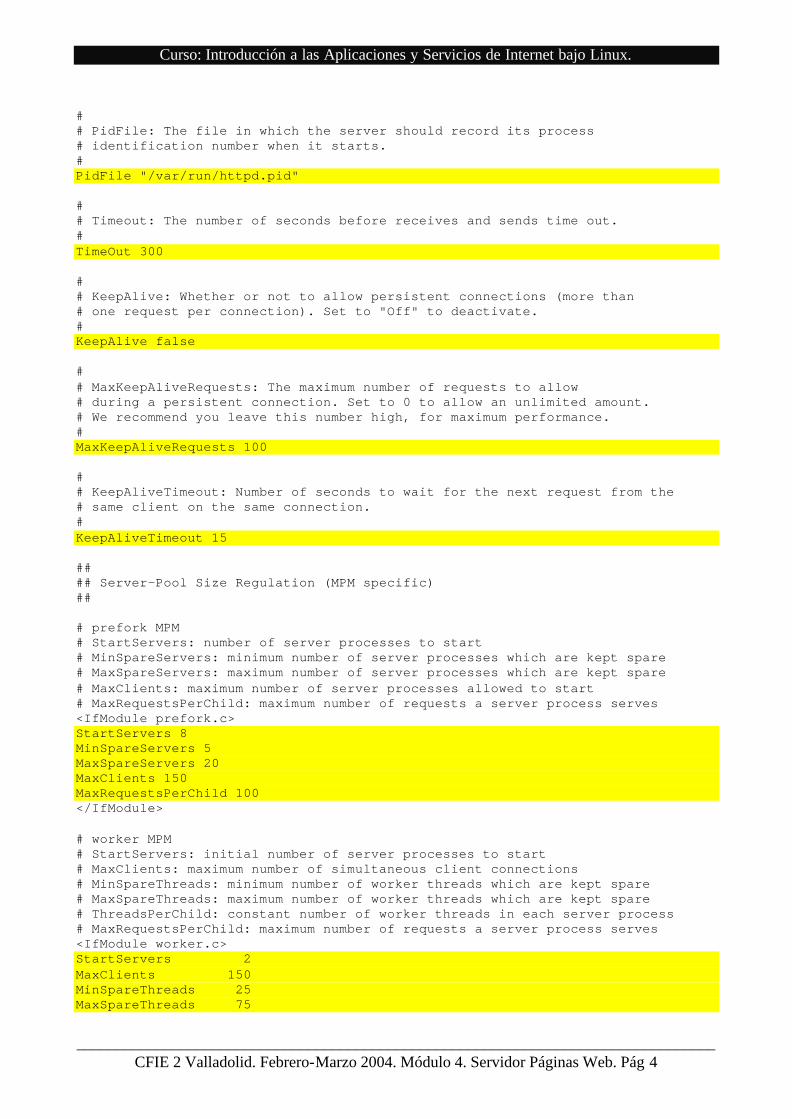
para valorar los permisos locales al directorio) a configurarse un único fichero httpd.conf, eso si más largo y complejo como era de esperar ☺. La localización del fichero httpd.conf a partir de la versión RedHat 8 (verdadera pionera de los cambios) se encuentra en /etc/httpd/conf y, como es lógico nos cansaremos de editarlo, cambiar cosillas, entrar y salir de él para afinarlo. Como os comentaba antes, a partir de la versión 8 de RedHat existen dos formas de configurar este macro fichero, una de ellas, la de siempre… a pedalillo (recomendable en parte) y la otra con la ayuda de un gestor gráfico (ayuda bastante al principio como todo lo gráfico, pero se queda cojo a la hora de tocar partes importantes), así que probaremos ambas opciones y conseguiremos nuestro objetivo. No es por asustar, pero lo primero que vamos a hacer es listar el fichero completo (ya se que es una pasada, pero luego iremos viendo partes y nos ayudará mucho tenerlo. Esta es una versión acabada y completa del que yo he diseñado para montar los ejemplos… y casi sirve para lo que nos proponemos) ahí va: ################################################################################################ ## httpd.conf - configuration for the Apache web server # # Generated automatically... if you edit manually, the changes will be lost # the next time you run "apacheconfig". # ### Sección 1: Configuración Global # # The directives in this section affect the overall operation of Apache, # such as the number of concurrent requests it can handle or where it # can find its configuration files. # # # Don't give away too much information about all the subcomponents # we are running. Comment out this line if you don't mind remote sites # finding out what major optional modules you are running ServerTokens OS # # ServerRoot: The top of the directory tree under which the server's # configuration, error, and log files are kept. # # NOTE! If you intend to place this on an NFS (or otherwise network) # mounted filesystem then please read the LockFile documentation # (available at <URL:http://httpd.apache.org/docs-2.0/mod/core.html#lockfile>); # you will save yourself a lot of trouble. # # Do NOT add a slash at the end of the directory path. # ServerRoot "/etc/httpd" # # ScoreBoardFile: File used to store internal server process information. # If unspecified (the default), the scoreboard will be stored in an # anonymous shared memory segment, and will be unavailable to third-party # applications. # If specified, ensure that no two invocations of Apache share the same # scoreboard file. The scoreboard file MUST BE STORED ON A LOCAL DISK. # #ScoreBoardFile run/httpd.scoreboard
Curso: Introducción a las Aplicaciones y Servicios de Internet bajo Linux.
________________________________________________________________________________CFIE 2 Valladolid. Febrero-Marzo 2004. Módulo 4. Servidor Páginas Web. Pág 4
# # PidFile: The file in which the server should record its process # identification number when it starts. # PidFile "/var/run/httpd.pid" # # Timeout: The number of seconds before receives and sends time out. # TimeOut 300 # # KeepAlive: Whether or not to allow persistent connections (more than # one request per connection). Set to "Off" to deactivate. # KeepAlive false # # MaxKeepAliveRequests: The maximum number of requests to allow # during a persistent connection. Set to 0 to allow an unlimited amount. # We recommend you leave this number high, for maximum performance. # MaxKeepAliveRequests 100 # # KeepAliveTimeout: Number of seconds to wait for the next request from the # same client on the same connection. # KeepAliveTimeout 15 ## ## Server-Pool Size Regulation (MPM specific) ## # prefork MPM # StartServers: number of server processes to start # MinSpareServers: minimum number of server processes which are kept spare # MaxSpareServers: maximum number of server processes which are kept spare # MaxClients: maximum number of server processes allowed to start # MaxRequestsPerChild: maximum number of requests a server process serves <IfModule prefork.c> StartServers 8 MinSpareServers 5 MaxSpareServers 20 MaxClients 150 MaxRequestsPerChild 100 </IfModule> # worker MPM # StartServers: initial number of server processes to start # MaxClients: maximum number of simultaneous client connections # MinSpareThreads: minimum number of worker threads which are kept spare # MaxSpareThreads: maximum number of worker threads which are kept spare # ThreadsPerChild: constant number of worker threads in each server process # MaxRequestsPerChild: maximum number of requests a server process serves <IfModule worker.c> StartServers 2 MaxClients 150 MinSpareThreads 25 MaxSpareThreads 75

Curso: Introducción a las Aplicaciones y Servicios de Internet bajo Linux.
________________________________________________________________________________CFIE 2 Valladolid. Febrero-Marzo 2004. Módulo 4. Servidor Páginas Web. Pág 5
ThreadsPerChild 25 MaxRequestsPerChild 0 </IfModule> # perchild MPM # NumServers: constant number of server processes # StartThreads: initial number of worker threads in each server process # MinSpareThreads: minimum number of worker threads which are kept spare # MaxSpareThreads: maximum number of worker threads which are kept spare # MaxThreadsPerChild: maximum number of worker threads in each server process # MaxRequestsPerChild: maximum number of connections per server process <IfModule perchild.c> NumServers 5 StartThreads 5 MinSpareThreads 5 MaxSpareThreads 10 MaxThreadsPerChild 20 MaxRequestsPerChild 0 </IfModule> # # Listen: Allows you to bind Apache to specific IP addresses and/or # ports, in addition to the default. See also the <VirtualHost> # directive. # # Change this to Listen on specific IP addresses as shown below to # prevent Apache from glomming onto all bound IP addresses (0.0.0.0) # #Listen 12.34.56.78:80 Listen 192.168.1.1:80 Listen 10.10.0.1:80 # # Load config files from the config directory "/etc/httpd/conf.d". # Include conf.d/ssl.conf # # Dynamic Shared Object (DSO) Support # # To be able to use the functionality of a module which was built as a DSO you # have to place corresponding `LoadModule' lines at this location so the # directives contained in it are actually available _before_ they are used. # Statically compiled modules (those listed by `httpd -l') do not need # to be loaded here. # # Example: # LoadModule foo_module modules/mod_foo.so # LoadModule access_module modules/mod_access.so LoadModule auth_module modules/mod_auth.so LoadModule auth_anon_module modules/mod_auth_anon.so LoadModule auth_dbm_module modules/mod_auth_dbm.so LoadModule auth_digest_module modules/mod_auth_digest.so LoadModule include_module modules/mod_include.so LoadModule log_config_module modules/mod_log_config.so LoadModule env_module modules/mod_env.so LoadModule mime_magic_module modules/mod_mime_magic.so LoadModule cern_meta_module modules/mod_cern_meta.so LoadModule expires_module modules/mod_expires.so
Curso: Introducción a las Aplicaciones y Servicios de Internet bajo Linux.
________________________________________________________________________________CFIE 2 Valladolid. Febrero-Marzo 2004. Módulo 4. Servidor Páginas Web. Pág 6
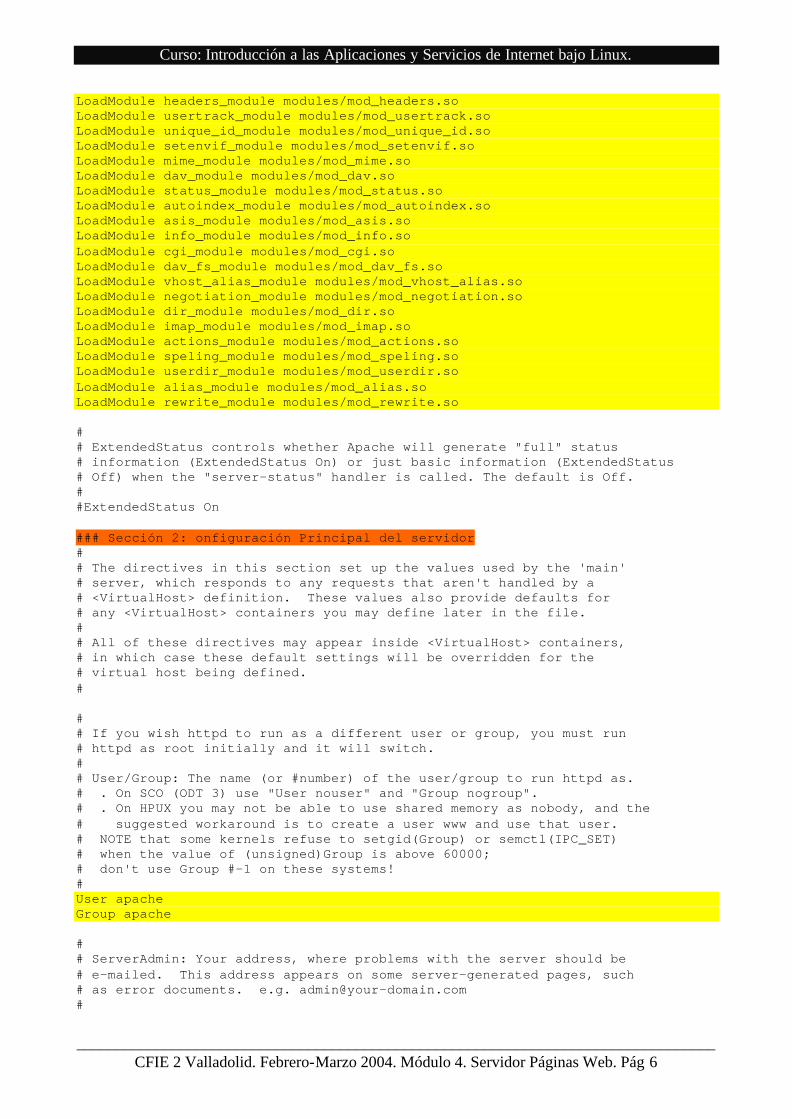
LoadModule headers_module modules/mod_headers.so LoadModule usertrack_module modules/mod_usertrack.so LoadModule unique_id_module modules/mod_unique_id.so LoadModule setenvif_module modules/mod_setenvif.so LoadModule mime_module modules/mod_mime.so LoadModule dav_module modules/mod_dav.so LoadModule status_module modules/mod_status.so LoadModule autoindex_module modules/mod_autoindex.so LoadModule asis_module modules/mod_asis.so LoadModule info_module modules/mod_info.so LoadModule cgi_module modules/mod_cgi.so LoadModule dav_fs_module modules/mod_dav_fs.so LoadModule vhost_alias_module modules/mod_vhost_alias.so LoadModule negotiation_module modules/mod_negotiation.so LoadModule dir_module modules/mod_dir.so LoadModule imap_module modules/mod_imap.so LoadModule actions_module modules/mod_actions.so LoadModule speling_module modules/mod_speling.so LoadModule userdir_module modules/mod_userdir.so LoadModule alias_module modules/mod_alias.so LoadModule rewrite_module modules/mod_rewrite.so # # ExtendedStatus controls whether Apache will generate "full" status # information (ExtendedStatus On) or just basic information (ExtendedStatus # Off) when the "server-status" handler is called. The default is Off. # #ExtendedStatus On ### Sección 2: onfiguración Principal del servidor # # The directives in this section set up the values used by the 'main' # server, which responds to any requests that aren't handled by a # <VirtualHost> definition. These values also provide defaults for # any <VirtualHost> containers you may define later in the file. # # All of these directives may appear inside <VirtualHost> containers, # in which case these default settings will be overridden for the # virtual host being defined. # # # If you wish httpd to run as a different user or group, you must run # httpd as root initially and it will switch. # # User/Group: The name (or #number) of the user/group to run httpd as. # . On SCO (ODT 3) use "User nouser" and "Group nogroup". # . On HPUX you may not be able to use shared memory as nobody, and the # suggested workaround is to create a user www and use that user. # NOTE that some kernels refuse to setgid(Group) or semctl(IPC_SET) # when the value of (unsigned)Group is above 60000; # don't use Group #-1 on these systems! # User apache Group apache # # ServerAdmin: Your address, where problems with the server should be # e-mailed. This address appears on some server-generated pages, such # as error documents. e.g. [email protected] #

Curso: Introducción a las Aplicaciones y Servicios de Internet bajo Linux.
________________________________________________________________________________CFIE 2 Valladolid. Febrero-Marzo 2004. Módulo 4. Servidor Páginas Web. Pág 7
ServerAdmin [email protected] # # ServerName gives the name and port that the server uses to identify itself. # This can often be determined automatically, but we recommend you specify # it explicitly to prevent problems during startup. # # If this is not set to valid DNS name for your host, server-generated # redirections will not work. See also the UseCanonicalName directive. # # If your host doesn't have a registered DNS name, enter its IP address here. # You will have to access it by its address anyway, and this will make # redirections work in a sensible way. # ServerName www.infoedu.org # # UseCanonicalName: Determines how Apache constructs self-referencing # URLs and the SERVER_NAME and SERVER_PORT variables. # When set "Off", Apache will use the Hostname and Port supplied # by the client. When set "On", Apache will use the value of the # ServerName directive. # UseCanonicalName on # # DocumentRoot: The directory out of which you will serve your # documents. By default, all requests are taken from this directory, but # symbolic links and aliases may be used to point to other locations. # DocumentRoot "/var/www/html" # # Disable autoindex for the root directory, and present a # default Welcome page if no other index page is present. # <LocationMatch "^/$"> Options -Indexes ErrorDocument 403 /error/noindex.html </LocationMatch> # # UserDir: The name of the directory that is appended onto a user's home # directory if a ~user request is received. # # The path to the end user account 'public_html' directory must be # accessible to the webserver userid. This usually means that ~userid # must have permissions of 711, ~userid/public_html must have permissions # of 755, and documents contained therein must be world-readable. # Otherwise, the client will only receive a "403 Forbidden" message. # # See also: http://httpd.apache.org/docs/misc/FAQ.html#forbidden # <IfModule mod_userdir.c> # # UserDir is disabled by default since it can confirm the presence # of a username on the system (depending on home directory # permissions). # UserDir "disable" UserDir "enable" capi paco

Curso: Introducción a las Aplicaciones y Servicios de Internet bajo Linux.
________________________________________________________________________________CFIE 2 Valladolid. Febrero-Marzo 2004. Módulo 4. Servidor Páginas Web. Pág 8
UserDir http://www.infoedu.org/~* # # To enable requests to /~user/ to serve the user's public_html # directory, use this directive instead of "UserDir disable": # UserDir public_html </IfModule> # # DirectoryIndex: sets the file that Apache will serve if a directory # is requested. # # The index.html.var file (a type-map) is used to deliver content- # negotiated documents. The MultiViews Option can be used for the # same purpose, but it is much slower. # DirectoryIndex index.html default.htm default.html index.htm # # AccessFileName: The name of the file to look for in each directory # for access control information. See also the AllowOverride directive. # AccessFileName .htaccess # # The following lines prevent .htaccess and .htpasswd files from being # viewed by Web clients. # <Files ~ "^\.ht"> Order allow,deny Deny from all </Files> # # TypesConfig describes where the mime.types file (or equivalent) is # to be found. # TypesConfig "/etc/mime.types" # # DefaultType is the default MIME type the server will use for a document # if it cannot otherwise determine one, such as from filename extensions. # If your server contains mostly text or HTML documents, "text/plain" is # a good value. If most of your content is binary, such as applications # or images, you may want to use "application/octet-stream" instead to # keep browsers from trying to display binary files as though they are # text. # DefaultType text/plain # # The mod_mime_magic module allows the server to use various hints from the # contents of the file itself to determine its type. The MIMEMagicFile # directive tells the module where the hint definitions are located. # <IfModule mod_mime_magic.c> # MIMEMagicFile /usr/share/magic.mime MIMEMagicFile conf/magic </IfModule>
Curso: Introducción a las Aplicaciones y Servicios de Internet bajo Linux.
________________________________________________________________________________CFIE 2 Valladolid. Febrero-Marzo 2004. Módulo 4. Servidor Páginas Web. Pág 9
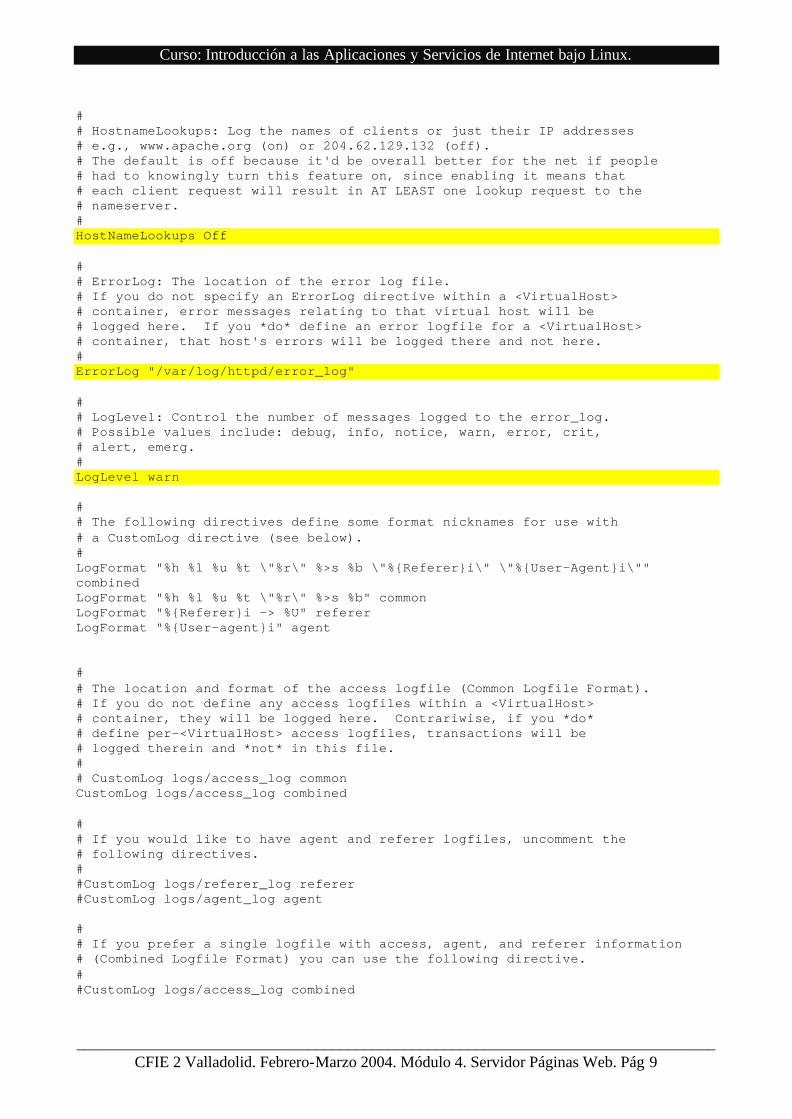
# # HostnameLookups: Log the names of clients or just their IP addresses # e.g., www.apache.org (on) or 204.62.129.132 (off). # The default is off because it'd be overall better for the net if people # had to knowingly turn this feature on, since enabling it means that # each client request will result in AT LEAST one lookup request to the # nameserver. # HostNameLookups Off # # ErrorLog: The location of the error log file. # If you do not specify an ErrorLog directive within a <VirtualHost> # container, error messages relating to that virtual host will be # logged here. If you *do* define an error logfile for a <VirtualHost> # container, that host's errors will be logged there and not here. # ErrorLog "/var/log/httpd/error_log" # # LogLevel: Control the number of messages logged to the error_log. # Possible values include: debug, info, notice, warn, error, crit, # alert, emerg. # LogLevel warn # # The following directives define some format nicknames for use with # a CustomLog directive (see below). # LogFormat "%h %l %u %t \"%r\" %>s %b \"%{Referer}i\" \"%{User-Agent}i\"" combined LogFormat "%h %l %u %t \"%r\" %>s %b" common LogFormat "%{Referer}i -> %U" referer LogFormat "%{User-agent}i" agent # # The location and format of the access logfile (Common Logfile Format). # If you do not define any access logfiles within a <VirtualHost> # container, they will be logged here. Contrariwise, if you *do* # define per-<VirtualHost> access logfiles, transactions will be # logged therein and *not* in this file. # # CustomLog logs/access_log common CustomLog logs/access_log combined # # If you would like to have agent and referer logfiles, uncomment the # following directives. # #CustomLog logs/referer_log referer #CustomLog logs/agent_log agent # # If you prefer a single logfile with access, agent, and referer information # (Combined Logfile Format) you can use the following directive. # #CustomLog logs/access_log combined

Curso: Introducción a las Aplicaciones y Servicios de Internet bajo Linux.
________________________________________________________________________________CFIE 2 Valladolid. Febrero-Marzo 2004. Módulo 4. Servidor Páginas Web. Pág 10
# # Optionally add a line containing the server version and virtual host # name to server-generated pages (error documents, FTP directory listings, # mod_status and mod_info output etc., but not CGI generated documents). # Set to "EMail" to also include a mailto: link to the ServerAdmin. # Set to one of: On | Off | EMail # ServerSignature on # # Aliases: Add here as many aliases as you need (with no limit). The format is # Alias fakename realname # # Note that if you include a trailing / on fakename then the server will # require it to be present in the URL. So "/icons" isn't aliased in this # example, only "/icons/". If the fakename is slash-terminated, then the # realname must also be slash terminated, and if the fakename omits the # trailing slash, the realname must also omit it. # # We include the /icons/ alias for FancyIndexed directory listings. If you # do not use FancyIndexing, you may comment this out. # Alias /icons/ "/var/www/icons/" # # This should be changed to the ServerRoot/manual/. The alias provides # the manual, even if you choose to move your DocumentRoot. You may comment # this out if you do not care for the documentation. # Alias /manual "/var/www/manual" <IfModule mod_dav_fs.c> # Location of the WebDAV lock database. DAVLockDB /var/lib/dav/lockdb </IfModule> # # ScriptAlias: This controls which directories contain server scripts. # ScriptAliases are essentially the same as Aliases, except that # documents in the realname directory are treated as applications and # run by the server when requested rather than as documents sent to the client. # The same rules about trailing "/" apply to ScriptAlias directives as to # Alias. # ScriptAlias /cgi-bin/ "/var/www/cgi-bin/" <IfModule mod_cgid.c> # # Additional to mod_cgid.c settings, mod_cgid has Scriptsock <path> # for setting UNIX socket for communicating with cgid. # #Scriptsock logs/cgisock </IfModule> # # Redirect allows you to tell clients about documents which used to exist in # your server's namespace, but do not anymore. This allows you to tell the # clients where to look for the relocated document. # Example: # Redirect permanent /foo http://www.example.com/bar

Curso: Introducción a las Aplicaciones y Servicios de Internet bajo Linux.
________________________________________________________________________________CFIE 2 Valladolid. Febrero-Marzo 2004. Módulo 4. Servidor Páginas Web. Pág 11
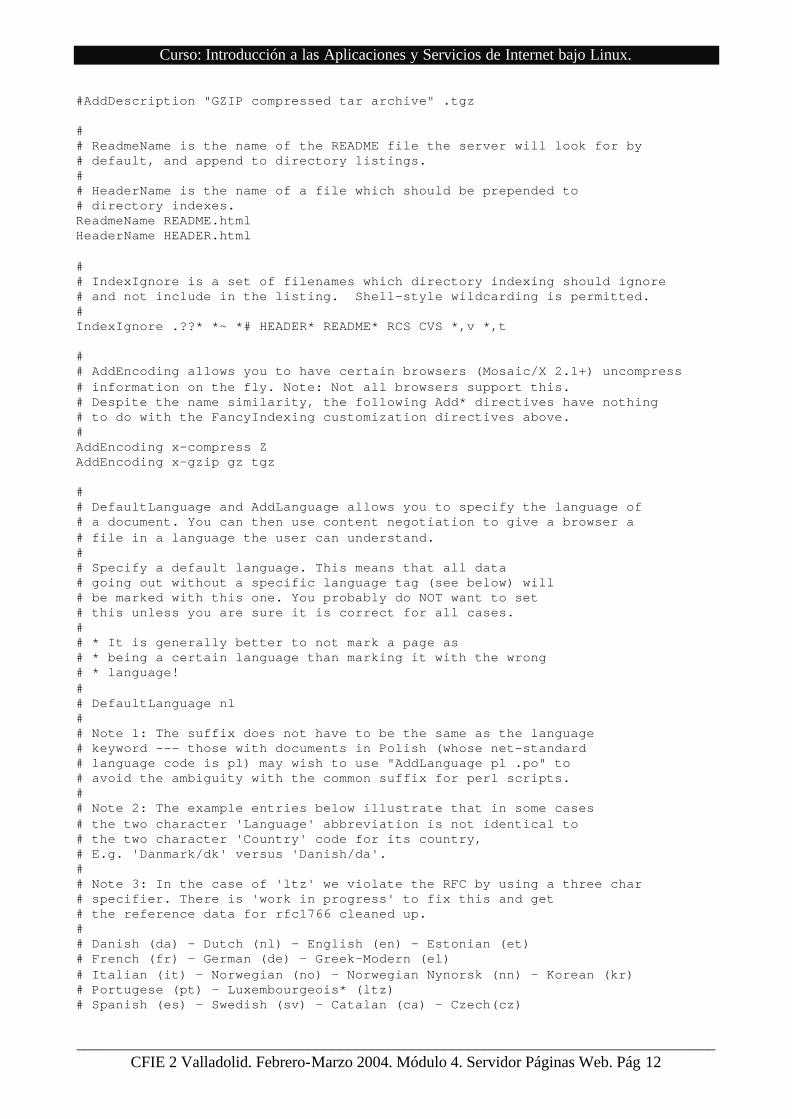
# # Directives controlling the display of server-generated directory listings. # # # FancyIndexing is whether you want fancy directory indexing or standard. # VersionSort is whether files containing version numbers should be # compared in the natural way, so that `apache-1.3.9.tar' is placed before # `apache-1.3.12.tar'. # IndexOptions FancyIndexing VersionSort NameWidth=* # # AddIcon* directives tell the server which icon to show for different # files or filename extensions. These are only displayed for # FancyIndexed directories. # AddIconByEncoding (CMP,/icons/compressed.gif) x-compress x-gzip AddIconByType (TXT,/icons/text.gif) text/* AddIconByType (IMG,/icons/image2.gif) image/* AddIconByType (SND,/icons/sound2.gif) audio/* AddIconByType (VID,/icons/movie.gif) video/* AddIcon /icons/binary.gif .bin .exe AddIcon /icons/binhex.gif .hqx AddIcon /icons/tar.gif .tar AddIcon /icons/world2.gif .wrl .wrl.gz .vrml .vrm .iv AddIcon /icons/compressed.gif .Z .z .tgz .gz .zip AddIcon /icons/a.gif .ps .ai .eps AddIcon /icons/layout.gif .html .shtml .htm .pdf AddIcon /icons/text.gif .txt AddIcon /icons/c.gif .c AddIcon /icons/p.gif .pl .py AddIcon /icons/f.gif .for AddIcon /icons/dvi.gif .dvi AddIcon /icons/uuencoded.gif .uu AddIcon /icons/script.gif .conf .sh .shar .csh .ksh .tcl AddIcon /icons/tex.gif .tex AddIcon /icons/bomb.gif core AddIcon /icons/back.gif .. AddIcon /icons/hand.right.gif README AddIcon /icons/folder.gif ^^DIRECTORY^^ AddIcon /icons/blank.gif ^^BLANKICON^^ # # DefaultIcon is which icon to show for files which do not have an icon # explicitly set. # DefaultIcon /icons/unknown.gif # # AddDescription allows you to place a short description after a file in # server-generated indexes. These are only displayed for FancyIndexed # directories. # Format: AddDescription "description" filename # #AddDescription "GZIP compressed document" .gz #AddDescription "tar archive" .tar
Curso: Introducción a las Aplicaciones y Servicios de Internet bajo Linux.
________________________________________________________________________________CFIE 2 Valladolid. Febrero-Marzo 2004. Módulo 4. Servidor Páginas Web. Pág 12
#AddDescription "GZIP compressed tar archive" .tgz # # ReadmeName is the name of the README file the server will look for by # default, and append to directory listings. # # HeaderName is the name of a file which should be prepended to # directory indexes. ReadmeName README.html HeaderName HEADER.html # # IndexIgnore is a set of filenames which directory indexing should ignore # and not include in the listing. Shell-style wildcarding is permitted. # IndexIgnore .??* *~ *# HEADER* README* RCS CVS *,v *,t # # AddEncoding allows you to have certain browsers (Mosaic/X 2.1+) uncompress # information on the fly. Note: Not all browsers support this. # Despite the name similarity, the following Add* directives have nothing # to do with the FancyIndexing customization directives above. # AddEncoding x-compress Z AddEncoding x-gzip gz tgz # # DefaultLanguage and AddLanguage allows you to specify the language of # a document. You can then use content negotiation to give a browser a # file in a language the user can understand. # # Specify a default language. This means that all data # going out without a specific language tag (see below) will # be marked with this one. You probably do NOT want to set # this unless you are sure it is correct for all cases. # # * It is generally better to not mark a page as # * being a certain language than marking it with the wrong # * language! # # DefaultLanguage nl # # Note 1: The suffix does not have to be the same as the language # keyword --- those with documents in Polish (whose net-standard # language code is pl) may wish to use "AddLanguage pl .po" to # avoid the ambiguity with the common suffix for perl scripts. # # Note 2: The example entries below illustrate that in some cases # the two character 'Language' abbreviation is not identical to # the two character 'Country' code for its country, # E.g. 'Danmark/dk' versus 'Danish/da'. # # Note 3: In the case of 'ltz' we violate the RFC by using a three char # specifier. There is 'work in progress' to fix this and get # the reference data for rfc1766 cleaned up. # # Danish (da) - Dutch (nl) - English (en) - Estonian (et) # French (fr) - German (de) - Greek-Modern (el) # Italian (it) - Norwegian (no) - Norwegian Nynorsk (nn) - Korean (kr) # Portugese (pt) - Luxembourgeois* (ltz) # Spanish (es) - Swedish (sv) - Catalan (ca) - Czech(cz)

Curso: Introducción a las Aplicaciones y Servicios de Internet bajo Linux.
________________________________________________________________________________CFIE 2 Valladolid. Febrero-Marzo 2004. Módulo 4. Servidor Páginas Web. Pág 13
# Polish (pl) - Brazilian Portuguese (pt-br) - Japanese (ja) # Russian (ru) - Croatian (hr) # AddLanguage da .dk AddLanguage nl .nl AddLanguage en .en AddLanguage et .et AddLanguage fr .fr AddLanguage de .de AddLanguage he .he AddLanguage el .el AddLanguage it .it AddLanguage ja .ja AddLanguage pl .po AddLanguage kr .kr AddLanguage pt .pt AddLanguage nn .nn AddLanguage no .no AddLanguage pt-br .pt-br AddLanguage ltz .ltz AddLanguage ca .ca AddLanguage es .es AddLanguage sv .se AddLanguage cz .cz AddLanguage ru .ru AddLanguage tw .tw AddLanguage zh-tw .tw AddLanguage hr .hr # # LanguagePriority allows you to give precedence to some languages # in case of a tie during content negotiation. # # Just list the languages in decreasing order of preference. We have # more or less alphabetized them here. You probably want to change this. # LanguagePriority en es da nl et fr de el it ja kr no pl pt pt-br ltz ca sv tw # # ForceLanguagePriority allows you to serve a result page rather than # MULTIPLE CHOICES (Prefer) [in case of a tie] or NOT ACCEPTABLE (Fallback) # [in case no accepted languages matched the available variants] # ForceLanguagePriority Prefer Fallback # # Specify a default charset for all pages sent out. This is # always a good idea and opens the door for future internationalisation # of your web site, should you ever want it. Specifying it as # a default does little harm; as the standard dictates that a page # is in iso-8859-1 (latin1) unless specified otherwise i.e. you # are merely stating the obvious. There are also some security # reasons in browsers, related to javascript and URL parsing # which encourage you to always set a default char set. # AddDefaultCharset ISO-8859-1 # # Commonly used filename extensions to character sets. You probably # want to avoid clashes with the language extensions, unless you # are good at carefully testing your setup after each change.

Curso: Introducción a las Aplicaciones y Servicios de Internet bajo Linux.
________________________________________________________________________________CFIE 2 Valladolid. Febrero-Marzo 2004. Módulo 4. Servidor Páginas Web. Pág 14
# See ftp://ftp.isi.edu/in-notes/iana/assignments/character-sets for # the official list of charset names and their respective RFCs # AddCharset ISO-8859-1 .iso8859-1 .latin1 AddCharset ISO-8859-2 .iso8859-2 .latin2 .cen AddCharset ISO-8859-3 .iso8859-3 .latin3 AddCharset ISO-8859-4 .iso8859-4 .latin4 AddCharset ISO-8859-5 .iso8859-5 .latin5 .cyr .iso-ru AddCharset ISO-8859-6 .iso8859-6 .latin6 .arb AddCharset ISO-8859-7 .iso8859-7 .latin7 .grk AddCharset ISO-8859-8 .iso8859-8 .latin8 .heb AddCharset ISO-8859-9 .iso8859-9 .latin9 .trk AddCharset ISO-2022-JP .iso2022-jp .jis AddCharset ISO-2022-KR .iso2022-kr .kis AddCharset ISO-2022-CN .iso2022-cn .cis AddCharset Big5 .Big5 .big5 # For russian, more than one charset is used (depends on client, mostly): AddCharset WINDOWS-1251 .cp-1251 .win-1251 AddCharset CP866 .cp866 AddCharset KOI8-r .koi8-r .koi8-ru AddCharset KOI8-ru .koi8-uk .ua AddCharset ISO-10646-UCS-2 .ucs2 AddCharset ISO-10646-UCS-4 .ucs4 AddCharset UTF-8 .utf8 # The set below does not map to a specific (iso) standard # but works on a fairly wide range of browsers. Note that # capitalization actually matters (it should not, but it # does for some browsers). # # See ftp://ftp.isi.edu/in-notes/iana/assignments/character-sets # for a list of sorts. But browsers support few. # AddCharset GB2312 .gb2312 .gb AddCharset utf-7 .utf7 AddCharset utf-8 .utf8 AddCharset big5 .big5 .b5 AddCharset EUC-TW .euc-tw AddCharset EUC-JP .euc-jp AddCharset EUC-KR .euc-kr AddCharset shift_jis .sjis # # AddType allows you to add to or override the MIME configuration # file mime.types for specific file types. # AddType application/x-tar .tgz # # AddHandler allows you to map certain file extensions to "handlers": # actions unrelated to filetype. These can be either built into the server # or added with the Action directive (see below) # # To use CGI scripts outside of ScriptAliased directories: # (You will also need to add "ExecCGI" to the "Options" directive.) # #AddHandler cgi-script .cgi # # For files that include their own HTTP headers: #
Curso: Introducción a las Aplicaciones y Servicios de Internet bajo Linux.
________________________________________________________________________________CFIE 2 Valladolid. Febrero-Marzo 2004. Módulo 4. Servidor Páginas Web. Pág 15
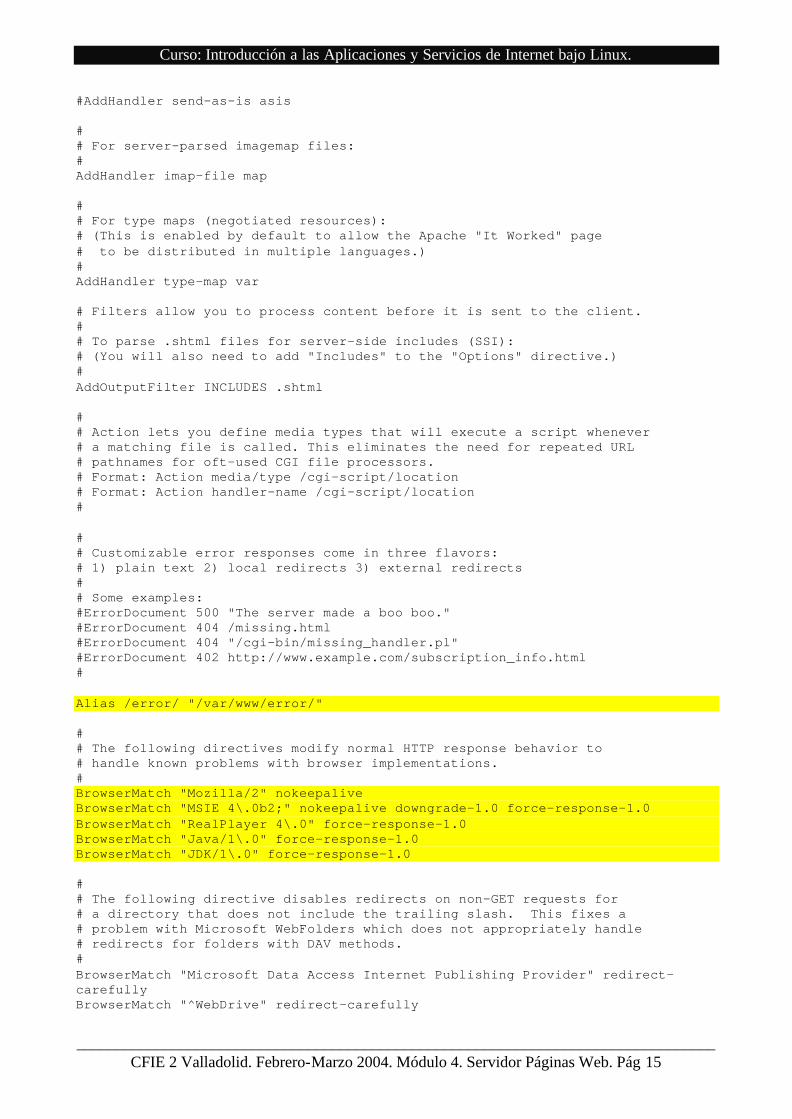
#AddHandler send-as-is asis # # For server-parsed imagemap files: # AddHandler imap-file map # # For type maps (negotiated resources): # (This is enabled by default to allow the Apache "It Worked" page # to be distributed in multiple languages.) # AddHandler type-map var # Filters allow you to process content before it is sent to the client. # # To parse .shtml files for server-side includes (SSI): # (You will also need to add "Includes" to the "Options" directive.) # AddOutputFilter INCLUDES .shtml # # Action lets you define media types that will execute a script whenever # a matching file is called. This eliminates the need for repeated URL # pathnames for oft-used CGI file processors. # Format: Action media/type /cgi-script/location # Format: Action handler-name /cgi-script/location # # # Customizable error responses come in three flavors: # 1) plain text 2) local redirects 3) external redirects # # Some examples: #ErrorDocument 500 "The server made a boo boo." #ErrorDocument 404 /missing.html #ErrorDocument 404 "/cgi-bin/missing_handler.pl" #ErrorDocument 402 http://www.example.com/subscription_info.html # Alias /error/ "/var/www/error/" # # The following directives modify normal HTTP response behavior to # handle known problems with browser implementations. # BrowserMatch "Mozilla/2" nokeepalive BrowserMatch "MSIE 4\.0b2;" nokeepalive downgrade-1.0 force-response-1.0 BrowserMatch "RealPlayer 4\.0" force-response-1.0 BrowserMatch "Java/1\.0" force-response-1.0 BrowserMatch "JDK/1\.0" force-response-1.0 # # The following directive disables redirects on non-GET requests for # a directory that does not include the trailing slash. This fixes a # problem with Microsoft WebFolders which does not appropriately handle # redirects for folders with DAV methods. # BrowserMatch "Microsoft Data Access Internet Publishing Provider" redirect-carefully BrowserMatch "^WebDrive" redirect-carefully
Curso: Introducción a las Aplicaciones y Servicios de Internet bajo Linux.
________________________________________________________________________________CFIE 2 Valladolid. Febrero-Marzo 2004. Módulo 4. Servidor Páginas Web. Pág 16
# # Allow server status reports, with the URL of http://servername/server-status # Change the ".your-domain.com" to match your domain to enable. # #<Location /server-status> # SetHandler server-status # Order deny,allow # Deny from all # Allow from .your-domain.com #</Location> # # Allow remote server configuration reports, with the URL of # http://servername/server-info (requires that mod_info.c be loaded). # Change the ".your-domain.com" to match your domain to enable. # #<Location /server-info> # SetHandler server-info # Order deny,allow # Deny from all # Allow from .your-domain.com #</Location> # # Proxy Server directives. Uncomment the following lines to # enable the proxy server: # #<IfModule mod_proxy.c> #ProxyRequests On # #<Proxy *> # Order deny,allow # Deny from all # Allow from .your-domain.com #</Proxy> # # Enable/disable the handling of HTTP/1.1 "Via:" headers. # ("Full" adds the server version; "Block" removes all outgoing Via: headers) # Set to one of: Off | On | Full | Block # #ProxyVia On # # To enable the cache as well, edit and uncomment the following lines: # (no cacheing without CacheRoot) # #CacheRoot "/etc/httpd/proxy" #CacheSize 5 #CacheGcInterval 4 #CacheMaxExpire 24 #CacheLastModifiedFactor 0.1 #CacheDefaultExpire 1 #NoCache a-domain.com another-domain.edu joes.garage-sale.com #</IfModule> # End of proxy directives.
Curso: Introducción a las Aplicaciones y Servicios de Internet bajo Linux.
________________________________________________________________________________CFIE 2 Valladolid. Febrero-Marzo 2004. Módulo 4. Servidor Páginas Web. Pág 17
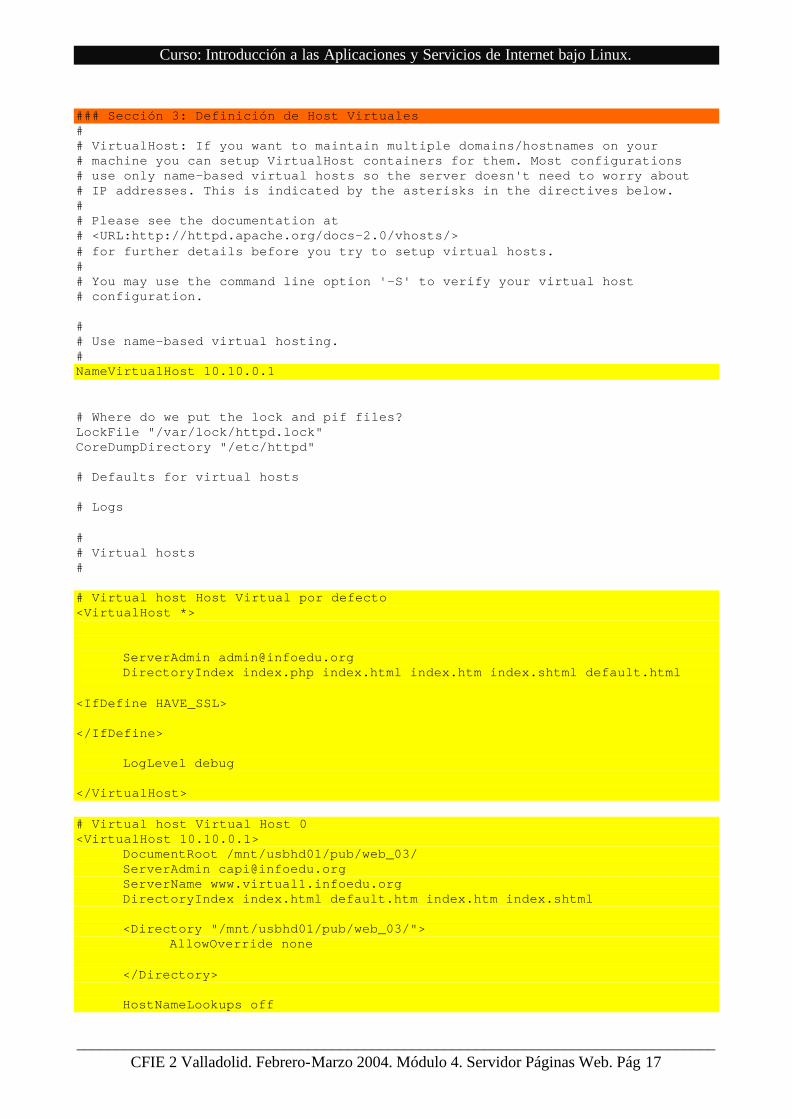
### Sección 3: Definición de Host Virtuales # # VirtualHost: If you want to maintain multiple domains/hostnames on your # machine you can setup VirtualHost containers for them. Most configurations # use only name-based virtual hosts so the server doesn't need to worry about # IP addresses. This is indicated by the asterisks in the directives below. # # Please see the documentation at # <URL:http://httpd.apache.org/docs-2.0/vhosts/> # for further details before you try to setup virtual hosts. # # You may use the command line option '-S' to verify your virtual host # configuration. # # Use name-based virtual hosting. # NameVirtualHost 10.10.0.1 # Where do we put the lock and pif files? LockFile "/var/lock/httpd.lock" CoreDumpDirectory "/etc/httpd" # Defaults for virtual hosts # Logs # # Virtual hosts # # Virtual host Host Virtual por defecto <VirtualHost *> ServerAdmin [email protected] DirectoryIndex index.php index.html index.htm index.shtml default.html <IfDefine HAVE_SSL> </IfDefine> LogLevel debug </VirtualHost> # Virtual host Virtual Host 0 <VirtualHost 10.10.0.1> DocumentRoot /mnt/usbhd01/pub/web_03/ ServerAdmin [email protected] ServerName www.virtual1.infoedu.org DirectoryIndex index.html default.htm index.htm index.shtml <Directory "/mnt/usbhd01/pub/web_03/"> AllowOverride none </Directory> HostNameLookups off
Curso: Introducción a las Aplicaciones y Servicios de Internet bajo Linux.
________________________________________________________________________________CFIE 2 Valladolid. Febrero-Marzo 2004. Módulo 4. Servidor Páginas Web. Pág 18
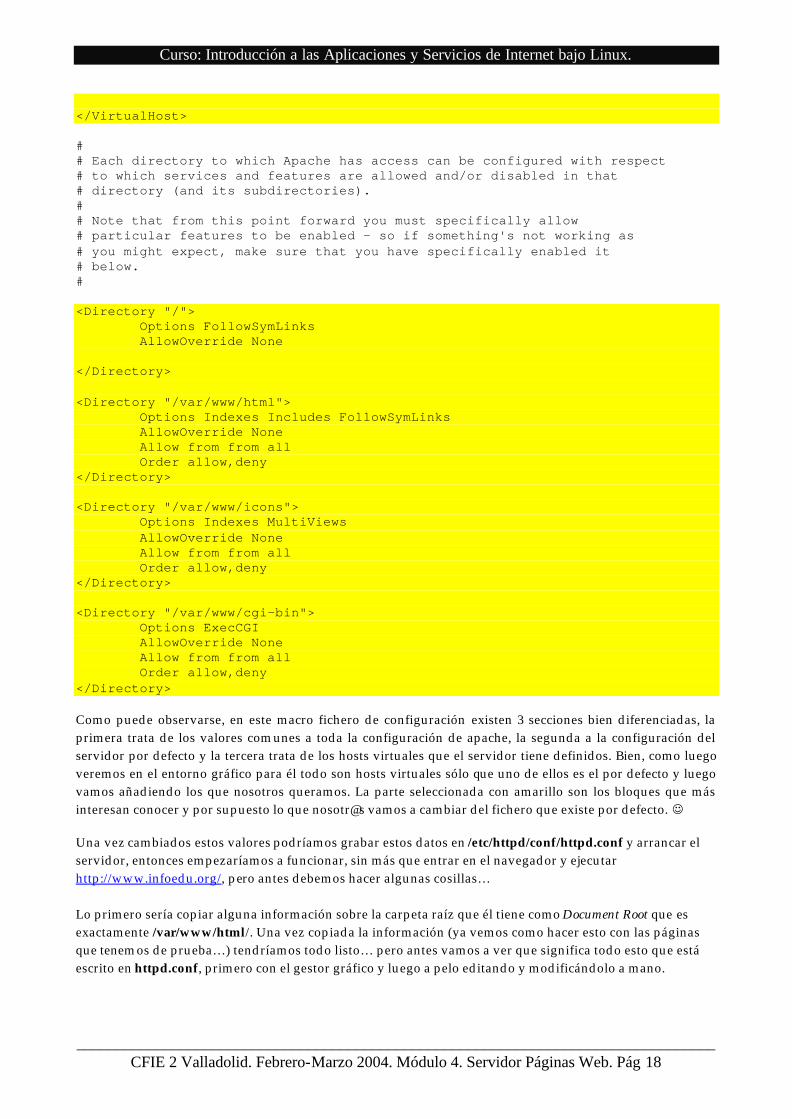
</VirtualHost> # # Each directory to which Apache has access can be configured with respect # to which services and features are allowed and/or disabled in that # directory (and its subdirectories). # # Note that from this point forward you must specifically allow # particular features to be enabled - so if something's not working as # you might expect, make sure that you have specifically enabled it # below. # <Directory "/"> Options FollowSymLinks AllowOverride None </Directory> <Directory "/var/www/html"> Options Indexes Includes FollowSymLinks AllowOverride None Allow from from all Order allow,deny </Directory> <Directory "/var/www/icons"> Options Indexes MultiViews AllowOverride None Allow from from all Order allow,deny </Directory> <Directory "/var/www/cgi-bin"> Options ExecCGI AllowOverride None Allow from from all Order allow,deny </Directory> Como puede observarse, en este macro fichero de configuración existen 3 secciones bien diferenciadas, la primera trata de los valores comunes a toda la configuración de apache, la segunda a la configuración del servidor por defecto y la tercera trata de los hosts virtuales que el servidor tiene definidos. Bien, como luego veremos en el entorno gráfico para él todo son hosts virtuales sólo que uno de ellos es el por defecto y luego vamos añadiendo los que nosotros queramos. La parte seleccionada con amarillo son los bloques que más interesan conocer y por supuesto lo que nosotr@s vamos a cambiar del fichero que existe por defecto. ☺ Una vez cambiados estos valores podríamos grabar estos datos en /etc/httpd/conf/httpd.conf y arrancar el servidor, entonces empezaríamos a funcionar, sin más que entrar en el navegador y ejecutar http://www.infoedu.org/, pero antes debemos hacer algunas cosillas… Lo primero sería copiar alguna información sobre la carpeta raíz que él tiene como Document Root que es exactamente /var/www/html/. Una vez copiada la información (ya vemos como hacer esto con las páginas que tenemos de prueba…) tendríamos todo listo… pero antes vamos a ver que significa todo esto que está escrito en httpd.conf, primero con el gestor gráfico y luego a pelo editando y modificándolo a mano.

Curso: Introducción a las Aplicaciones y Servicios de Internet bajo Linux.
________________________________________________________________________________CFIE 2 Valladolid. Febrero-Marzo 2004. Módulo 4. Servidor Páginas Web. Pág 19
CONFIGURACIÓN DE LOS PARÁMETROS A TRAVÉS DEL GESTOR GRÁFICO. Como comentábamos antes, la primera parte, básica, de configuración la haremos con el gestor gráfico. Vamos a crear cinco sitios web a saber:
1. Sitio web http://www.infoedu.org 2. Sitio web seguro (SSL) en https://www.infoedu.org 3. Sitio web de host virtual llamado http://www.virtual1.infoedu.org 4. Sitio web personal del usuario capi (local) en http://www.infoedu.org/~capi/ 5. Sitio web personal del usuario paco (local) en http://www.infoedu.org/~paco/ 6. Probaremos la seguridad de no acceso a http://www.infoedu.org/˜root/
En el gestor gráfico crearemos parte de los puntos 1 y 2 y 3 y a mano configuraremos httpd.conf para el resto. Equilibrado ¿no? Je,je. [root@casiopea /root]# redhat-config-httpd invoca al gestor gráfico de configuración. En esta ventana inicial podemos ver varias cosas que podemos ir escribiendo: Nombre del servidor: www.infoedu.org (lo configuramos antes en el servidor DNS ¿recordáis?) Dirección de e-mail del webmaster: [email protected] Direcciones de escucha del servidor y puertos de escucha: 192.168.1.1:80 y 10.10.0.1:80 (Se trata de un servidor multihomed y por lo tanto puedo utilizar ambas IP´s para que escuche ¿no? Además utilizaremos la dirección 10.10.0.1 para instalar el host virtual http://www.virtual1.infoedu.org. El puerto definido para la escucha de servidores web es el 80, aunque puede ponerse el que se quiera. Ojo si se configura por debajo del 1024 es necesario ser usuari@ root para configuarlo y si es por encima de 1024 lo puede hacer cualquier usuari@ -no root- Aquí eso es todo, pasamos a la solapa Host Virtuales para ver más cosillas:
Curso: Introducción a las Aplicaciones y Servicios de Internet bajo Linux.
________________________________________________________________________________CFIE 2 Valladolid. Febrero-Marzo 2004. Módulo 4. Servidor Páginas Web. Pág 20
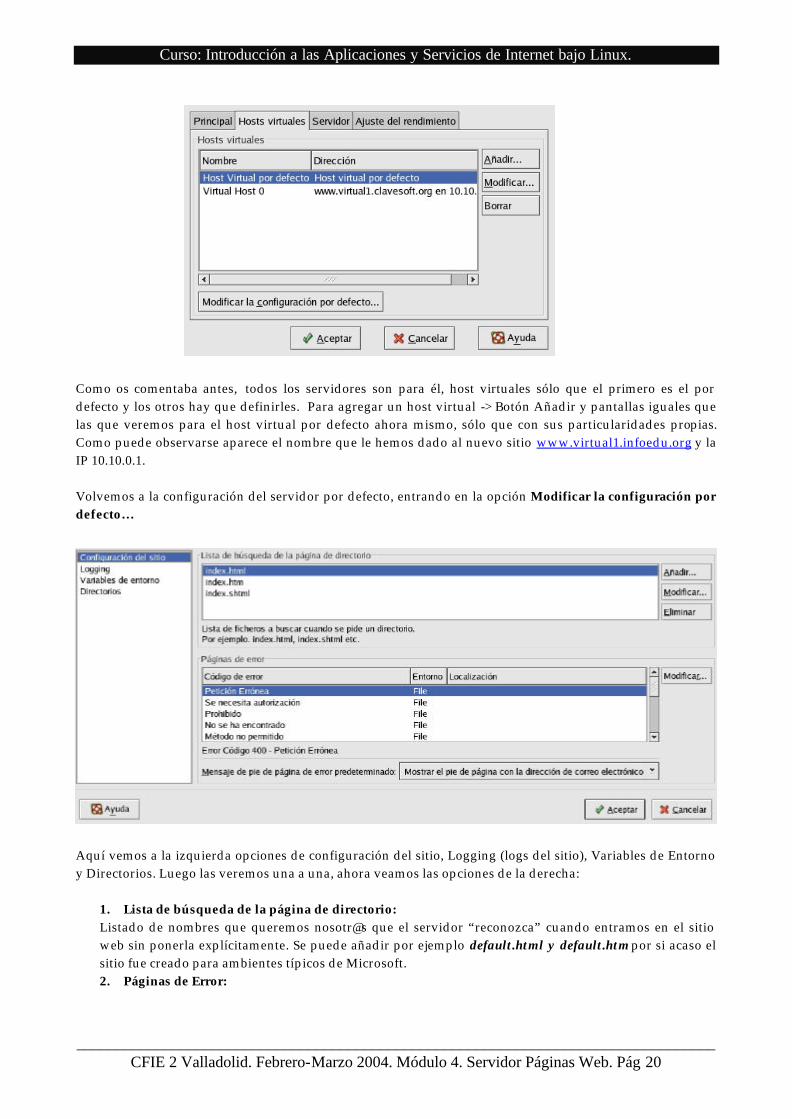
Como os comentaba antes, todos los servidores son para él, host virtuales sólo que el primero es el por defecto y los otros hay que definirles. Para agregar un host virtual -> Botón Añadir y pantallas iguales que las que veremos para el host virtual por defecto ahora mismo, sólo que con sus particularidades propias. Como puede observarse aparece el nombre que le hemos dado al nuevo sitio www.virtual1.infoedu.org y la IP 10.10.0.1. Volvemos a la configuración del servidor por defecto, entrando en la opción Modificar la configuración por defecto… Aquí vemos a la izquierda opciones de configuración del sitio, Logging (logs del sitio), Variables de Entorno y Directorios. Luego las veremos una a una, ahora veamos las opciones de la derecha:
1. Lista de búsqueda de la página de directorio: Listado de nombres que queremos nosotr@s que el servidor “reconozca” cuando entramos en el sitio web sin ponerla explícitamente. Se puede añadir por ejemplo default.html y default.htm por si acaso el sitio fue creado para ambientes típicos de Microsoft. 2. Páginas de Error:

Curso: Introducción a las Aplicaciones y Servicios de Internet bajo Linux.
________________________________________________________________________________CFIE 2 Valladolid. Febrero-Marzo 2004. Módulo 4. Servidor Páginas Web. Pág 21
Qué hacer si se produce un error, si redirigimos a una página de error tipo, enviamos las solicitudes de error a otro servidor o lo dejamos tal cual está con las páginas por defecto, etc… (No lo tocamos) Vamos a la opción Logging (Cómo tratar los ficheros de log):
Nos informa de donde deja los ficheros de log y sobre todo una variable que tenemos que cambiar y ahí no lo está: Búsqueda Inversa del DNS, aparece como Búsqueda inversa y debe decir: Sin búsqueda ya que en este caso cada vez que conecta con un sitio le pide al servidor DNS que le confirme a través de una búsqueda inversa que el servidor existe y bla, bla bla y eso al final es tiempo de espera y bajo rendimiento, así que cambiadlo hacia el valor -> Sin Búsqueda. En la solapa Variables de Entorno se colocan valores que pueden venir bien en el inicio del servidor (En nuestro caso es mucho arroz para un pollo… así que lo dejamos) La siguiente ventana Directorios si que vamos a verla: En esta opción veremos que el directorio que controla este sitio web a través de la dirección física /var/www/html/ corresponde con el sitio / (raíz) de nuestro sistema de Servidor de páginas.

Curso: Introducción a las Aplicaciones y Servicios de Internet bajo Linux.
________________________________________________________________________________CFIE 2 Valladolid. Febrero-Marzo 2004. Módulo 4. Servidor Páginas Web. Pág 22
Volvemos Aceptando a la página principal del Sitio y ahora nos encontramos con la solapa Servidor que pasamos a ver: Esta ventana nos informa de cuestiones de almacenamiento de ficheros operativos del servidor, tales como donde se almacena el PID generado por el proceso de arranque del demonio httpd, cual es el archivo de bloqueo y donde se produce el volcado del núcleo del servidor… A nosotr@s de aquí nos interesa saber una cosa, muy, muy importante. Cuando se inicia el servidor de páginas web, el proceso debe arrancarse como usuari@ root (administrador) ya que es un proceso muy importante, pero luego una vez arrancado sería una “temeridad” mantener el servidor con el /la usuari@ root como responsable, ya que si se perpetrara un ataque y se consiguiera… el /la atacante sería root también L y eso no mola nada, nada, nada por que el barco estaría conquistado en su totalidad… ¿Qué hacemos? Colocamos un/una usuari@ sin mayores permisos para que una vez arrancado el servidor, la persona que entre no tenga más permisos que los que tenga est@ usuari@ (¡¡¡Qué a nadie en su sano juicio se le ocurra poner al usuari@ apache dentro del grupo de administradores!!! ó poner aquí root ¿eh?) BUENO ☺ Vamos a ver la ventana de Ajustes de Rendimiento: Esta ventana permite configurar cuantas conexiones simultáneas se permiten hacer cómo máximo sin tener que recompilar el Kernel L de la máquina, para nosotr@s y para cualquier servidor con pocos clientes está bien. También vemos cuanto tiempo se mantiene “viva” la conexión si no hay nuevas peticiones y cuántas peticiones (concurrentes) se pueden hacer por conexión. Así mismo vemos que no se pueden hacer

Curso: Introducción a las Aplicaciones y Servicios de Internet bajo Linux.
________________________________________________________________________________CFIE 2 Valladolid. Febrero-Marzo 2004. Módulo 4. Servidor Páginas Web. Pág 23
conexiones persistentes ya que esto significaría que el cliente “pillaría” al servidor todo el tiempo hasta que acabase de solicitarle páginas, y si esto lo hacen 150 clientes a la vez pueden dejar a nuestro servidor más tieso que la mojama, así que nuestro servidor “sirve” una página y desconecta con el cliente, hasta que ese cliente le pida más cosas y así sí que las cosas funcionan mejor, con mayor rendimiento y se sirve a más clientes. Hasta aquí hemos definido la configuración normal del servidor http://www.infoedu.org, pero os recuerdo que también necesitábamos configurar el servidor https://www.infoedu.org y eso es otro cantar. En la solapa Host Virtual existía otra opción llamada SSL (Secure Socket Layer) o conexión de Sitio Web seguro en la que pueden verse: Habilitar el soporte SSL que debe estar marcado si se quiere que para este sitio web o sea www.infoedu.org exista la posibilidad https://, a lo cual le decimos Si. Ahora aparecen otra serie de opciones altamente importantes para el funcionamiento de un sitio web seguro (cifrado) origen-destino. Para poder trabajar con seguridad son necesarios ciertos ajustes del servidor entre ellos que proporcione seguridad en las comunicaciones, utilizando una combinación del protocolo SSL y un certificado de una autoridad certificadora (CA). El protocolo SSL gestiona la comunicación cifrada y la autentificación mutua entre el servidor y el navegador (cliente). El certificado aprobado por la CA proporciona autentificación para el servidor web seguro (La CA otorga su reputación a la certificación de la identidad de la organización que tiene el servidor). Cuando se lleva a cabo una comunicación mediante el cifrado SSL, es preciso el prefijo https:// en la invocación de la URL. Para configurar el servidor seguro, se utilizará la criptografía de clave pública para crear el par clave pública-clave privada. Un servidor seguro utiliza un certificado de servidor para identificarse ante los navegadores. Puede crear su propio certificado (llamado certificado “auto-firmado) que será nuestro caso de ejemplo, u obtenerlo de una entidad certificadora oficial tal como la FNMT ó Verisign previo pago de un dinerito. Parece claro cuales son los motivos de la elección ☺ ¿no?

Curso: Introducción a las Aplicaciones y Servicios de Internet bajo Linux.
________________________________________________________________________________CFIE 2 Valladolid. Febrero-Marzo 2004. Módulo 4. Servidor Páginas Web. Pág 24
PAQUETES DE SEGURIDAD NECESARIOS PARA QUE TODO VAYA BIEN. Para que nuestro sistema pueda generar claves, certificados, y funcionar como un servidor SSL es necesario que una serie de programas estén instalados en nuestro sistema. Estos son todos ellos:
NOMBRE DEL PAQUETE UBICADO EN EL GRUPO ¿OPCIONAL? httpd Demonios/Entorno Sistema No mod_ssl Demonios/Entorno Sistema No openssl Demonios/Entorno Sistema No httpd-devel Desarrollo/Librerías Si httpd-manual Documentación Si openssh Aplicaciones/Internet Si openssh-askpass Aplicaciones/Internet Si openssh-askpass-gnome Aplicaciones/Internet Si openssh-clients Aplicaciones/Internet Si openssh-server Demonios/Entorno Sistema Si openssl-devel Desarrollo/Librerías Si stunnel Aplicaciones/Internet Si
La mejor manera de ver si tenemos estos paquetes instalados es preguntarle al gestor de rpm: [root@casiopea /root]# rpm –qa|grep httpd para los paquetes que comienzan por hhtpd [root@casiopea /root]# rpm –qa|grep openssl para los paquetes que comienzan por openssl [root@casiopea /root]# rpm –qa|grep openssh para los paquetes que comienzan por openssh [root@casiopea /root]# rpm –qa|grep stunnel para los paquetes que comienzan por stunnel A mi servidor sólo le falta el paquete httpd-devel necesario por que contiene los ficheros Include que permiten Incluir módulos extra al servidor, y el módulo ssl_mod no viene montado por defecto. Así que me voy al disco 2 de instalación, cojo la versión de httpd-devel-version.rpm que hay ahí y lo copio al /root por ejemplo. Arranco el gestor gráfico de rpm de KDE y le digo que instale httpd-devel-version.rpm. En ese momento me dice que el paquete tiene dependencias y que es preciso instalar también otros dos más: apr-devel-version.rpm y apr-util-devel-version.rpm lo cual hago desde el interfaz de texto –el gráfico se queda tieso- con el comando: [root@casiopea /root]# rpm –i /root/apr-devel-version.rpm y se lo traga, luego: [root@casiopea /root]# rpm –i /root/apr-util-devel-version.rpm y se lo traga, luego: [root@casiopea /root]# rpm –i /root/httpd-devel-version.rpm y también funciona… Luego pelín desconfiado compruebo que todo fue bien con el rpm –qa|grep nombres y me dice que están así que okeis mackeys… Continuamos EL FICHERO /etc/httpd/conf.d/ssl.conf En algún lugar del fichero /etc/httpd/conf/httpd.conf, concretamente antes de la carga de los módulos mediante la sentencia Include conf.d/ssl.conf nos informa que es preciso para funcionar con el módulo mod_ssl que sea cargado y además este hecho provoca que se configure un 2º fichero de configuración para el caso del sitio web seguro llamado /etc/httpd/conf.d/ssl.conf que debe ser retocado con las particularidades debidas a esta configuración. A continuación veremos este fichero, mucho más pequeño que su gran hermano httpd.conf:

Curso: Introducción a las Aplicaciones y Servicios de Internet bajo Linux.
________________________________________________________________________________CFIE 2 Valladolid. Febrero-Marzo 2004. Módulo 4. Servidor Páginas Web. Pág 25
########################################################################### # This is the Apache server configuration file providing SSL support. # It contains the configuration directives to instruct the server how to # serve pages over an https connection. For detailing information about these # directives see <URL:http://httpd.apache.org/docs-2.0/mod/mod_ssl.html> # # For the moment, see <URL:http://www.modssl.org/docs/> for this info. # The documents are still being prepared from material donated by the # modssl project. # # Do NOT simply read the instructions in here without understanding # what they do. They're here only as hints or reminders. If you are unsure # consult the online docs. You have been warned. # LoadModule ssl_module modules/mod_ssl.so # Until documentation is completed, please check http://www.modssl.org/ # for additional config examples and module docmentation. Directives # and features of mod_ssl are largely unchanged from the mod_ssl project # for Apache 1.3. # # When we also provide SSL we have to listen to the # standard HTTP port (see above) and to the HTTPS port # Listen 443 # # Dynamic Shared Object (DSO) Support # # To be able to use the functionality of a module which was built as a DSO you # ErrorLog logs/dummy-host.example.com-error_log # CustomLog logs/dummy-host.example.com-access_log common ## ## SSL Global Context ## ## All SSL configuration in this context applies both to ## the main server and all SSL-enabled virtual hosts. ## # # Some MIME-types for downloading Certificates and CRLs # AddType application/x-x509-ca-cert .crt AddType application/x-pkcs7-crl .crl # Pass Phrase Dialog: # Configure the pass phrase gathering process. # The filtering dialog program (`builtin' is a internal # terminal dialog) has to provide the pass phrase on stdout. SSLPassPhraseDialog builtin # Inter-Process Session Cache: # Configure the SSL Session Cache: First the mechanism # to use and second the expiring timeout (in seconds). #SSLSessionCache none #SSLSessionCache shmht:/var/cache/mod_ssl/scache(512000) #SSLSessionCache shmcb:/var/cache/mod_ssl/scache(512000)

Curso: Introducción a las Aplicaciones y Servicios de Internet bajo Linux.
________________________________________________________________________________CFIE 2 Valladolid. Febrero-Marzo 2004. Módulo 4. Servidor Páginas Web. Pág 26
SSLSessionCache dbm:/var/cache/mod_ssl/scache SSLSessionCacheTimeout 300 # Semaphore: # Configure the path to the mutual exclusion semaphore the # SSL engine uses internally for inter-process synchronization. SSLMutex file:logs/ssl_mutex # Pseudo Random Number Generator (PRNG): # Configure one or more sources to seed the PRNG of the # SSL library. The seed data should be of good random quality. # WARNING! On some platforms /dev/random blocks if not enough entropy # is available. This means you then cannot use the /dev/random device # because it would lead to very long connection times (as long as # it requires to make more entropy available). But usually those # platforms additionally provide a /dev/urandom device which doesn't # block. So, if available, use this one instead. Read the mod_ssl User # Manual for more details. SSLRandomSeed startup builtin SSLRandomSeed connect builtin #SSLRandomSeed startup file:/dev/random 512 #SSLRandomSeed startup file:/dev/urandom 512 #SSLRandomSeed connect file:/dev/random 512 #SSLRandomSeed connect file:/dev/urandom 512 ## ## SSL Virtual Host Context ## <VirtualHost _default_:443> # General setup for the virtual host DocumentRoot "/var/www/html/ssl" ServerName www.infoedu.org:443 ServerAdmin [email protected] ErrorLog logs/ssl_error_log TransferLog logs/ssl_access_log # SSL Engine Switch: # Enable/Disable SSL for this virtual host. SSLEngine on # SSL Cipher Suite: # List the ciphers that the client is permitted to negotiate. # See the mod_ssl documentation for a complete list. SSLCipherSuite ALL:!ADH:!EXPORT56:RC4+RSA:+HIGH:+MEDIUM:+LOW:+SSLv2:+EXP:+eNULL # Server Certificate: # Point SSLCertificateFile at a PEM encoded certificate. If # the certificate is encrypted, then you will be prompted for a # pass phrase. Note that a kill -HUP will prompt again. A test # certificate can be generated with `make certificate' under # built time. Keep in mind that if you've both a RSA and a DSA # certificate you can configure both in parallel (to also allow # the use of DSA ciphers, etc.) SSLCertificateFile /etc/httpd/conf/ssl.crt/server.crt #SSLCertificateFile /etc/httpd/conf/ssl.crt/server-dsa.crt # Server Private Key: # If the key is not combined with the certificate, use this # directive to point at the key file. Keep in mind that if

Curso: Introducción a las Aplicaciones y Servicios de Internet bajo Linux.
________________________________________________________________________________CFIE 2 Valladolid. Febrero-Marzo 2004. Módulo 4. Servidor Páginas Web. Pág 27
# you've both a RSA and a DSA private key you can configure # both in parallel (to also allow the use of DSA ciphers, etc.) SSLCertificateKeyFile /etc/httpd/conf/ssl.key/server.key #SSLCertificateKeyFile /etc/httpd/conf/ssl.key/server-dsa.key # Server Certificate Chain: # Point SSLCertificateChainFile at a file containing the # concatenation of PEM encoded CA certificates which form the # certificate chain for the server certificate. Alternatively # the referenced file can be the same as SSLCertificateFile # when the CA certificates are directly appended to the server # certificate for convinience. #SSLCertificateChainFile /etc/httpd/conf/ssl.crt/ca.crt # Certificate Authority (CA): # Set the CA certificate verification path where to find CA # certificates for client authentication or alternatively one # huge file containing all of them (file must be PEM encoded) # Note: Inside SSLCACertificatePath you need hash symlinks # to point to the certificate files. Use the provided # Makefile to update the hash symlinks after changes. #SSLCACertificatePath /etc/httpd/conf/ssl.crt #SSLCACertificateFile /etc/httpd/conf/ssl.crt/ca-bundle.crt # Certificate Revocation Lists (CRL): # Set the CA revocation path where to find CA CRLs for client # authentication or alternatively one huge file containing all # of them (file must be PEM encoded) # Note: Inside SSLCARevocationPath you need hash symlinks # to point to the certificate files. Use the provided # Makefile to update the hash symlinks after changes. #SSLCARevocationPath /etc/httpd/conf/ssl.crl #SSLCARevocationFile /etc/httpd/conf/ssl.crl/ca-bundle.crl # Client Authentication (Type): # Client certificate verification type and depth. Types are # none, optional, require and optional_no_ca. Depth is a # number which specifies how deeply to verify the certificate # issuer chain before deciding the certificate is not valid. #SSLVerifyClient require #SSLVerifyDepth 10 # Access Control: # With SSLRequire you can do per-directory access control based # on arbitrary complex boolean expressions containing server # variable checks and other lookup directives. The syntax is a # mixture between C and Perl. See the mod_ssl documentation # for more details. #<Location /> #SSLRequire ( %{SSL_CIPHER} !~ m/^(EXP|NULL)/ \ # and %{SSL_CLIENT_S_DN_O} eq "Snake Oil, Ltd." \ # and %{SSL_CLIENT_S_DN_OU} in {"Staff", "CA", "Dev"} \ # and %{TIME_WDAY} >= 1 and %{TIME_WDAY} <= 5 \ # and %{TIME_HOUR} >= 8 and %{TIME_HOUR} <= 20 ) \ # or %{REMOTE_ADDR} =~ m/^192\.76\.162\.[0-9]+$/ #</Location> # SSL Engine Options: # Set various options for the SSL engine. # o FakeBasicAuth: # Translate the client X.509 into a Basic Authorisation. This means that

Curso: Introducción a las Aplicaciones y Servicios de Internet bajo Linux.
________________________________________________________________________________CFIE 2 Valladolid. Febrero-Marzo 2004. Módulo 4. Servidor Páginas Web. Pág 28
# the standard Auth/DBMAuth methods can be used for access control. The # user name is the `one line' version of the client's X.509 certificate. # Note that no password is obtained from the user. Every entry in the user # file needs this password: `xxj31ZMTZzkVA'. # o ExportCertData: # This exports two additional environment variables: SSL_CLIENT_CERT and # SSL_SERVER_CERT. These contain the PEM-encoded certificates of the # server (always existing) and the client (only existing when client # authentication is used). This can be used to import the certificates # into CGI scripts. # o StdEnvVars: # This exports the standard SSL/TLS related `SSL_*' environment variables. # Per default this exportation is switched off for performance reasons, # because the extraction step is an expensive operation and is usually # useless for serving static content. So one usually enables the # exportation for CGI and SSI requests only. # o CompatEnvVars: # This exports obsolete environment variables for backward compatibility # to Apache-SSL 1.x, mod_ssl 2.0.x, Sioux 1.0 and Stronghold 2.x. Use this # to provide compatibility to existing CGI scripts. # o StrictRequire: # This denies access when "SSLRequireSSL" or "SSLRequire" applied even # under a "Satisfy any" situation, i.e. when it applies access is denied # and no other module can change it. # o OptRenegotiate: # This enables optimized SSL connection renegotiation handling when SSL # directives are used in per-directory context. #SSLOptions +FakeBasicAuth +ExportCertData +CompatEnvVars +StrictRequire <Files ~ "\.(cgi|shtml|phtml|php3?)$"> SSLOptions +StdEnvVars </Files> <Directory "/var/www/cgi-bin"> SSLOptions +StdEnvVars </Directory> # SSL Protocol Adjustments: # The safe and default but still SSL/TLS standard compliant shutdown # approach is that mod_ssl sends the close notify alert but doesn't wait for # the close notify alert from client. When you need a different shutdown # approach you can use one of the following variables: # o ssl-unclean-shutdown: # This forces an unclean shutdown when the connection is closed, i.e. no # SSL close notify alert is send or allowed to received. This violates # the SSL/TLS standard but is needed for some brain-dead browsers. Use # this when you receive I/O errors because of the standard approach where # mod_ssl sends the close notify alert. # o ssl-accurate-shutdown: # This forces an accurate shutdown when the connection is closed, i.e. a # SSL close notify alert is send and mod_ssl waits for the close notify # alert of the client. This is 100% SSL/TLS standard compliant, but in # practice often causes hanging connections with brain-dead browsers. Use # this only for browsers where you know that their SSL implementation # works correctly. # Notice: Most problems of broken clients are also related to the HTTP # keep-alive facility, so you usually additionally want to disable # keep-alive for those clients, too. Use variable "nokeepalive" for this. # Similarly, one has to force some clients to use HTTP/1.0 to workaround # their broken HTTP/1.1 implementation. Use variables "downgrade-1.0" and # "force-response-1.0" for this. SetEnvIf User-Agent ".*MSIE.*" \ nokeepalive ssl-unclean-shutdown \
Curso: Introducción a las Aplicaciones y Servicios de Internet bajo Linux.
________________________________________________________________________________CFIE 2 Valladolid. Febrero-Marzo 2004. Módulo 4. Servidor Páginas Web. Pág 29
downgrade-1.0 force-response-1.0 # Per-Server Logging: # The home of a custom SSL log file. Use this when you want a # compact non-error SSL logfile on a virtual host basis. CustomLog logs/ssl_request_log \ "%t %h %{SSL_PROTOCOL}x %{SSL_CIPHER}x \"%r\" %b" </VirtualHost> CERTIFICADOS EXISTENTES Si por un casual un@ ya tiene un certificado de una CA prestigiosa, la IP de la máquina y su nombre de dominio es el mismo (o sea se va a migrar la máquina) pues entonces aquí van los lugares donde deben copiarse los ficheros de clave privada y el certificado existente: /etc/httpd/conf/ssl.key/server.key para la llave privada y: /etc/httpd/conf/ssl.crt/server.crt para el certificado de servidor. Curiosamente es una de las variables que hay que cambiar en la pantalla SSL del gestor gráfico que antes veíamos. ¿Alguien se me pierde? Espero que no… INCISO. Si por un casual alguien está migrando desde versiones de apache 1.x hacia 2.0.X el lugar y nombre del almacén de claves y certificados son /etc/httpd/httpsd.key y httpsd.crt que tendrá que mover al sitio nuevo con los nombres que haya decidido poner en su configuración. GENERACIÓN DE CLAVE PRIVADA. Lo primero es lo primero, necesitamos borrar tanto la clave privada y el certificado que viene por defecto en nuestro sistema, ya que ambos están vacíos y tienen más peligro que un saco de bombas ☺. Así que a la tarea: [root@casiopea /root]# rm /etc/httpd/conf/ssl.key/server.key y lo mismo para el certificado: [root@casiopea /root]# rm /etc/httpd/conf/ssl.crt/server.crt Ahora vamos a crear una clave privada propia aleatoria. Nos ponemos sobre la carpeta /usr/share/ssl/certs/ de nuestro sistema y escribimos lo siguiente: [root@casiopea /root]# make genkey Y a continuación se realizarán una pregunta sobre la contraseña… pues nada a ello… me muestra algo así como: umask 77; \ /usr/bin/openssl genrsa –des3 1024 > /etc/httpd/conf/ssl.key/server.key Generating RSA private key, 1024 bit long modulus ………………..++++++++++++++++++++++++e is 65537 (0x10001) Enter PEM pass phrase: Y comenzamos a rellenar lo que nos pida… ¡Ah la contraseña debe tener al menos 8 caracteres e incluir números, signos de puntuación, mayúsculas, minúsculas, etc…
Curso: Introducción a las Aplicaciones y Servicios de Internet bajo Linux.
________________________________________________________________________________CFIE 2 Valladolid. Febrero-Marzo 2004. Módulo 4. Servidor Páginas Web. Pág 30
Recuerda la contraseña ya que deberás introducirla cada vez que entres en el sitio web seguro. Te pide que la escribas una 2º vez para confirmar y ya está lista. TRUCO. Si no quieres tener que escribir cada vez que entres en el web seguro tu contraseña, haz lo siguiente, total esto es un ejemplín de cómo se hace bien. [root@casiopea /root]# /usr/bin/openssl genrsa 1024 > /etc/httpd/conf/ssl.key/server.key y luego escribe lo siguiente para asegurarte que los permisos sobre el fichero de la clave son correctos: [root@casiopea /root]# chmod go-rwx /etc/httpd/conf/ssl.key/server.key Esto pone un 77 en ownwer y group del fichero. Es de todos modos un problema deshabilitar la contraseña en el servidor seguro, y os recomiendo que no lo hagáis si vais a poner en marcha un servidor web seguro en producción. Clarito ¿no? ☺ CREAR UN CERTIFICADO AUTO-FIRMADO (O SEA NADA SEGURO ☺) Como ya hemos dicho antes, esto que hacemos es sólo por que esto es incurso, y nuestras máquinas no viven en un mundo real, pero si nuestro servidor fuera un Servidor seguro de comercio electrónico, la realidad sería otra muy, muy distinta ¿eh? Y seguramente tendríamos que ir a Verisign, FNMT, Silcon, etc… y pagarles por un certificado temporal (1 año) de clase 1 o seimilar y aflojar un dinerito… That´s life. En nuestro caso nos vamos a generar uno auto-firmado para funcionar en clase ¿ok? Y nada más que para eso ☺. Nos vamos a la carpeta /usr/share/ssl/certs y escribimos: [root@casiopea /root]# /usr/share/ssl/certs/make testcert y vemos algo así como: umask 77; \ /usr/bin/openssl req –new -key /etc/httpd/conf/ssl.key/server.key -x509 –days 365 –out /etc/httpd/conf/ssl.crt/server.crt Using configuration from /usr/share/ssl/openssl.cnf Enter PEM pass phrase: <introduce aquí un password> Luego pide información a cerca del nombre de la empresa, email, país, ciudad, etc… y luego ya tiene creado el certificado. En el caso de un certificado “bueno” es conveniente hacer copia de seguridad de los archivos server.key como del server.crt ¡Si los pierdes tienes que comprarlos de nuevo! Sólo queda arrancar de nuevo el demonio httpd y listo… a funcionar ☺. Teclea en el navegador https://www.infoedu.org y verás esta “maravillosa página de bienvenida:

Curso: Introducción a las Aplicaciones y Servicios de Internet bajo Linux.
________________________________________________________________________________CFIE 2 Valladolid. Febrero-Marzo 2004. Módulo 4. Servidor Páginas Web. Pág 31
Y si quieres puedes ver también a estas alturas la página web no segura creada en http://www.infoedu.org/

Curso: Introducción a las Aplicaciones y Servicios de Internet bajo Linux.
________________________________________________________________________________CFIE 2 Valladolid. Febrero-Marzo 2004. Módulo 4. Servidor Páginas Web. Pág 32
CONFIGURACIÓN DE UN HOST VIRTUAL EN EL SERVIDOR APACHE. Al comienzo de este módulo comentamos que todos los sitios web que se crean son considerados como Host Virtuales para Apache, pero bien es cierto que uno de ellos es considerado como Host por defecto y ese es el que hemos visto y hemos configurado hasta ahora –en sus versiones http:// y https://. Ahora vamos a ver como configurar un Host Virtual a mayores con la herramienta gráfica, así invocamos de nuevo a redhat-config-htpd y vemos que al elegir la solapa Host Virtuales y pedir que se cree uno nuevo aparece lo siguiente: Como puede apreciarse en las opciones generales para este Host Virtual se le dice que dirección IP y como se llamará el Host, en que directorio está el / de este servidor nuevo y poco más. No tendrá solapa SSL (ya que aquí no vamos a construir la versión https://, las variables de entorno no vamos a definir ninguna, la solapa de directorio tendrá el directorio raíz (/). Veremos las ventanas de logging:
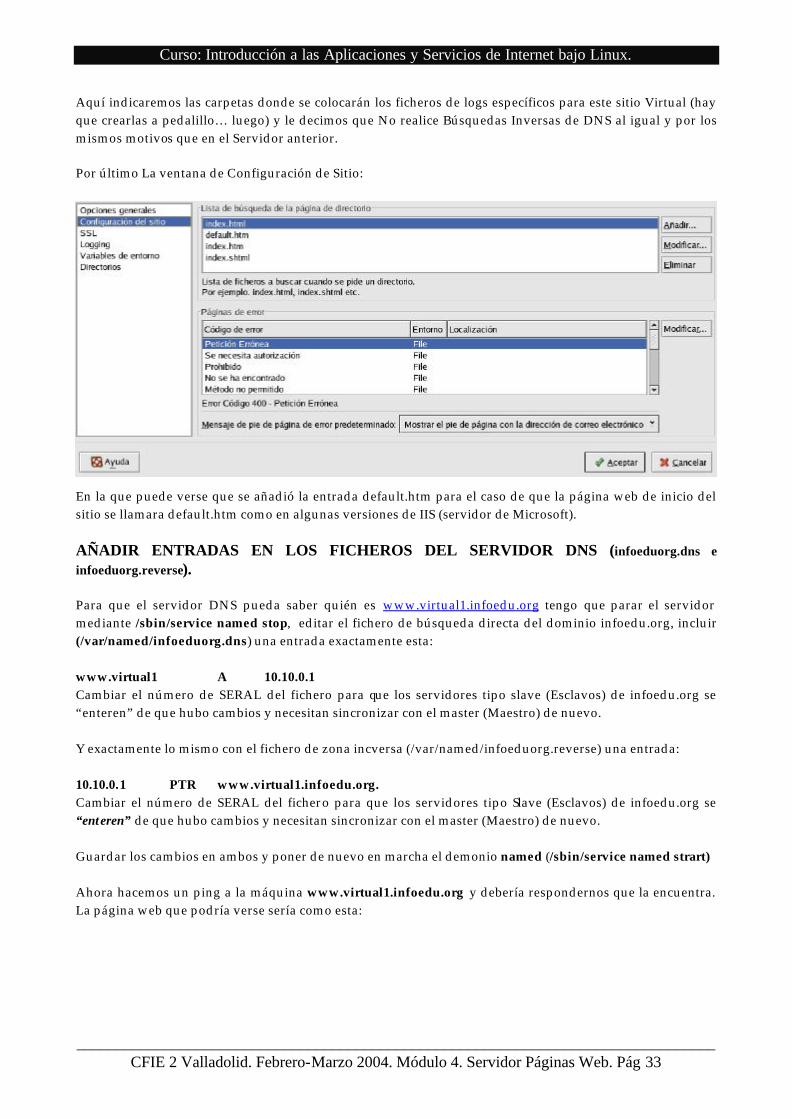
Curso: Introducción a las Aplicaciones y Servicios de Internet bajo Linux.
________________________________________________________________________________CFIE 2 Valladolid. Febrero-Marzo 2004. Módulo 4. Servidor Páginas Web. Pág 33
Aquí indicaremos las carpetas donde se colocarán los ficheros de logs específicos para este sitio Virtual (hay que crearlas a pedalillo… luego) y le decimos que No realice Búsquedas Inversas de DNS al igual y por los mismos motivos que en el Servidor anterior. Por último La ventana de Configuración de Sitio: En la que puede verse que se añadió la entrada default.htm para el caso de que la página web de inicio del sitio se llamara default.htm como en algunas versiones de IIS (servidor de Microsoft). AÑADIR ENTRADAS EN LOS FICHEROS DEL SERVIDOR DNS (infoeduorg.dns e infoeduorg.reverse). Para que el servidor DNS pueda saber quién es www.virtual1.infoedu.org tengo que parar el servidor mediante /sbin/service named stop, editar el fichero de búsqueda directa del dominio infoedu.org, incluir (/var/named/infoeduorg.dns) una entrada exactamente esta: www.virtual1 A 10.10.0.1 Cambiar el número de SERAL del fichero para que los servidores tipo slave (Esclavos) de infoedu.org se “enteren” de que hubo cambios y necesitan sincronizar con el master (Maestro) de nuevo. Y exactamente lo mismo con el fichero de zona incversa (/var/named/infoeduorg.reverse) una entrada: 10.10.0.1 PTR www.virtual1.infoedu.org. Cambiar el número de SERAL del fichero para que los servidores tipo Slave (Esclavos) de infoedu.org se “enteren” de que hubo cambios y necesitan sincronizar con el master (Maestro) de nuevo. Guardar los cambios en ambos y poner de nuevo en marcha el demonio named (/sbin/service named strart) Ahora hacemos un ping a la máquina www.virtual1.infoedu.org y debería respondernos que la encuentra. La página web que podría verse sería como esta:
Curso: Introducción a las Aplicaciones y Servicios de Internet bajo Linux.
________________________________________________________________________________CFIE 2 Valladolid. Febrero-Marzo 2004. Módulo 4. Servidor Páginas Web. Pág 34
CONFIGURACIÓN DE SITIOS EN CARPETAS WEB PERSONALES DE USUARI@S. Esta última opción que veremos en este módulo tiene mucho que ver con la posibilidad de que cada usuari@ que tenga una cuenta en un servidor pueda alojar su propia página web en su directorio personal, o sea en /home/<nombre_usuari@>. Cuando se crea una cuenta de usuari@ en un servidor Linux, normalmente se creará un nombre de usuari@, una contraseña personal, un grupo al que pertenece, y una carpeta de inicio. Pues bien existe la posibilidad de decirle a nuestro servidor de páginas que nos habilite la posibilidad de que la carpeta /home/<nombre_usuari@> sea el directorio / de un sitio web personal para <nombre_usuario> y desde ahí se administre cada usuari@ la página como estime pertinente… (Eso no lo veremos). De todos modos os anticipo que esta es la forma en que trabajan los proveedores de servicios Internet (ISP´s) con la mayoría de sus clientes ☺. A partir de ahora las modificaciones que haremos en el fichero /etc/httpd/conf/httpd.conf serán definitivas, hechas a mano y además no entraremos más ene. Gestor gráfico redhat-config-httpd ya que si lo hacemos nuestras configuraciones finales se perderán, ¿Entendido? La sección de texto que ahora nos interesa modificar del fichero httpd.conf es la siguiente:

Curso: Introducción a las Aplicaciones y Servicios de Internet bajo Linux.
________________________________________________________________________________CFIE 2 Valladolid. Febrero-Marzo 2004. Módulo 4. Servidor Páginas Web. Pág 35
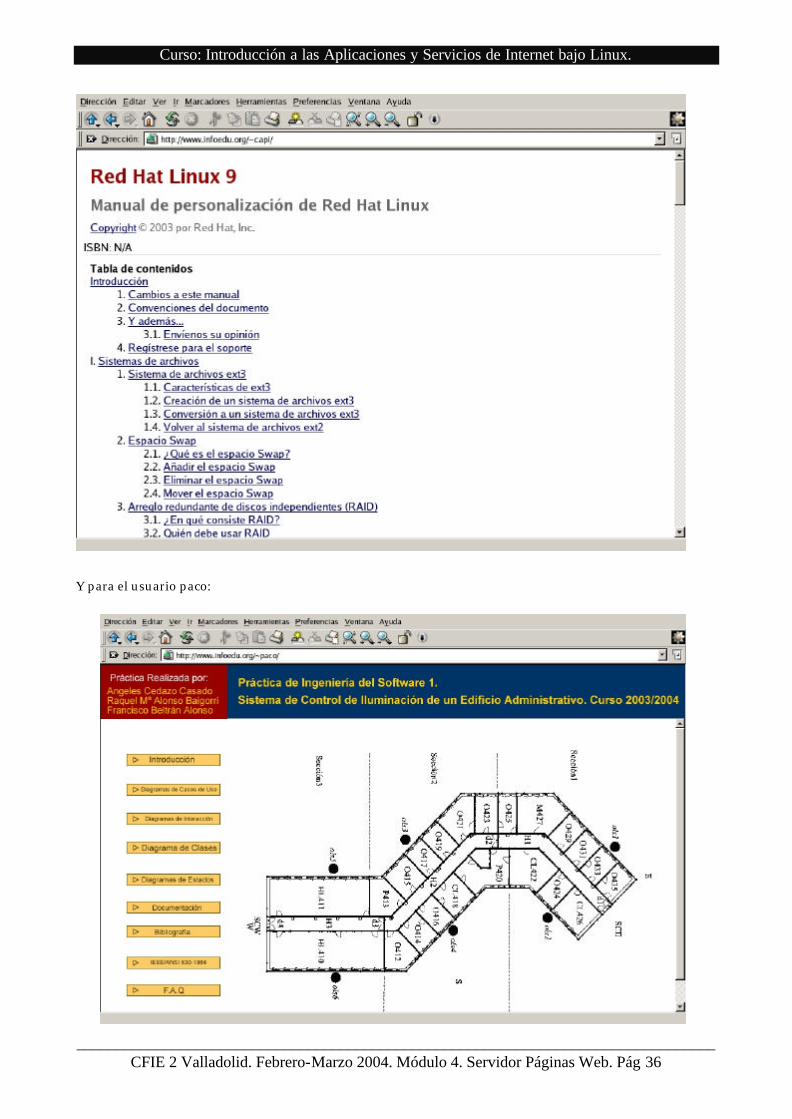
<IfModule mod_userdir.c> # # UserDir is disabled by default since it can confirm the presence # of a username on the system (depending on home directory # permissions). # UserDir "disable" UserDir "enable" capi paco UserDir http://www.infoedu.org/~* # # To enable requests to /~user/ to serve the user's public_html # directory, use this directive instead of "UserDir disable": # UserDir public_html </IfModule> En este módulo le decimos a través del parámetro UserDir que no esté disponible en general para tod@s los usuari@s, más bien que no esté disponible, pero luego le digo SI para el usuario capi y el usuario paco (definidos previamente como usuarios del sistema local). El formato de cómo podrán acceder a su página personal es mediante UserDir http://www.infoedu.org/~* veamos las posibilidades que yo tengo: Para visualizar la página de mi carpeta personal /home/capi/proa/index.html en distintos formatos:
DIRECTIVA USERDIR URL DE RUTA DE REFERENCIA UserDir public_html ~capi/public_html/proa/index.html UserDir /public/*/WWW /public/capi/WWW/proa/index.html UserDir /usr/local/web /usr/local/web/capi/proa/index.html UserDir http://www.dominio.com/users http://www.dominio.com/users/capi/proa/index.html UserDir http://www.dominio.com/~* http://www.dominio.com/~capi/proa/index.html UserDir http://www.dominio.com/*/html http://www.dominio.com/capi/html/proa/index.html Y por último le digo que en mi carpeta personal (bueno en todas las carpetas personales de l@s usuari@s habilitad@s a tener carpetas personales) existe una carpeta llamada public_html. Para asegurarme de crear estas carpetas y de que tengan los permisos apropiados de visualización, pero no de nada más… hago lo siguiente: [root@casiopea /root]# mkdir /home/capi/public_html y lo mismo para el usuario paco: [root@casiopea /root]# mkdir /home/paco/public_html. Ahora le asigno permisos a la carpeta /home/capi y /home/paco: [root@casiopea /root]# chmod +711 /home/capi y lo mismo a paco [root@casiopea /root]# chmod +711 /home/paco y por ultimo a public_html de capi y paco: [root@casiopea /root]# chmod +755 /home/capi/public_html y lo mismo a paco: [root@casiopea /root]# chmod +755 /home/paco/public_html Ahora copiamos contenido de páginas web de ejemplo en /home/capi/public_html y /home/paco/public_html con a través del servidor ftp.infoedu.org y veremos las siguientes páginas web de inicio para ambos usuarios.
Curso: Introducción a las Aplicaciones y Servicios de Internet bajo Linux.
________________________________________________________________________________CFIE 2 Valladolid. Febrero-Marzo 2004. Módulo 4. Servidor Páginas Web. Pág 36
Y para el usuario paco:
Curso: Introducción a las Aplicaciones y Servicios de Internet bajo Linux.
________________________________________________________________________________CFIE 2 Valladolid. Febrero-Marzo 2004. Módulo 4. Servidor Páginas Web. Pág 37
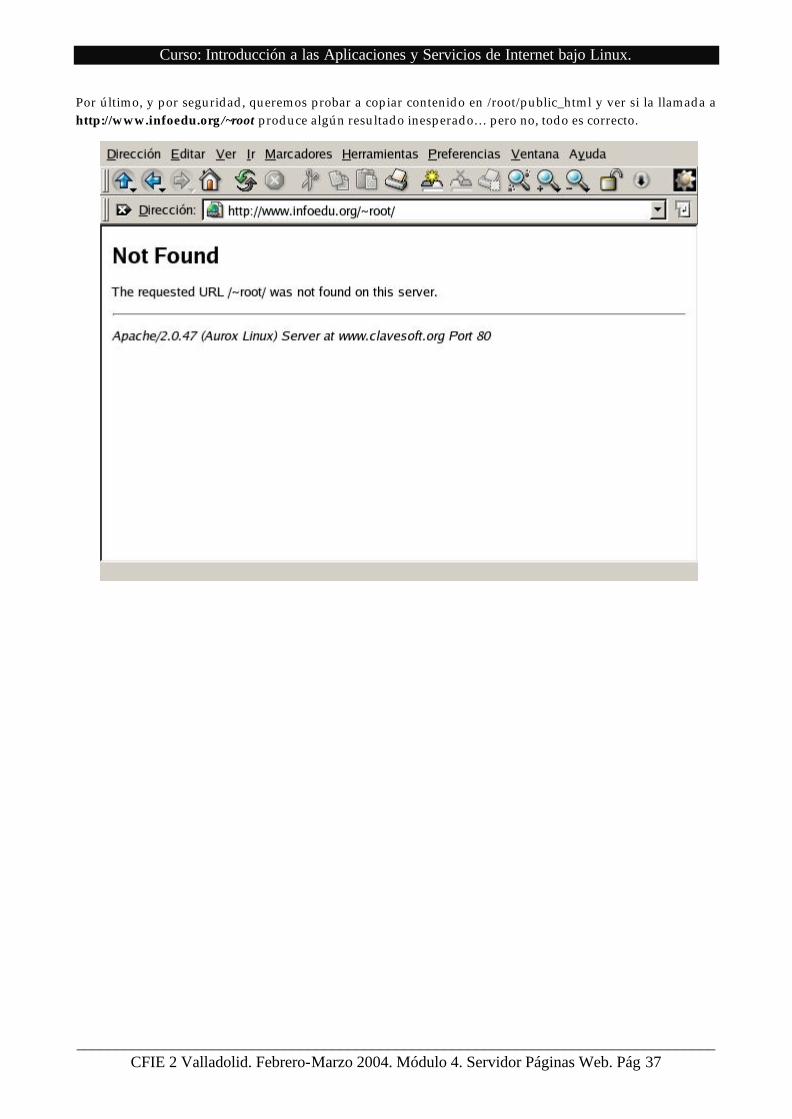
Por último, y por seguridad, queremos probar a copiar contenido en /root/public_html y ver si la llamada a http://www.infoedu.org/~root produce algún resultado inesperado… pero no, todo es correcto.