multiplicador de par - ega masterlos modelos que proporcionan un par de apriete de 25:1, disponen de...
TRANSCRIPT

MANUAL DE INSTRUCCIONESOPERATING INSTRUCTIONS
MULTIPLICADOR DE PAR
MULTIPLICADORES DE PAR / TORQUE MULTIPLIERS
ESPAÑOL ............................... 2
ENGLISH ................................ 5
GARANTIA / GUARANTEE / GARANTIE ............................. 9

2
INSTRUCCIONES DE SEGURIDAD
¡Atención! Cuide su seguridad.
1. Lea el manual atentamente antes de utilizar el aparato.2. Consérvelo cerca para futura referencia.3. No golpee el multiplicador de forma violenta o permita su caída.4. Tenga cuidado en su transporte.5. No sobreexponer el multiplicador a mayor par del admitido, puede causar rotura o pérdida de
eficacia.6. Se aconseja probar inicialmente con pequeños pares de apriete para familiarizarse con la
herramienta.7. Se recomienda usar herramientas y accesorios de alta calidad con nuestros multiplicadores de
par, como los ofrecidos por EGA Master.
ESPAÑOL

3
1.1 Información relevante
Antes de comenzar a usar este aparato, lea y observe detenidamente todas las instrucciones de uso. Fundamentalmente, los Multiplicadores de Par son una herramienta de precisión que permite obtener altos pares de apriete con el menor esfuerzo. Ha de asegurarse que solo serán utilizados por personal cualificado para su uso específico, y en el rango de valores para el cual están diseñados.
1.2 Puesta en marcha Para comenzar a usar el multiplicador de par es necesario disponer de:
- Dos llaves de vaso de impacto de la medida adecuada para conectar al: * cuadrado de salida al tornillo o tuerca a apretar * cuadrado de salida de la placa de reacción - Una llave dinamométrica con el cuadrado de entrada adecuado (1/2” o 3/4”) para poder accionar
el multiplicador.
1. INTRODUCCIÓN
3. SELECCIÓN DE MODELO DE MULTIPLICADOR
Dependiendo del par de apriete exigido, seleccionaremos un modelo u otro. Se ofrecen dos tipos de ratio de multiplicación de par: 5:1 o 25:1.
Los modelos que proporcionan un par de apriete de 25:1, disponen de un sistema anti-retorno que evita que el multiplicador rebobine proporcionando la máxima seguridad. Estos multiplicadores permiten a su vez emplear llaves dinamométricas de menor longitud, por lo que son la opción ideal para usar en espacios reducidos.
Todos los multiplicadores de par disponen de un sistema anti-dañado de engranajes en caso de sobrecarga.
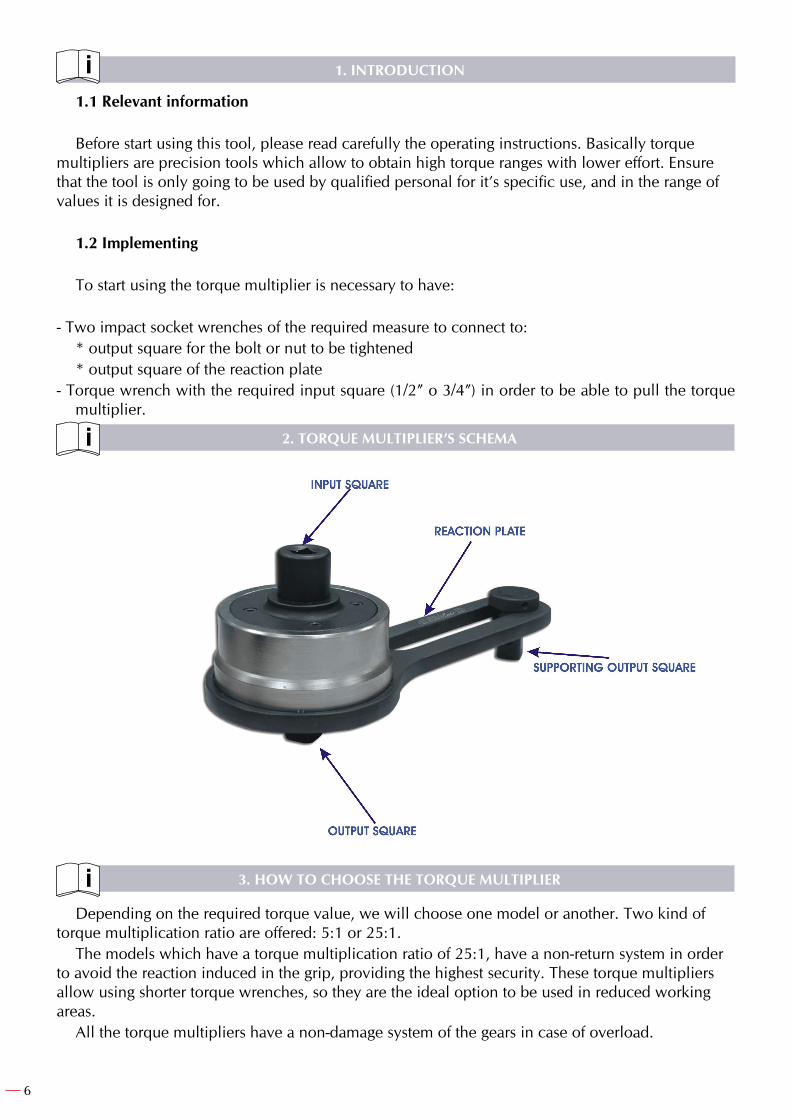
2. PARTES DEL ULTIPLICADOR DE PAR

4
4. MODO DE EMPLEO
Nota: Para prevenir que el multiplicador se mueva o desajuste durante el uso, ha de asegurarse que
está perfectamente insertado en los vasos de impacto. Es importante intentar colocar el vaso del plato de reacción lo más alejado posible del cuadrado conductor, es decir, intentar que la distancia “D” sea la máxima posible (ver croquis adjunto). Esto favorecerá una mayor estabilidad y seguridad.
Una vez que se dispone de todos los elementos necesarios especificados en el punto 1.2, se puede comenzar a usar el multiplicador de par:
1. Colocar el multiplicador de par con los vasos de impacto correspondientes en el tornillo o tuerca a apretar.
2. Ajustar el cuadrado de la placa de reacción a la posición disponible del tornillo o tuerca próximo.
Ha de cerciorarse que la disposición del multiplicador es totalmente paralela a la superficie adherida. Una mala colocación perjudicaría el buen funcionamiento de la herramienta y podría provocar daños en el multiplicador.
3. Colocar la llave dinamométrica correspondiente en el cuadrado de entrada del multiplicador de par.
4. Apretar con la llave dinamométrica hasta llegar al par de apriete deseado de forma suave y controlada.
5
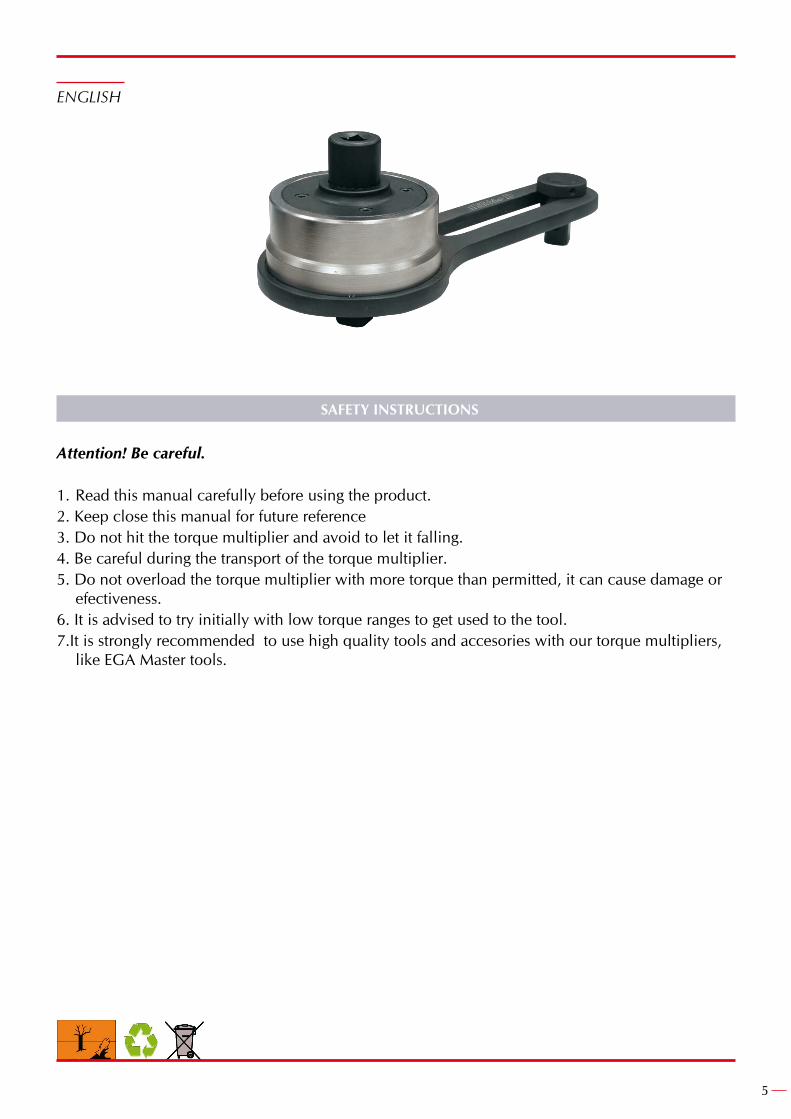
ENGLISH
SAFETY INSTRUCTIONS
Attention! Be careful.
1. Read this manual carefully before using the product.2. Keep close this manual for future reference3. Do not hit the torque multiplier and avoid to let it falling.4. Be careful during the transport of the torque multiplier.5. Do not overload the torque multiplier with more torque than permitted, it can cause damage or
efectiveness.6. It is advised to try initially with low torque ranges to get used to the tool.7.It is strongly recommended to use high quality tools and accesories with our torque multipliers,
like EGA Master tools.
6
1.1 Relevant information
Before start using this tool, please read carefully the operating instructions. Basically torque multipliers are precision tools which allow to obtain high torque ranges with lower effort. Ensure that the tool is only going to be used by qualified personal for it’s specific use, and in the range of values it is designed for.
1.2 Implementing
To start using the torque multiplier is necessary to have:
- Two impact socket wrenches of the required measure to connect to: * output square for the bolt or nut to be tightened * output square of the reaction plate - Torque wrench with the required input square (1/2” o 3/4”) in order to be able to pull the torque
multiplier.
1. INTRODUCTION
3. HOW TO CHOOSE THE TORQUE MULTIPLIER
Depending on the required torque value, we will choose one model or another. Two kind of torque multiplication ratio are offered: 5:1 or 25:1.
The models which have a torque multiplication ratio of 25:1, have a non-return system in order to avoid the reaction induced in the grip, providing the highest security. These torque multipliers allow using shorter torque wrenches, so they are the ideal option to be used in reduced working areas.
All the torque multipliers have a non-damage system of the gears in case of overload.
2. TORQUE MULTIPLIER’S SCHEMA

7
4. INSTRUCTIONS
Note: In order to avoid any movement or mismatching while using the torque multiplier, please ensure
that the torque multiplier is correctly placed and well inserted in the impact socket wrenches.
It is very important to place the impact socket wrench of the supporting output square as fas as possible form the main output square. So that, “D” distance must be the maximum available in the working place (see picture below). That will help having bigger stability and safety.
Once we have available all the required elements specified in section 1.2, we can start using the torque multiplier:
1. Place the torque multiplier with the impact socket wrenches on the bolt or nut to be tightened.
2. Adjust the output square of the reaction plate to the next available bolt or nut.It must be ensured that the torque multiplier disposal is completely paralell to the surface it is
joined to. A bad disposal of the torque multiplier would act against the well functioning of the tool and could cause damage in the torque multiplier.
3. Insert the corresponding torque wrench in the input square of the torque multiplier.
4. Tighten up with the torque wrench in a smooth and controllated way until the torque value is reached.

8
ARTICULO / ITEM / ARTICLE: ....................................................................................................................
Nº DE SERIE / SERIE Nº / Nº SERIE: ...........................................................................................................
DISTRIBUIDOR / DISTRIBUTOR / DISTRIBUTEUR: ...................................................................................
PAIS / COUNTRY / PAYS: .............................................................................TEL.:....................................
FECHA DE VENTA / SALE DATE / DATE VENTE: ........................................................................................
NOMBRE DEL COMPRADOR / BUYER NAME / NOM DE L’ACHETEUR: ..................................................
TEL. COMPRADOR / BUYER TEL. / TEL. DE L’ACHETEUR: ........................................................................
CERTIFICADO DE GARANTIAGUARANTEE CERTIFICATECERTIFICAT DE GARANTIE
SELLO / STAMP / CACHET
EGA MASTER GARANTIZA AL COMPRADOR DE ESTA MAQUINA LA GARANTIA TOTAL (DURANTE 12 MESES), DE LAS PIEZAS CON DEFECTOS DE FABRICACION. ESTA GARANTIA NO CUBRE AQUELLAS PIEZAS QUE POR SU USO NORMAL TIENEN UN DESGASTE. PARA OBTENER LA VALIDEZ DE LA GARANTIA , ES ABSOLUTAMENTE IMPRESCINDIBLE QUE COMPLETE Y REMITA ESTE DOCUMENTO A EGA MASTER , DENTRO DE LOS SIETE DIAS A PARTIR DE LA FECHA DE COMPRA.
EGA MASTER GUARANTEES TO THE BUYER OF THIS MACHINE THE TOTAL WARRANTY (DURING 12 MONTHS), OF THE PIECES WITH MANUFACTURING FAULTS.THIS GUARANTEE DOES NOT COVER THOSE PIECES WORN OUT DUE TO A NORMAL USE. IN ORDER TO OBTAIN THE VALIDITY OF THIS WARRANTY , IT IS ABSOLUTELY NECESSARY TO FULFILL THIS DOCUMENT AND RESEND IT TO EGA MASTER WITHIN 7 DAYS FROM SALE DATE.
EGA MASTER GARANTIE A L’ACHETEUR DE CETTE MACHINE LA GARANTIE TOTALE (PENDANT 12 MOIS) DES PIECES AVEC DEFAUTS DE FABRICATION. CETTE GARANTIE NE COUVRE PAS LES PIECES QUE PAR UN USAGE NORMAL, SOIENT DETERIOREES. POUR OBTENIR LA VALIDITE DE LA GARANTIE, IL EST ABSOLUMENT IMPERATIF COMPLETER ET ENVOYER CE DOCUMENT EGA MASTER, DANS UN DELAI DE 7 JOURS A PARTIR DE LA DATE D’ACHAT.
EJEMPLAR PARA EGA MASTER / COPY FOR EGA MASTER / EXEMPLAIRE POUR EGA MASTER
ARTICULO / ITEM / ARTICLE: ....................................................................................................................
Nº DE SERIE / SERIE Nº / Nº SERIE: ...........................................................................................................
DISTRIBUIDOR / DISTRIBUTOR / DISTRIBUTEUR: ...................................................................................
PAIS / COUNTRY / PAYS: .............................................................................TEL.:....................................
FECHA DE VENTA / SALE DATE / DATE VENTE: ........................................................................................
NOMBRE DEL COMPRADOR / BUYER NAME / NOM DE L’ACHETEUR: ..................................................
TEL. COMPRADOR / BUYER TEL. / TEL. DE L’ACHETEUR: ........................................................................
CERTIFICADO DE GARANTIAGUARANTEE CERTIFICATECERTIFICAT DE GARANTIE
SELLO / STAMP / CACHET
EGA MASTER GARANTIZA AL COMPRADOR DE ESTA MAQUINA LA GARANTIA TOTAL (DURANTE 12 MESES), DE LAS PIEZAS CON DEFECTOS DE FABRICACION. ESTA GARANTIA NO CUBRE AQUELLAS PIEZAS QUE POR SU USO NORMAL TIENEN UN DESGASTE. PARA OBTENER LA VALIDEZ DE LA GARANTIA , ES ABSOLUTAMENTE IMPRESCINDIBLE QUE COMPLETE Y REMITA ESTE DOCUMENTO A EGA MASTER , DENTRO DE LOS SIETE DIAS A PARTIR DE LA FECHA DE COMPRA.
EGA MASTER GUARANTEES TO THE BUYER OF THIS MACHINE THE TOTAL WARRANTY (DURING 12 MONTHS), OF THE PIECES WITH MANUFACTURING FAULTS.THIS GUARANTEE DOES NOT COVER THOSE PIECES WORN OUT DUE TO A NORMAL USE. IN ORDER TO OBTAIN THE VALIDITY OF THIS WARRANTY , IT IS ABSOLUTELY NECESSARY TO FULFILL THIS DOCUMENT AND RESEND IT TO EGA MASTER WITHIN 7 DAYS FROM SALE DATE.
EGA MASTER GARANTIE A L’ACHETEUR DE CETTE MACHINE LA GARANTIE TOTALE (PENDANT 12 MOIS) DES PIECES AVEC DEFAUTS DE FABRICATION. CETTE GARANTIE NE COUVRE PAS LES PIECES QUE PAR UN USAGE NORMAL, SOIENT DETERIOREES. POUR OBTENIR LA VALIDITE DE LA GARANTIE, IL EST ABSOLUMENT IMPERATIF COMPLETER ET ENVOYER CE DOCUMENT EGA MASTER, DANS UN DELAI DE 7 JOURS A PARTIR DE LA DATE D’ACHAT.
EJEMPLAR PARA EL CLIENTE / COPY FOR THE CUSTOMER / EXEMPLAIRE POUR LE CLIENT


C/ ZORROLLETA 11, POL. IND. JUNDIZ01015 VITORIA, SPAIN P.O.B. APTDO. 5005TEL. 34 - 945 290 001 FAX. 34 - 945 290 141
www.egamaster.com