detector de presencia de superficie kdp7 motion detector ... · preste atención en qué dirección...
TRANSCRIPT

KDP7
ww
w.g
rup
otem
per
.com
Detector de presencia de superficieMotion detector light control
2Manual de instrucciones | www.grupotemper.com
KDP7 Detector de presencia de superficie
Índice
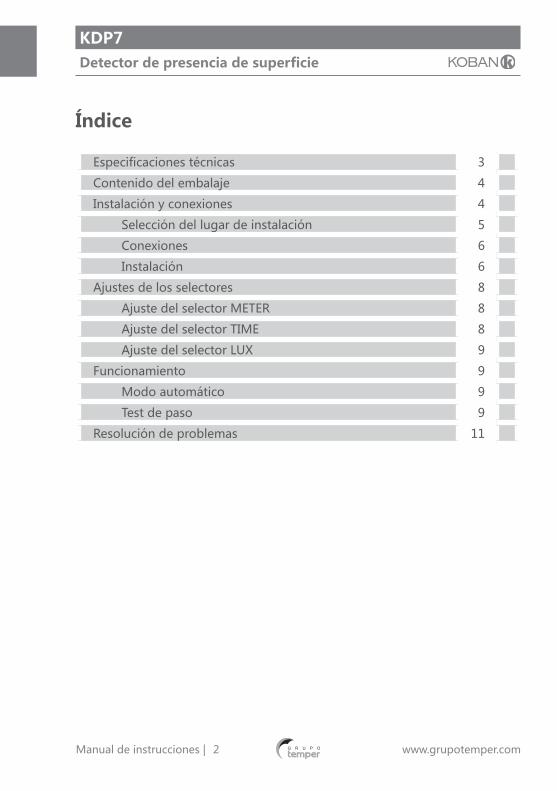
Especificaciones técnicas 3
Contenido del embalaje 4
Instalación y conexiones 4
Selección del lugar de instalación 5
Conexiones 6
Instalación 6
Ajustes de los selectores 8
Ajuste del selector METER 8
Ajuste del selector TIME 8
Ajuste del selector LUX 9
Funcionamiento 9
Modo automático 9
Test de paso 9
Resolución de problemas 11
3Manual de instrucciones | www.grupotemper.com
KDP7Detector de presencia de superficie
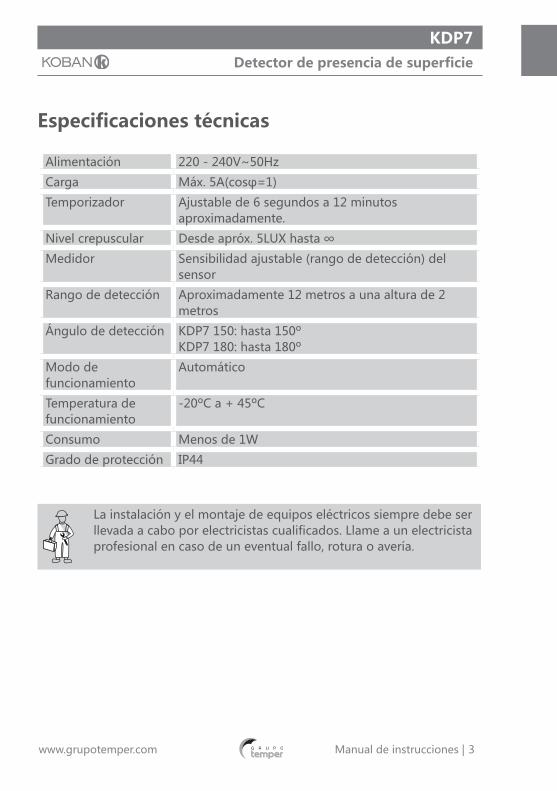
Especificaciones técnicas
Alimentación 220 - 240V~50Hz
Carga Máx. 5A(cosφ=1)
Temporizador Ajustable de 6 segundos a 12 minutos aproximadamente.
Nivel crepuscular Desde apróx. 5LUX hasta ∞
Medidor Sensibilidad ajustable (rango de detección) del sensor
Rango de detección Aproximadamente 12 metros a una altura de 2 metros
Ángulo de detección KDP7 150: hasta 150ºKDP7 180: hasta 180º
Modo de funcionamiento
Automático
Temperatura de funcionamiento
-20ºC a + 45ºC
Consumo Menos de 1W
Grado de protección IP44
La instalación y el montaje de equipos eléctricos siempre debe ser llevada a cabo por electricistas cualificados. Llame a un electricista profesional en caso de un eventual fallo, rotura o avería.
4Manual de instrucciones | www.grupotemper.com
KDP7 Detector de presencia de superficie
Contenido del embalaje
Icono
Artículo DetectorTornillos Φ3x8mm
Tornillos Φ3x8mm
punta planaManual
Cantidad 1 2 2 1
Icono
ArtículoTornillos
Φ4x25mmPinza para cable Junta de goma
Cantidad 2 1 1
Instalación y conexiones
PrecauciónAntes de instalar el detector desconecte la alimentación. Lea este manual de instrucciones al completo antes de comenzar la instalación.
Dimensiones: 101 x 62,5 x 117 mm (Ver FIG. 1)
FIG.1
117
101
62,5

5Manual de instrucciones | www.grupotemper.com
KDP7Detector de presencia de superficie
Selección del lugar de instalación (Ver FIG.2-A y FIG. 2-B)
Este detector es ideal para su uso en pasillos, escaleras, cuartos de herramientas, sótanos, garajes, etc...Debido a la sensibilidad del sensor ante los cambios de temperatura, evite las siguientes condiciones:• Evite dirigir el sensor hacia zonas u objetos de superficie muy reflectante
como espejos, monitores….• Evite dirigir el detector hacia objetos que pudieran moverse con el viento
como las cortinas, plantas de cierta altura, árboles pequeños, etc..• No instale el detector cerca de fuentes de calor tales como respiraderos de
calefacción, de aire acondicionado, calefacciones, luces…
Se recomienda instalar el detector a una altura de unos 2m; desde esa posición el área de detección puede alcanzar los 12m. (Ver FIG.3)
B-2.GIFA-2.GIF
FIG.3
Vista lateral
2m
0 1 2 3 6 12m
Vista superior
12m
6 2 0 2 6(m)
150o
Vista superior
6 2 0 2 6(m)
180o
12m
KDP7 150 KDP7 180
Área de detección ajustable en 3 niveles
Ángulo de detección 150º Ángulo de detección 180º
6Manual de instrucciones | www.grupotemper.com
KDP7 Detector de presencia de superficie
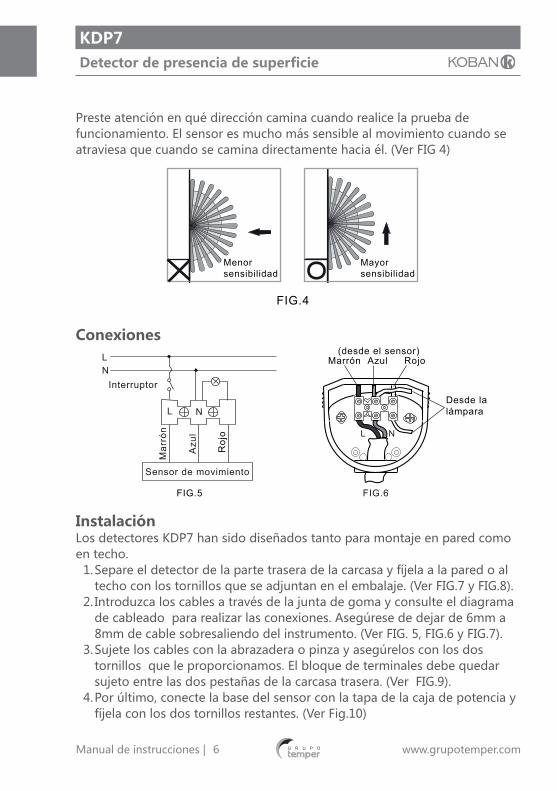
Preste atención en qué dirección camina cuando realice la prueba de funcionamiento. El sensor es mucho más sensible al movimiento cuando se atraviesa que cuando se camina directamente hacia él. (Ver FIG 4)
Conexiones
InstalaciónLos detectores KDP7 han sido diseñados tanto para montaje en pared como en techo.
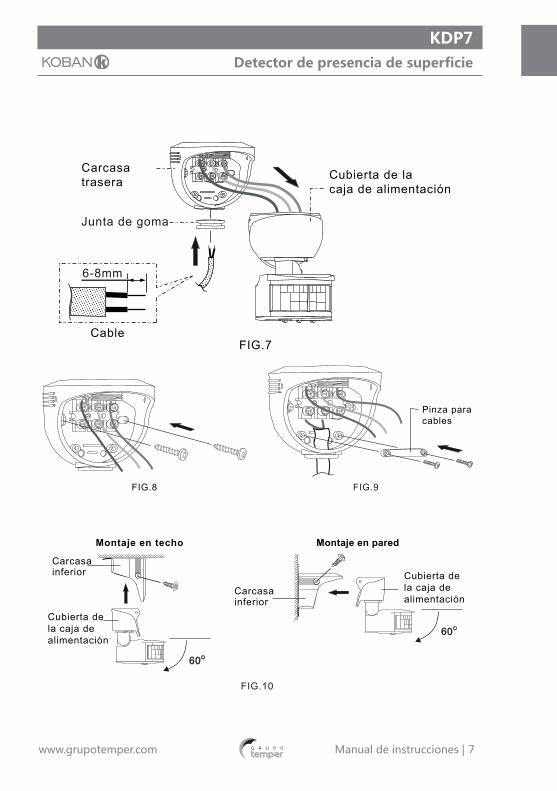
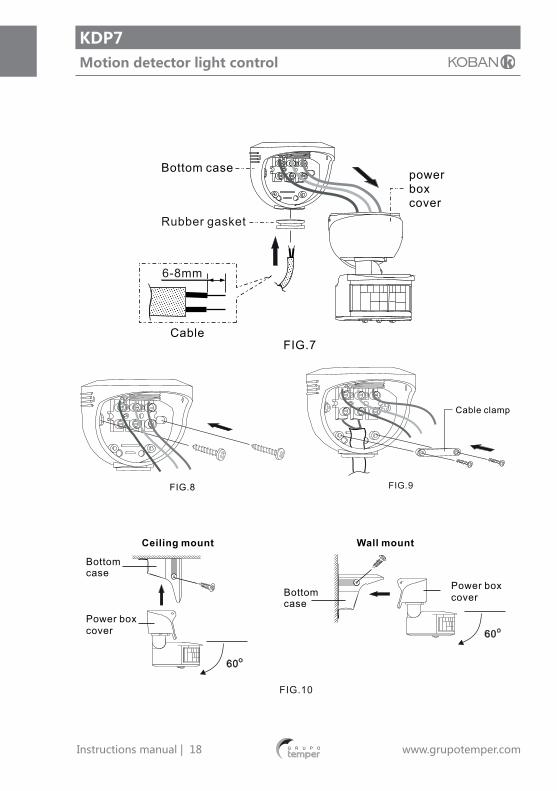
1. Separe el detector de la parte trasera de la carcasa y fíjela a la pared o al techo con los tornillos que se adjuntan en el embalaje. (Ver FIG.7 y FIG.8).
2. Introduzca los cables a través de la junta de goma y consulte el diagrama de cableado para realizar las conexiones. Asegúrese de dejar de 6mm a 8mm de cable sobresaliendo del instrumento. (Ver FIG. 5, FIG.6 y FIG.7).
3. Sujete los cables con la abrazadera o pinza y asegúrelos con los dos tornillos que le proporcionamos. El bloque de terminales debe quedar sujeto entre las dos pestañas de la carcasa trasera. (Ver FIG.9).
4. Por último, conecte la base del sensor con la tapa de la caja de potencia y fíjela con los dos tornillos restantes. (Ver Fig.10)
FIG.4
Menorsensibilidad
Mayorsensibilidad
FIG.5
NL
NL
Mar
rón
Azu
l
Interruptor
Roj
o
Sensor de movimiento
FIG.6
Desde lalámpara
L N
(desde el sensor)Marrón Azul Rojo
7Manual de instrucciones | www.grupotemper.com
KDP7Detector de presencia de superficie
FIG.7Cable
6-8mm
Junta de goma
Carcasatrasera Cubierta de la
caja de alimentación
FIG.8 FIG.9
Pinza paracables
FIG.10
Montaje en pared
Carcasainferior
60O
60O
Montaje en techo
Carcasainferior
Cubierta dela caja dealimentación
Cubierta dela caja dealimentación

8Manual de instrucciones | www.grupotemper.com
KDP7 Detector de presencia de superficie
Ajustes de los selectores
Selectores METER - TIME - LUX (Ver FIG. 11)
Ajuste del selector METER
• Ajustando el selector METER en la posición “-“ obtendremos el menor campo de visión posible y por tanto la mínima área de detección.
• Por el contrario, ajustando el selector en la posición “+” conseguimos el mayor campo de visión y área de detección posible.
• Ajuste el selector METER entre las posiciones “-“ y “+” según el campo de visión del detector que desee.
Ajuste del selector TIME
• Ajustando el selector TIME en la posición “-“, conseguimos el mínimo tiempo de retardo (la iluminación permanecerá encendida 5 segundos).
• Ajustando el selector TIME en la posición “+” conseguimos el máximo tiempo de retardo (la iluminación permanecerá encendida 10 minutos).
• Coloque el selector TIME en alguna de las posiciones entre “-“ y “+” hasta que ajuste el tiempo de encendido de la iluminación a sus deseos.
FIG.11
METER LUX TIME
Ajuste del área dedetección
Ajuste del nivel deluz ambiente
Temporizador deapagado automático

9Manual de instrucciones | www.grupotemper.com
KDP7Detector de presencia de superficie
Ajuste del selector LUX
• Coloque el selector Lux en la posición . El valor LUX será igual a 5Lux. En esta posición el detector no reaccionará ante el movimiento ya que la luz ambiente siempre será más intensa que 5Lux.
• Coloque el selector Lux en la posición de máximo valor de LUX. El detector responderá ante el movimiento sea cual sea el nivel de luz.
• Colocando el selector en alguna de las posiciones intermedias ajustará el nivel de LUX a sus deseos.
Funcionamiento
Modo automático
Los detectores de presencia con control de luz KDP7 llevan integrado un dispositivo que permite el control automático de la iluminación según el nivel de luz (LUX) y el tiempo (TIMER) configurados. De esta manera cuando el sensor detecte una presencia en su área de cobertura , la iluminación se encenderá y se apagará según el nivel de luz ambiental durante el tiempo que previamente hayamos seleccionado. Por el contrario, si el nivel de luz ambiental no concuerda con el nivel de Lux configurado, el sensor permanecerá inactivo y la luz no se encenderá incluso si hay movimiento dentro de su área de detección.
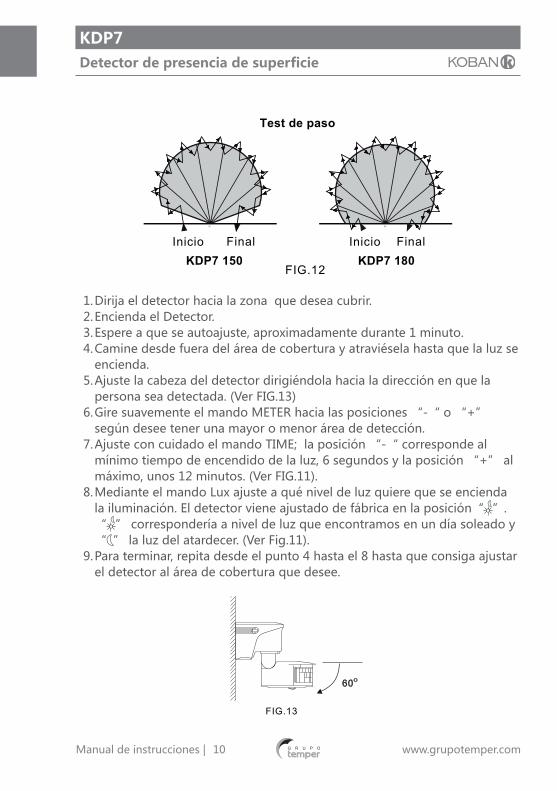
Test de paso
La realización de esta prueba nos ayudará a escoger el lugar idóneo para instalar el detector y así tener un mejor ángulo de detección. Coloque el interruptor en la posición AUTO, gire el selector METER hasta “+”,TIME hasta “-“ y el LUX a “ ” y realice el test de paso siguiendo las siguientes indicaciones.El detector KDP7 necesita aproximadamente un 1 minuto para autoajustarse la primera vez que se enciende o tras un tiempo apagado. Durante la prueba, la luz del detector se activará durante 6 segundos cuando detecte el movimiento a través de su área de cobertura. (Ver FIG. 12).Deténgase una vez la luz se encienda, en caso contrario el temporizador se reseteará y volverá a encenderse durante otros 6 segundos.
10Manual de instrucciones | www.grupotemper.com
KDP7 Detector de presencia de superficie
1. Dirija el detector hacia la zona que desea cubrir.2. Encienda el Detector.3. Espere a que se autoajuste, aproximadamente durante 1 minuto.4. Camine desde fuera del área de cobertura y atraviésela hasta que la luz se
encienda.5. Ajuste la cabeza del detector dirigiéndola hacia la dirección en que la
persona sea detectada. (Ver FIG.13)6. Gire suavemente el mando METER hacia las posiciones “-“ o “+”
según desee tener una mayor o menor área de detección.7. Ajuste con cuidado el mando TIME; la posición “-“ corresponde al
mínimo tiempo de encendido de la luz, 6 segundos y la posición “+” al máximo, unos 12 minutos. (Ver FIG.11).
8. Mediante el mando Lux ajuste a qué nivel de luz quiere que se encienda la iluminación. El detector viene ajustado de fábrica en la posición“ ”. “ ” correspondería a nivel de luz que encontramos en un día soleado y “ ” la luz del atardecer. (Ver Fig.11).
9. Para terminar, repita desde el punto 4 hasta el 8 hasta que consiga ajustar el detector al área de cobertura que desee.
FIG.12
Inicio Final
Test de paso
KDP7 150 KDP7 180Inicio Final
FIG.13
60O

11Manual de instrucciones | www.grupotemper.com
KDP7Detector de presencia de superficie
Nota
Bajo las siguientes condiciones medioambientales, el detector puede tener una menor sensibilidad:• En noches de mucha niebla, la humedad que se puede acumular en las
lentes puede restar sensibilidad al aparato.• En los días muy calurosos la menor sensibilidad se deberá a que la
temperatura corporal se acercará a la ambiental.• En días de mucho frío, la cantidad de ropa que nos ponemos y
especialmente si nos tapamos la cara, evita que desprendamos calor corporal y al detector le será más difícil captar nuestra presencia.
• Limpieza: Utilice únicamente un paño seco. El uso de jabones y paños ásperos, podrían dañar la lente del detector.
Resolución de problemas
Problema Posible causa Solución sugerida
Los dispositivos de iluminación no se encienden
1. El selector LUX no se ha ajustado correctamente.2. El tiempo de reabastecimiento de energía es menor de 5 seg.3. No hay alimentación, la bombilla funciona mal o no se conectado correctamente.4. El cabezal del detector está en la posición incorrecta.
1. Coloque el selector LUX en la posición “ ”.2. Apague el detector durante al menos 5 segundos y enciéndalo de nuevo.3. Compruebe que el suministro eléctrico está conectado, cambie la bombilla por una nueva o bien consulte el diagrama de conexiones.4. Ajuste la cabeza del detector hacia la posición deseada.

12Manual de instrucciones | www.grupotemper.com
KDP7 Detector de presencia de superficie
Problema Posible causa Solución sugerida
Los dispositivos de iluminación no se apagan
1. El tiempo de encendido seleccionado es demasiado largo y el detector está continuamente activado.2. Hay una posible interferencia.3. Cableado incorrecto.4. El detector se ha instalado en una situación incorrecta.
1. Compruebe el tiempo de retardo especificado en el modo TIME y que no hay interferencias que activen el detector.2. Manténgase fuera de la zona de cobertura del detector cuando realice la prueba.3. Compruebe que la carga y los cables están conectados correctamente.4. Asegúrese de que el aparato no está dirigido hacia algún objeto que pudiera afectar a su sensor de temperatura, como aparatos de aire acondicionado o rejillas de calefacción.
Las luces se pagan y encienden muy rápido
1. Si hemos instalado el detector en un lugar inadecuado, pude que el calor de las bombillas lo activen.2. Dentro del área de detección hay objetos blancos o extremadamente reflectantes.
1. Seleccione otro lugar para su instalación.2. Compruebe si hay algún objeto blanco o reflectante en la zona del patrón de detección y de ser así, ajuste del sensor para que esté dirigido a una dirección diferente de las luces.
Nota
Mantenga siempre las lentes del detector limpias y asegúrese de que nada las obstruye. No intente usted mismo abrir o reparar el aparato, existe riesgo de sufrir una descarga eléctrica debido al alto voltaje del mismo.
13Instructions manual | www.grupotemper.com
KDP7Motion detector light control
Contents
Technical specifications 3
Package contents 4
Installation and wiring 4
Select a proper location 5
Wiring 6
Installation procedure 6
Knob setting 8
METER knob setting 8
TIME knob setting 8
LUX knob setting 9
Operation 9
Auto mode 9
Walk test 9
Troubleshooting 11

14Instructions manual | www.grupotemper.com
KDP7Motion detector light control
Technical specifications
Rated Voltage 220 - 240V~50Hz
Load Max. 5A(cosφ=1)
Times Adjustable from about 6 sec to 12 min
LUX Adjustable “Light Level”control about 5 - ∞ LUX
Meter Adjustable “Sensitivity” (detecting range) of sensor
Detection range Detection range approx. 12m at 2m height
Detection Angle KDP7 150: up to 150ºKDP7 180: up to 180º
Operation mode Auto
Operating temperature
-20ºC to + 45ºC
Power consumption Less than 1W
Enviromental protection
IP44
Installation and assembly of electrical equipment must be carried out by qualified electricians. Contact a qualified electrician in the event of fault or break down.
15Instructions manual | www.grupotemper.com
KDP7Motion detector light control
Package contents
Pattern
ItemMotion
DetectorScrew
Φ3x8mmScrew
Φ3x8mmManual
Quantity 1 2 2 1
Pattern
ItemScrew
Φ4x25mmCable clamp Rubber gasket
Quantity 2 1 1
Installation and wiring
CautionPlease disconnect power completely and read the entire instruction manual carefully before installation.
Dimension: 101 x 62.5 x 117MM (See FIG.1)
FIG.1
117
101
62,5

16Instructions manual | www.grupotemper.com
KDP7Motion detector light control
Select a proper location (See FIG.2-A & FIG.2-B)
The optimal location for installation is at corridor, staircase, utility room, basement, garage etc.Since the detector responds to temperature change, please avoid the following conditions:• Avoid pointing the detector toward the objects whose surfaces are highly
reflective, such as mirror, etc.• Avoid mounting the detector near heat sources, such as heating vents, air
conditioners, lights, etc.• Avoid aiming the detector toward the objects which may be swayed in the
wind, such as curtain, tall plants, etc.
It is recommended to install at the height of 2m. The detection range can reach up to 12m at the height of 2m (See FIG.3).
B-2.GIFA-2.GIF
FIG.3
Three level of viewadjustable range
Side view
2m
0 1 2 3 6 12m
150 protectioncoverage
o
Top view
12m
6 2 0 2 6(m)
150o
180 protectioncoverage
o
Top view
6 2 0 2 6(m)
180o
12m
KDP7 150 KDP7 180

17Instructions manual | www.grupotemper.com
KDP7Motion detector light control
Pay attention to the walking direction in the test proceeding (See FIG.4).
Wiring
Installation procedureThe detector can be mounted either on the wall or on the ceiling.
1. Detach the sensor part from the bottom case, then fix the bottom case on the wall or on the ceiling with the screws (See FIG.7 & FIG.8).
2. Feed the cables through rubber gasket and refer to wiring diagram to connect the cables, please be noted to strip off 6 - 8mm of cable sheathing by tool (See FIG.5 & FIG.6 & FIG.7).
3. Arrange cables with a cable clamp and secure it with two screws. The terminal block has to be pressed in between two bosses of bottom case (See FIG.9).
4. Connect the sensor base with the power box cover, then fix firmly with 2 screws (See FIG.10).
FIG.4
Moresensitive
Lesssensitive
FIG.5
NL
NL
Bro
wn
Blu
e
ControlSwitch
Red
Motion sensor
FIG.6
Fromlamp
L N
(from sensor)Brown Blue Red
18Instructions manual | www.grupotemper.com
KDP7Motion detector light control
FIG.7Cable
6-8mm
Rubber gasket
Bottom case powerboxcover
FIG.8 FIG.9
Cable clamp
FIG.10
Wall mount
Bottomcase
Power boxcover
60O
60O
Ceiling mount
Bottomcase
Power boxcover

19Instructions manual | www.grupotemper.com
KDP7Motion detector light control
Knob setting
METER - TIME - LUX knob (See FIG.11).
METER knob setting
• Set Meter knob value at the position of “-”, the smallest “field of view” will be performed.
• Set Meter knob value at the position of “+”, the largest “field of view” will be performed.
• To adjust the Meter knob according to user’s desires in between the position of “+” & “-”.
TIME knob setting
• Set TIME knob value at the position of “ - “, the minimum delay time will be approx 6sec.
• Set TIME knob value at the position of “ + “, the maximum delay time will be approx 12min.
• To adjust the TIME knob according to user’s desires in between the position of “+” & “ - “.
FIG.11
METER LUX TIME
To set desireddetection range
To set ambientlight level
Auto shut-offtimer control
20Instructions manual | www.grupotemper.com
KDP7Motion detector light control
LUX knob setting
• Set LUX knob value the position of , the minimum LUX value will be approx 5lux. KDP7 has no reaction against the movement as the actual light level is higher than 5lux.
• Set LUX knob value at the position of the maximum LUX value will be performed, in such way KDP7 responds to the movement at any light level.
• To adjust LUX knob according to user’s desires in between the position of & .
Operation
Auto mode
KDP7 Motion Detector Light Control can automatically turn the light ON or OFF depending on what the value of LUX and Timer are set. The light will turn on when ambient light level applies to LUX setting and the motion sensor is activated as the moving object is in detection coverage, and the lamp will turn off automatically when time set is reached.Conversely, when ambient light level does not apply to LUX setting, the sensor can not be activated and the light will not turn on even there is moving object in the detection coverage.
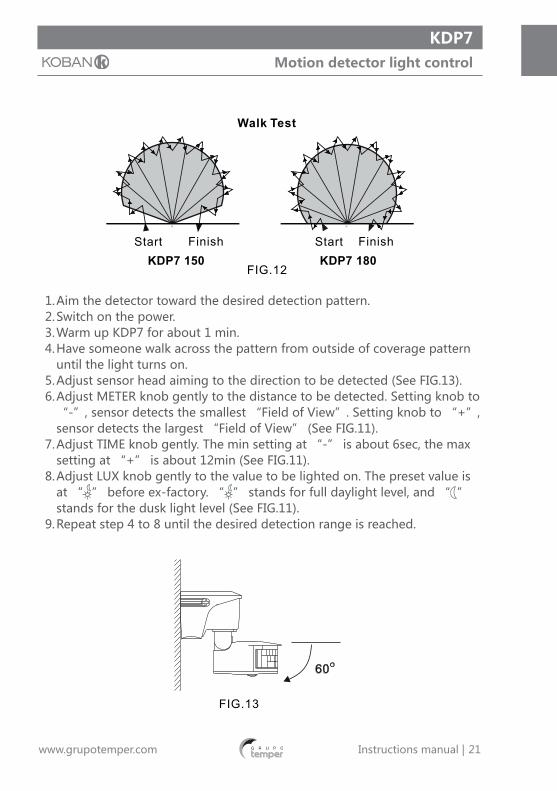
Walk test
The purpose of the walk test is to select a proper installation place and gain the desired detection coverage under auto mode. Please turn TIME knob to “-”, LUX knob to “ ”, and METER knob to “+”, then refer to the following steps conducting a walk test.The KDP7 needs to warm up for about 1min after power on. During test, the light will turn on for about 6sec when the detector is activated once the moving object starts to walk from inside the detection pattern (See FIG.12).Please stop walking as soon as the light turns on. If the moving object is keeping walking in the detection area, the timer will reset and re-count for another 6sec.
21Instructions manual | www.grupotemper.com
KDP7Motion detector light control
1. Aim the detector toward the desired detection pattern.2. Switch on the power.3. Warm up KDP7 for about 1 min.4. Have someone walk across the pattern from outside of coverage pattern
until the light turns on.5. Adjust sensor head aiming to the direction to be detected (See FIG.13).6. Adjust METER knob gently to the distance to be detected. Setting knob to
“-”, sensor detects the smallest “Field of View”. Setting knob to “+”, sensor detects the largest “Field of View” (See FIG.11).
7. Adjust TIME knob gently. The min setting at “-” is about 6sec, the max setting at “+” is about 12min (See FIG.11).
8. Adjust LUX knob gently to the value to be lighted on. The preset value is at “ ” before ex-factory. “ ” stands for full daylight level, and “ ” stands for the dusk light level (See FIG.11).
9. Repeat step 4 to 8 until the desired detection range is reached.
FIG.12
Start Finish
Walk Test
KDP7 150 KDP7 180Start Finish
FIG.13
60O

22Instructions manual | www.grupotemper.com
KDP7Motion detector light control
Note
The following conditions may cause lower sensitivity:• In very foggy nights, the sensitivity may be less due to moisture collecting
on the lens.• In very hot days, the sensitivity may be less since high ambient temperature
is close to body temperature making the unit to be less sensitive.• In very cold days when heavy clothing is dressed, especially the facial area
is covered, very little heat will be emitted from the body causing the unit to be less sensitive.
• Cleaning - Wipe with damp cloth only. Soap or polish may damage the sensor lens.
Troubleshooting
Problem Possible cause Suggested solution
Lights do not turn on
1. LUX knob set incorrectly.2. Time to power resupply is less than 5sec.3. Power does not switch on, malfunctioned bulb,or incorrect wiring.4. Incorrect direction of detector head.
1. Adjust LUX knob to “ ”.2. Shut power off for at least 5sec, then turn it again.3. Check if the power is supplied, or replace the bulb with a new one, or refer to wiring diagram to connect the wiring.4. Adjust the detector head to desired direction.

23Instructions manual | www.grupotemper.com
KDP7Motion detector light control
Problem Possible cause Suggested solution
Lights do not turn off
1. TIME setting is too long, detector iscontinuously triggered.2. Sensor is nuisance triggering.3. Incorrect location of detector.4. Wiring is connected incorrectly.
1. Setting TIME to “-”,check if the detector is nuisance.2. Keep away from detection zone to avoid activating detector while doing the test.3. Make sure unit is not aimed at object that would cause the temperaturechanging such as air conditioners orheating vents.4. Make sure load and wires are connected correctly.
Lights go on and off quickly
1. With the incorrectlocation, the detector isnuisance triggered by heat from the lamps.2. There are white or highly reflective objects within the detection coverage.
1. Select another location.2. Check if there is any white or reflective surface in the protectionpattern. Then adjust sensor and lights in different directions.
Note
Keep the lens area clean and free of obstructions. Do not attempt to open or repair the unit. There are dangerous high voltages inside.
24Instructions manual | www.grupotemper.com
KDP7Motion detector light control

25Instructions manual | www.grupotemper.com
KDP7Motion detector light control

26Instructions manual | www.grupotemper.com
KDP7Motion detector light control

TEMPER ENERGY INTERNATIONAL S.L. garantiza este aparato por 2 años ante todo defecto de fabricación. Para hacer válida esta garantía, es imprescindible presentar con este resguardo el ticket o factura de compra.
TEMPER ENERGY INTERNATIONAL S.L. guarantees this device during 2 years against any manufacturing defect. For warranty service, you must present this receipt with the purchase receipt or invoice.
TEMPER ENERGY INTERNATIONAL S.L. garantit cet apareil pour le durée de 2 annèes contre tout défault de fabrication. Pour le service de garantie, vous devez présenter ce reçu avec du ticket de caisse ou la facture.
TEMPER ENERGY INTERNATIONAL S.L. garantía este aparelho contra defeitos de fábrica ate 2 anos. Para o serviço de garantia, você deve apresentar este recibo com o recibo de compra ou fatura.
GARANTÍA • WARRANTYGARANTIE • GARANTIA 2años
yearsannéesanos
Ref. Art. Nº serie / Serial number
Nombre / Name / Nom / Nombre
Fecha de venta / Date of purchaseDate de vente / Data de venda
Sello establecimiento vendedor / Dealer stampCachet du commercant / Cambo da firma

TEMPER ENERGY INTERNATIONAL S.L.Polígono industrial de Granda, nave 1833199 • Granda - Siero • Asturias
Teléfono: +34 902 201 292Fax: +34 902 201 303Email: [email protected]
Una empresadel grupo