b14 livro de instruções eng pt - inicio - fluxs
TRANSCRIPT
ENGLISH
ESPAÑOL
ROMA
WWW.FLUXS.ES
MANUAL DE USUARIOUSER MANUAL
8
9
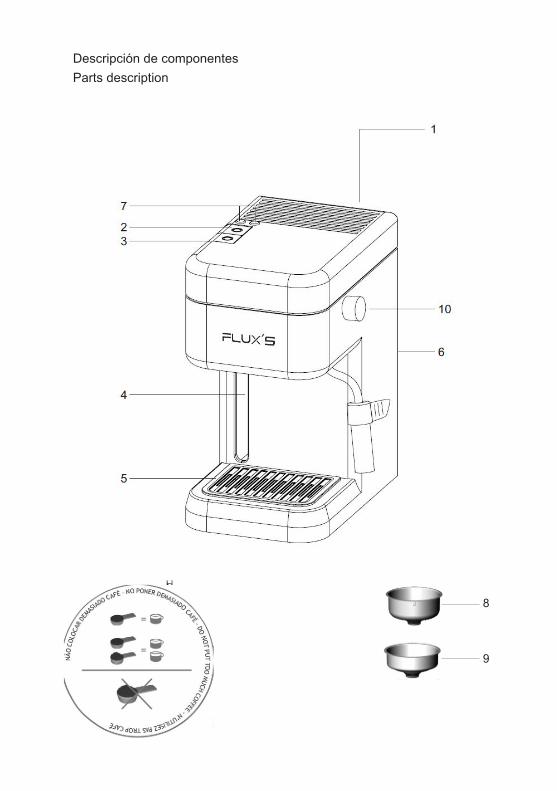
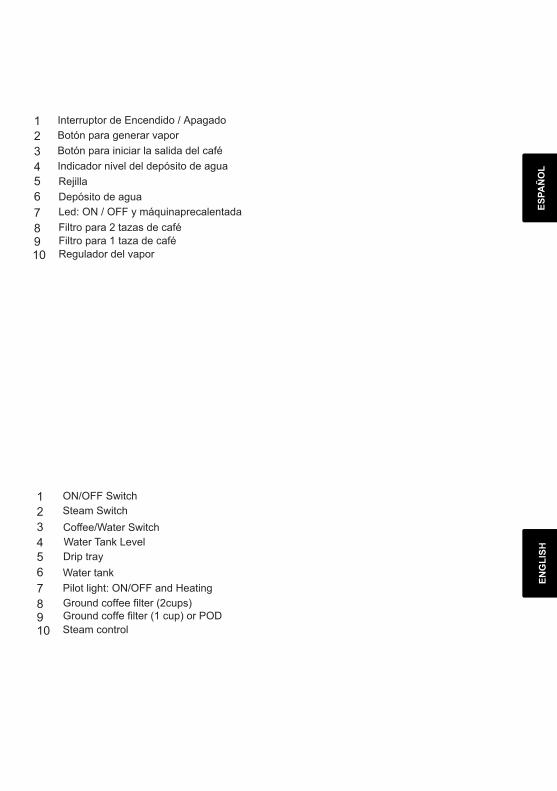
Descripción de componentes
Parts description
4
6
1
2
7
5
3
89
Interruptor de Encendido / Apagado Botón para generar vapor
Botón para iniciar la salida del café Indicador nivel del depósito de agua
RejillaDepósito de aguaLed: ON / OFF y máquinaprecalentada
Filtro para 2 tazas de caféFiltro para 1 taza de café
10 Regulador del vapor
4
6
1
2
7
5
Steam Switch
3
8910 Steam control
ENGLISH
ESPAÑOL
Ground coffee filter (2cups)Ground coffe filter (1 cup) or POD
ÍNDICE
1. Introducción2. Recomendaciones importantes3. Preparación4. El Espresso5. El Capuccino6. Preparando té 7. Limpieza y mantenimiento 8. Tecnología FLUX'S9. Garantía 10. ¿Que hacer si...?
1. INTRODUCClóN
Estimado cliente:
Le felicitamos por su compra. En FLUX'S esperamos que este satisfecho con la compra. Por eso hemos creado este libro de instrucciones y recomendaciones que esperamos le permita descubrir. .. EL VERDADERO ESPRESSO!
¿Quién no reconoce o aprecia un verdadero café Espresso? Ahora ya puede saborearlo en la tranquilidad de su hogar, sólo o en un grupo de amigos. Ésta es la invitación que le hace FLUX'S. Un buen Espresso se caracteriza por su agradable crema espesa en la superficie, de color acastañado, por su aroma único y rico y por su sabor intenso. Para ser apreciado en toda su grandeza, el Espresso debe ser servido en tazas pequeñas y poco llenas }I muy importante, debe tomarse inmediatamente después de salir de la máquina. Contrariamente a lo que piensan muchos, el café Espresso tiene, comparado con otros tipos de café, un grado menor de cafeína. Esto tiene que ver con el propio proceso de producción. Bajo la presión de una bomba, el agua caliente pasa rápidamente a través del café molido, cayendo inmediatamente a la taza. Así es el Espresso. Una manera distinta de sacar el mayor placer del café, inventada en Europa a comienzos del siglo pasado y que FLUX'S lleva hasta su casa.
2. RECOMENDACIONES IMPORTANTES
Lea atentamente las instrucciones de uso antes de utilizar la máquina por la primera vez; Verifique que la tensión indicada en la placa de características, en la parte inferior o posterior del aparato, corresponde a la de la red de su zona; La máquina deberá ser conectada a un enchufe con conexión a tierra; Cuando esté utilizando la máquina, el nivel del agua nunca debe estar por debajo de la ventanilla transparente del depósito del agua; Nunca sumergir la máquina dentro de agua; Desenchufe la máquina antes de limpiarla; Puede limpiarla con un trap0 húmedo; Si el cable de alimentación de la máquina se encuentra dañado, solo deberá ser cambiado en un taller autorizado por el fabricante, dado que son necesarias herramientas y componentes especiales para ese fin; La bomba de su máquina está protegida contra cualquier avería causada por calentamiento excesivo, ya que la bomba se desconecta automáticamente siempre que esté demasiado tiempo en funcionamiento. Si esto ocurriera, desenchufe la máquina y déjela enfriar durante unos 30 minutos. Pasado ese tiemp0, la máquina estará otra vez preparada para funcionar; No retire nunca la puntera de cappuccino con el mando de vapor abierto.
Datos Técnicos
Consulta la placa de las características puestas en la parte posterior o inferior de la máquina.
El nivel de presión acústica continuo equivalente ponderado A al cual el utilizador de este aparato está sujeto cuando éste se encuentra en funcionamiento normal, es inferior a 70 dB (A).
CE
3. PREPARACIÓN
Lave con agua y jabón el depósito extraíble de agua, el filtro de café y el porta-filtros. Enseguida, páselos por agua limpia; Todas las máquinas están 100% testadas en la línea de montaje }I dado que no es posible retirar toda el agua de la caldera, su máquina todavía debe tener algo de agua en su interior. No se extrañe, por lo tanto, si encuentra alguna gota de agua en la máquina o en el interior del embalaje; Por eso, saque cerca de medio depósito de agua a través de la máquina, precionando el conmutador para "café" 6', pero sin colocar café molido en el filtro. Es aconsejable repetir esta operación cuando la máquina esté durante bastante tiempo sin ser utilizada.
&. Importante: ¡No ponga la máquina en funcionamiento sin agua en el depósito!
4. EL ESPRESSO
Para preparar la máquina:
Extraer el depósito de agua y llenarlo con agua fresca (podemos llenarlo hasta el borde del depósito); Enchufar la máquina a la corriente; Conectar la máquina y pulsar el interruptor ó, el piloto de encendido se encenderá; Escoja el filtro que vaya a utilizar, de acuerdo con las páginas dos o tres (2,3).
Para café molido:
&. Coloque una cuchara dosificadora para cada taza de café espresso que desee.
Llene el filtro de café molido con la cuchara dosificadora que viene incluida en la máquina. Por favor introduzca una medida para cada taza de café espresso que desee. Procure que el café no rebose. Comprima ligeramente el café con el prensador de café Inserte el porta-filtros en la salida de café de la máquina; Coloque una o dos tazas de café en la bandeja debajo de las salidas de café del porta-filtros. Es importante que cierre el portafiltros correctamente de modo que el mango quede más a la derecha del punto central.
Para monodosis:
&. ¡Con la monodosis usted solo puede preparar un café cada vez!
Coloque un paquete monodosis en el porta-filtros para una dosis. Inserte el porta-filtros en la cabeza de extracción girando con fuerza hacia la derecha del frontal de la máquina; Coloque una taza de café en la bandeja debajo de las salidas de café del porta-filtros.
Preparar café:
Asegúrese de que el vapor se encuentra apagado en el boton y en la rueda reguladora; Cuando la máquina esté lista se encenderá un piloto de temperatura. Después de seguir los pasos anteriores su máquina ya está preparada para hacer café; Presione el botón para hacer café ó. En unos segundos empezará a salir el café; Cuanta más agua permita salir, más suave será el café que se realice. El espresso tendrá una suave capa de crema; Para cortar la salida de café basta presionar de nuevo el botón hacia la posición inicial.
Para extraer el portafiltro:
&, ¡Después de hacer café deje pasar entre 10-15 segundos antes de retirar elportafiltro!
Para hacer un nuevo espresso o bien extraer el portafiltros, gire el portafiltros hacia la izquierda de su máquina. Tenga cuidado con los restos de agua caliente que se encuentran sobre el café molido o la monodosis usados; Tire el café molido o la monodosis del portafiltros; Una vez haya finalizado el proceso enjuague el portafiltros y el filtro con agua corriente.
Notas:
Si desea usar saquitos monodosis después de usar café molido, basta con colocar el portafiltros el la cabeza de extracción completamente vacío y haga un café para así limpiar los restos de café del portafiltros; Con la monodosis usted solo puede preparar un café cada vez.
S. EL CAPUCCINO
Cappuccino es el nombre Italiano para la mezcla de café Espresso con un poco de leche espumada. Puede preparar un delicioso Cappuccino con su máquina de café Espresso FLUX'S. La espuma se obtiene utilizando el tubo de vapor. Primero se debe preparar el café Espresso y después la espuma de la leche. Para hacer Cappuccino, utilice tazas más grandes (175cc).
Para preparar la máquina:
Cerciórese de que existe agua suficiente en el depósito; Conectar la máquina, el piloto de encendido se encenderá; Aguarde hasta que la luz piloto de temperatura se encienda; Abra el mando del vapor girándolo hacia la izquierda. Al principio saldrá un poco de agua por el tubo. Después, cierre el mando del vapor; éste paso es solo para eliminar el agua y el vapor que puedan haber en la cámara interna antes de empezar.
Con la válvula cerrada, pulse entonces el botón de vapor en la cafetera y espere a que la luz verde esté encendida de nuevo. De esta forma se generará vapor en la cámara pero no saldrá.
Preparación de la leche:
Llene la mitad de un recipiente con leche fría; Es posible mover el tubo del vapor, girándolo, para colocarlo en una posición más favorable; Ponga el recipiente debajo del tubo del vapor, de forma que su punta quede completamente sumergida en la leche (para evitar salpicaduras); Abra lentamente el mando del vapor<& girándolo . El vapor empezará a salir por el tubo del vapor, haciendo que la leche burbujee. Baje el recipiente despacio, dejando tan solo la punta del tubo en contacto con la leche, produciendo una espuma de leche fina y compacta. A través del mando es posible controlar la cantidad de salida de vapor; Cierre el mando y el despulse boton de vaporJ\,,cuando se haya obtenido espuma de leche suficiente. Ahora ponga la leche y la espuma en el Espresso. Puede añadir cacao o canela.
¡Su Capuccino está listo para tomar!
Si quiere hacer más vapor:
Cuando el piloto indicador de temperatura OK se encienda, repita los pasos indicados arriba.
IMPORTANTE: si quiere hacer más Espresso después del Cappuccino, hay que limpiar el tubo del vapor. Debe limpiarlo con agua del grifo hasta que no quede leche dentro.
6. PREPARANDO TÉ
¡También puede prepararse un Té con su máquina FLUX'S!
Cerciórese de que existe agua suficiente en el depósito; Conecte la máquina y pulse el interruptor trasero de encendido; La luz piloto se encenderá; Ponga la taza con el saquito de té debajo del tubo del vapor; Abra el mando del vapor girándolo y después presione el botón para café ó y el boton del vapor a la vez, de esta forma el agua caliente empieza a salir por el tubo del vapor; Cuando la cantidad de té sea suficiente, despulse los dos botones y cierre el regulador del vapor.
7. LIMPIEZA Y MANTENIMIENTO
Desconecte la máquina; Lave regularmente los filtros y los portafiltros;
Suelte el portafiltro y quite el café o la monodosis utilizada. Después de limpiar, coloque el portafiltro de nuevo en la máquina; El depósito de agua, la rejilla y el apoyo de la rejilla son desmontables; En caso de que utilice café molido, limpie regularmente la salida del agua, para evitar la incrustación de café. Para eso, introduzca el portafiltros, sin café, en la máquina, presione el botón para café (para que salga el agua) y gire hacia atrás y adelante agitando el portafiltros; La puntera para Cappuccino puede ser extraída del tubo para mayor comodidad a la hora de limpiarla.
Descalcificación:
La cal existentente en el agua puede incrustarse en el interior de su máquina, por lo que se aconseja proceder a su descalcificación por lo menos una vez al año.
Llene medio depósito de agua con una solución de 50% agua y 50% vinagre; Haga su máquina funcionar hasta acabar con la solución como si estuviera haciendo café; Para limpiar los residuos de vinagre de su máquina y del tubo, utilice dos depósitos de agua completos, pero con agua limpia.
& Para esta operación podrá utilizar productos propios descalcificadores y no vinagre. Si lo hace, siga las instrucciones del fabricante.
-
¡Participe en la conservación del medio ambientel
Su electrodoméstico contiene materiales recuperables y/o reciclables. Entréguelo al final de su vida útil, en un centro de recogida específico donde será tratado de forma adecuada.
8. TECNOLOGÍA FLUX'S
20 Bares
Sistema Aquastop
Sistema que:
• Elimina el aire de la bomba y del circuito de agua;• Elimina la presión en la caldera evitando el goteo;• Actúa como válvula de seguridad;
Aquastop entra en funcionamiento cuando:
• Utilice la máquina por la primera vez;• La máquina lleva mucho tiempo sin ser utilizada;• El depósito de agua se quede vacío durante la utilización de la máquina;
Filtro Creammaker
Es un filtro que asegura una crema espesa en todos los cafés.
9. GARANTÍA
FLUX'S garantiza este producto por un período de 2 ANÓS* que entrará en vigor a partir de la fecha de VENTA, de acuerdo a las siguientes condiciones:
El titular de esta garantía tiene derecho a la reparación totalmente gratuita de los vicios o defectos originados y de los daños y perjuicios por ellos ocasionados. En el supuesto de que la reparación efectuada no fuera satisfactoria y el aparato no revistiese las condiciones óptimas para el uso al que estuviese destinado, el beneficiario tendrá derecho a la substitución del mismo por otro de idénticas características (previa presentación de la factura de compra y de éste documento debidamente cumplimentado).
Excepciones de Garantía:
No quedan cubiertos los daños sufridos por o como consecuencia de: uso indebido, deterioros producidos por efecto de las aguas utilizadas tales como cal u otros aditivos, ver manual de uso del aparato. Accidentes, negligencias, etc.;
La garantía quedará anulada automáticamente en el caso de que el producto haya sido manipulado por entidades o personas ajenas al servicio técnico autorizado por la marca; La reparación o canje de este producto durante el período de garantía la amplia en los términos legales de acuerdo con la ley vigente.
Vías de contacto
Para contactar con el departamento de atención al cliente de FLUX'S puede usar las siguientes vías:
Tlf: 902992782 - Email: Garantí[email protected]
Así mismo, al titular de esta garantía se le reconoce todos los derechos que la legislación vigente le otorgue, ya sean de ámbito estatal o de cada Comunidad Autónoma.
1 O. ¿QUE HACER SI?
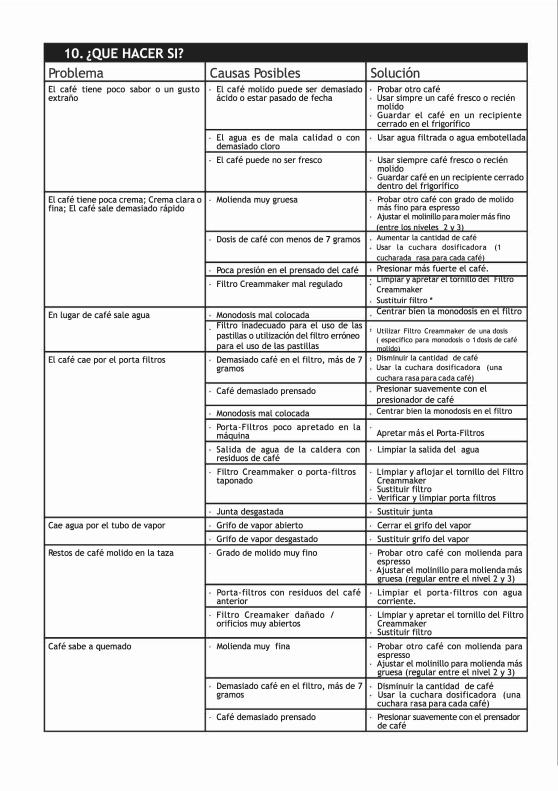
Problema Causas Posibles Solución El café tiene poco sabor o un gusto El café molido puede ser demasiado extraño ácido o estar pasado de fecha
El agua es de mala calidad o con demasiado cloro
El café puede no ser fresco
El café tiene poca crema; Crema clara o fina; El café sale demasiado rápido
• Molienda muy gruesa
Probar otro café Usar simpre un café fresco o recién molido Guardar el café en un recipiente cerrado en el fri¡¡orífico
Usar agua filtrada o agua embotellada
Usar siempre café fresco o recién molido Guardar café en un recipiente cerrado dentro del frigorífico
Probar otro café con grado de molido más fino para espresso
• Dosis de café con menos de 7 gramos
En lugar de café sale agua
El café cae por el porta filtros
• Ajustar el molinillo para moler más fino
(entre los niveles 2 y 3) Aumentar la cantidad de café
Usar la cuchara dosificadora (1
cucharada rasa para cada café)
• Presionar más fuerte el café. • Limpiar y apretar el tornillo del Filtro
Creammaker
Sustituir filtro •
Centrar bien la monodosis en el filtro
• Utilizar Filtro Creammaker de una dosis
( especifico para monodosis o 1 dosis de café
molido)
• Disminuir la cantidad de café
Usar la cuchara dosificadora (una
cuchara rasa para cada café)
Presionar suavemente con el
presionador de café
Centrar bien la monodosis en el filtro
Apretar más el Porta-Filtros
Cae agua por el tubo de vapor
Restos de café molido en la taza
Café sabe a quemado
Limpiar la salida del agua
Limpiar y aflojar el tornillo del Filtro Creammaker Sustituir filtroVerificar y limpiar porta filtros
Sustituir junta
Cerrar el grifo del vapor
Sustituir grifo del vapor
Probar otro café con molienda para espresso Ajustar el molinillo para molienda más 2ruesa (re2ular entre el nivel 2 v 3)
Limpiar el porta-filtros con agua corriente.
Limpiar y apretar el tornillo del Filtro Creammaker Sustituir filtro
Probar otro café con molienda para espresso
• Ajustar el molinillo para molienda más gruesa (regular entre el nivel 2 y 3)
Disminuir la cantidad de café Usar la cuchara dosificadora cuchara rasa para cada café)
(una
Poca presión en el prensado del café
Filtro Creammaker mal regulado
Monodosis mal colocada Filtro inadecuado para el uso de las pastillas o utilización del filtro erróneo para el uso de las pastillas
Demasiado café en el filtro, más de 7 gramos
Café demasiado prensado
Monodosis mal colocada
Porta-Filtros poco apretado en la máauina
Salida de agua de la caldera con residuos de café
Filtro Creammaker o porta-filtros taponado
Junta desgastada
Grifo de vapor abierto
Grifo de vapor desgastado
Grado de molido muy fino
Parta-filtros con residuos del café anterior
Filtro Creamaker dañado I
orificios muy abiertos
Molienda muy fina
Demasiado café en el filtro, más de 7 gramos
Café demasiado prensado Presionar suavemente con el prensador de café
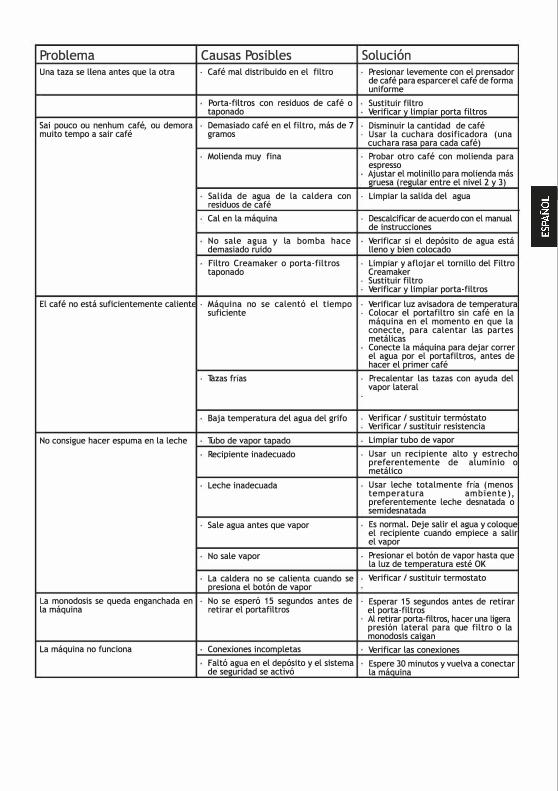
Problema Causas Posibles Solución
Una taza se llena antes que la otra • Café mal distribuido en el filtro
Sai pouco ou nenhum café, ou demora muito tempo a sair café
Porta-filtros con residuos de café o taponado
Demasiado café en el filtro, más de 7 gramos
Molienda muy fina
SaUda de agua de la caldera con residuos de café
Cal en la máquina
No sale agua y la bomba hace demasiado ruido
Filtro Creamaker o porta-filtros taponado
El café no está suficientemente caliente • Máquina no se calentó el tiempo suficiente
• Tazas frías
Baja temperatura del agua del grifo
No consigue hacer espuma en la leche Tubo de vapor tapado
Recipiente inadecuado
Leche inadecuada
• Sale agua antes que vapor
No sale vapor
La caldera no se calienta cuando se presiona el botón de vapor
La monodosis se queda enganchada en No se esperó 15 segundos antes de la máquina retirar el portafiltros
La máquina no funciona Conexiones incompletas
Faltó agua en el depósito y el sistema de seguridad se activó
Presionar levemente con el prensador de café para esparcer el cafe de forma uniforme
Sustituir filtro Verificar y limpiar porta filtros
Disminuir la cantidad de café Usar la cuchara dosificadora (una cuchara rasa para cada café)
Probar otro café con molienda para espresso Ajustar el molinillo para molienda más gruesa (regular entre el nivel 2 y 3)
Limpiar la salida del agua
Descalcificar de acuerdo con el manual de instrucciones
Verificar si el depósito de agua está lleno y bien colocado
Limpiar y aflojar el tornillo del Filtro Creamaker Sustituir filtroVerificar y limpiar porta-filtros
Verificar luz avisadora de temperatura Colocar el portafiltro sin café en la máquina en el momento en que la conecte, para calentar las partes metálicas Conecte la máquina para dejar correr el agua por el portafiltros, antes de hacer el primer café
Precalentar las tazas con ayuda del vapor lateral
Verificar / sustituir termóstato Verificar / sustituir resistencia
Limpiar tubo de vapor
Usar un recipiente alto y estrecho preferentemente de aluminio o metálico
Usar leche totalmente fría (menos temperatura ambiente), preferentemente leche desnatada o semi desnatada
Es normal. Deje salir el agua y coloque el recipiente cuando empiece a salir el vapor
Presionar el botón de vapor hasta que la luz de temoeratura esté OK
Verificar / sustituir termostato
Esperar 15 segundos antes de retirar el porta-filtros Al retirar porta-filtros, hacer una ligera presión lateral para que filtro o la monodosis caigan
Verificar las conexiones
Espere 30 minutos y vuelva a conectar la máquina
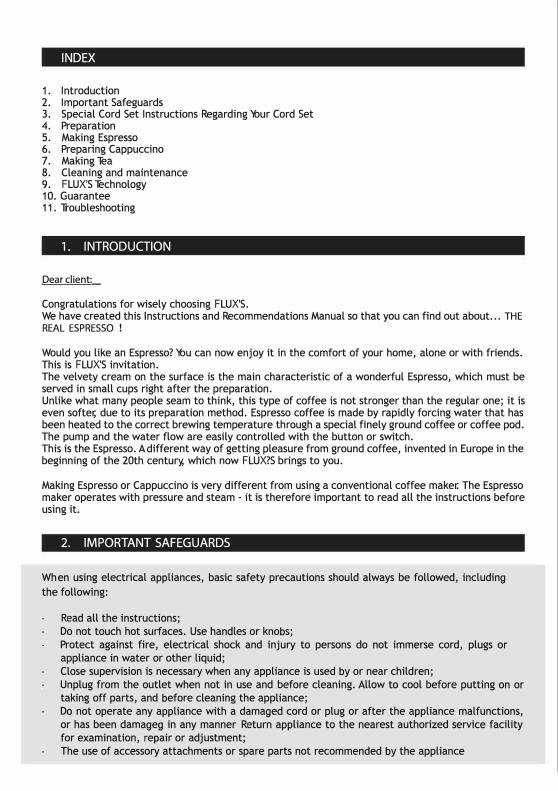
INDEX
1. lntroduction2. lmportant Safeguards3. Special Cord Set lnstructions Regarding 'ióur Cord Set4. Preparation5. Making Espresso6. Preparing Cappuccino7. Making Tea8. Cleaning and maintenance9. FLUX'S Technology1 O. Guarantee11. Troubleshooting
1. INTRODUCTION
Dear client:
Congratulations far wisely choosing FLUX'S. We have created this lnstructions and Recommendations Manual so that you can find out about... THE REAL ESPRESSO !
Would you like an Espresso? 'ióu can now enjoy it in the comfart of your home, alone or with friends. This is FLUX'S invitation. The velvety cream on the surface is the main characteristic of a wonderful Espresso, which must be served in small cups right after the preparation. Unlike what many people seam to think, this type of coffee is not stronger than the regular one; it is even softer, due to its preparation method. Espresso coffee is made by rapidly farcing water that has been heated to the correct brewing temperature through a special finely ground coffee or coffee pod. The pump and the water flow are easily controlled with the button or switch. This is the Espresso. A different way of getting pleasure from ground coffee, invented in Europe in the beginning of the 20th century, which now FLUX?S brings to you.
Making Espresso or Cappuccino is very different from using a conventional coffee maker. The Espresso maker operates with pressure and steam - it is therefare important to read ali the instructions befare using it.
2. IMPORTANT SAFEGUARDS
When using electrical appliances, basic safety precautions should always be fallowed, including
the fallowing:
Read ali the instructions;
Do not touch hot surfaces. Use handles or knobs;
Protect against fire, electrical shock and injury to persons do not immerse cord, plugs or
appliance in water or other liquid;
Clase supervision is necessary when any appliance is used by or near children;
Unplug from the outlet when not in use and befare cleaning. Allow to cool befare putting on or
taking off parts, and befare cleaning the appliance;
Do not operate any appliance with a damaged cord or plug or after the appliance malfunctions,
or has been damageg in any manner Return appLiance to the nearest authorized service facility
far examination, repair or adjustment;
The use of accessory attachments or spare parts not recommended by the appliance
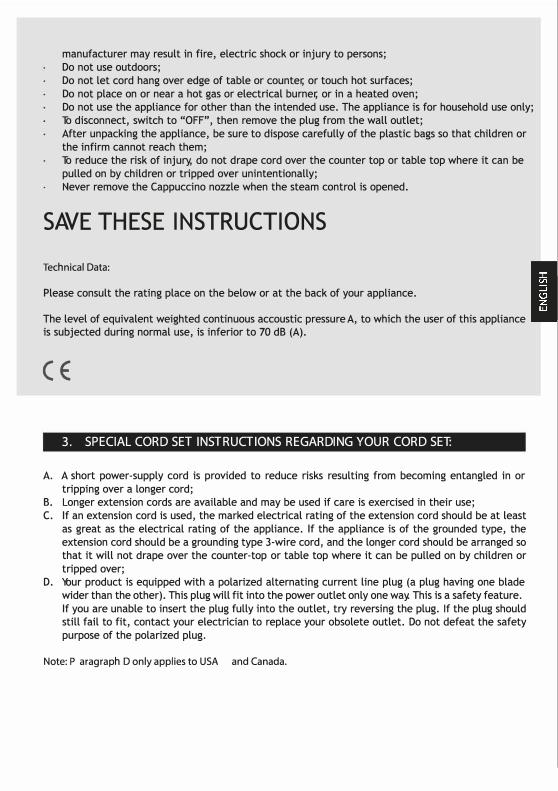
manufacturer may result in fire, electric shock or injury to persons;
Do not use outdoors;
Do not let cord hang over edge of table or counter, or touch hot surfaces;
Do not place on or near a hot gas or electrical burner, or in a heated oven;
Do not use the appliance for other than the intended use. The appliance is for household use only;
To disconnect, switch to "OFF", then remove the plug from the wall outlet;
After unpacking the appliance, be sure to dispose carefully of the plastic bags so that children or
the infirm cannot reach them;
To reduce the risk of injury, do not drape cord over the counter top or table top where it can be
pulled on by children or tripped over unintentionally;
Never remove the Cappuccino nozzle when the steam control is opened.
SAVE THESE INSTRUCTIONS
Technical Data:
Please consult the rating place on the below or at the back of your appliance.
The level of equivalent weighted continuous accoustic pressure A, to which the user of this appliance
is subjected during normal use, is inferior to 70 dB (A).
CE
3. SPECIAL CORO SET INSTRUCTIONS REGAROING YOUR CORO SET:
A. A short power-supply cord is provided to reduce risks resulting from becoming entangled in or
tripping over a longer cord;
B. Longer extension cords are available and may be used if care is exercised in their use;
C. lf an extension cord is used, the marked electrical rating of the extension cord should be at least
as great as the electrical rating of the appliance. lf the appliance is of the grounded type, the
extension cord should be a grounding type 3-wire cord, and the longer cord should be arranged so
that it will not drape over the counter-top or table top where it can be pulled on by children or
tripped over;
D. 'rour product is equipped with a polarized alternating current line plug (a plug having one blade
wider than the other). This plug will fit into the power outlet only one way. This is a safety feature.
lf you are unable to insert the plug fully into the outlet, try reversing the plug. lf the plug should
still fail to fit, contact your electrician to replace your obsolete outlet. Do not defeat the safety
purpose of the polarized plug.
Note: P aragraph D only applies to USA and Canada.
Making Steam:
Place the frothing jug half-filled with low fat milk under the cappuccino nozzle so that its tip is just under the surface of the milk; Slowly open steam control to release steam. Move pitcher in circular motion keeping the tip of frother just under surface of milk as it begins to froth. The air intake hales on side of frother should not be immersed in the milk. Do not let milk come to a boil since it will not froth; When you have made enough froth, clase steam control, and remove the pitcher; Spoon the froth onto the Espresso in each cup and gently pour the hot milk along the side of the cup. Top each cup of cappuccino with a dash of cinnamon, cocoa, nutmeg or chocolate shavings.
'rour Cappuccino is ready to be served!
lf you need to produce sorne more steam:
When the temperature OK indicator light glows, repeat ali the steps above indicated. Turn on the coffee function to assure you that the machine have water.
,&. Milk residues, when dry, can damage the cappuccino nozzle. 'rou must clean it after each use. To do it, remove it and rinse it well.
7. MAKING TEA
And you can make TEA as well!
Preparing the appliance:
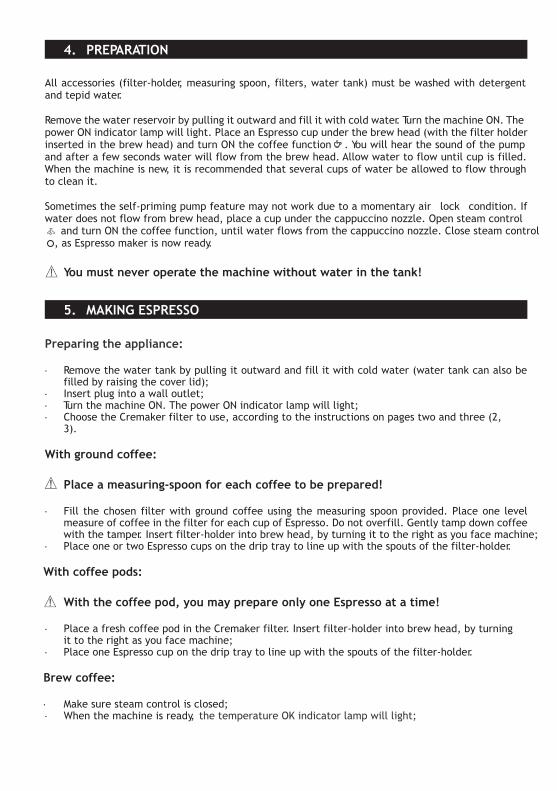
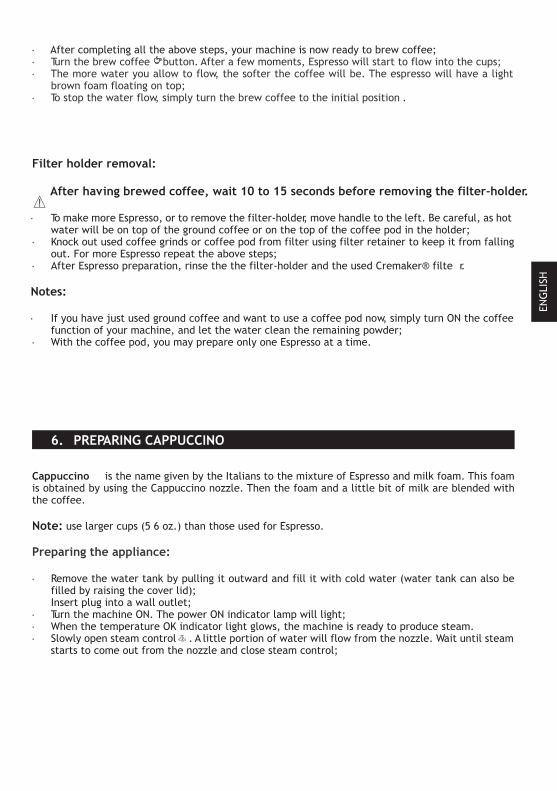
Remove the water tank by pulling it outward and fill it with cold water (water tank can also be filled by raising the cover lid); lnsert plug into a wall outlet; Turn the machine ON. The power ON indicator lamp will light; When the machine is ready, the temperature OK indicator lamp will light; Place the cup with the tee bag inside under the cappuccino nozzle. Open the steam control <l,, and turn the coffee function ON & . Water immediately drops from the cappuccino nozzle. When you reach the desired quantity of water, turn the coffee function OFF�, and clase the steam control;
8. CLEANING AND MAINTENANCE
Clean the cappuccino nozzle each time after you have immersed it in milk; otherwise the inside of nozzle and air intake hales become clogged and milk deposits on outside harden and are difficult
to remove. To clean hold wet cloth very clase to tip of nozzle and open steam control �. Let steam escape into the cloth for one or two seconds to clear out nozzle. Wipe outside of nozzle. Clean by soaking in hot water, then replace. lf necessary, use a needle to clean air intake hales on side of frother; No Briel parts should be placed in the dishwater. This will cause distortion and may result in the parts not functioning proverly or safely; From time to time, remove lower section of frother by holding upper part and unscrewing lower part. Clean carefully and reassemble; Clean filter-holder and coffee filters with water after each use; Remove drip tray and grid and wash with warm water. Use sponge to clean out drip area; Ground coffee will adhere to the seal inside of the brew head. Keep it clean; When the machine is not in use for a long period, drain stale water from machine by turning the coffee function ON. However, do this only after you have filled reservoir with fresh water. Never operate pump unless there is water in the machine; Wash Cremaker filters and the filter-holder regularly; The water tank and the drip tray can be removed for an easier cleaning; The cappuccino nozzle can be removed from the steam tube for cleaning.
Descaling:
lt is advisable to descale the appliance every 4- 6 months, depending on the hardness of the water and the frequency of use.
Fill the water tank with a 50% water, 50% vinegar solution; Place a recipient under the brew head without filter-holder; Turn ON the coffee funtion óand let most of the solution flow to a recipient; Turn OFF the coffee function, put the recipient under the Cappuccino nozzle and open the steam controlc&b; When the water tank is nearly empty, clase the steam control; To remove traces of the descaling solution, fill the water tank with fresh water and turn ON the coffee function ó . Let flow the equivalent to 2 anda half water tanks, and turn the coffee function OFF&; Open the steam control�,, and turn the coffee function ON<!J>, and let the remaining water on the water tank flow. Pay clase attention to the water level, as you must never operate the machine without water in the tank!
L'.t This operation may be hazardous if other substances are used instead of approved descalingmaterials recommended for household coffee makers. Product failure due to scale accumulation is not covered by the warrant}( No other servicing should be attempted by the user.
-
Environment protection first!
'tbur appliance contains valuable materials which can be recovered or recycled. Leave it at a collection point.
9. FLUX'S TECHNOLOGY
20 bar pump:
The Aquastop System
The Aquastop system has 3 functions:
• Eliminates most of the annoying dripping;· Has a water-return tube wich allows the heated water to flow back into the water reservoir, intested
of dripping;• Security valve;
lt starts working when:
• The machi ne is used for the first time;• The machine does not work for a long period oftime;• During the usage, the water tank becomes empty;
Creamaker filter:
Is a filter that assures a velvety cream in all Espressos.
1 O. GUARANTEE
FLUX'S guarantees your appliance for 2 YEARS * parts and labour from the date of purchase, according to the following conditions:
This guarantee is limited to the the replacement of inefficient parts or assembly malfunctions in Flux's authorized service centers; This guarantee is valid exclusively in the country where the appliance was bought; To take advantage of this guarantee, present proof of purchase.
This guarantee excludes damage resulting from:
All appliances not being used according to the manufacturer s instructions; The connection of the appliance to a power supply with a voltage different to that shown on the rating plate; Exterior influences such as atmospheric discharges, floodings, etc; A fall or impact (breakage of plastic or glass); lncorrect handling not in compliance with the instructions for use; Parts with natural consuming such as, filter-holder vedation joint, coffee filters; lnsufficient aftercare or cleanning, excessive limescale; The use of abrasive detergents unsuitable for plastic items; Damaged parts; Use for commercial purposes (including small offices).
L'.h Customer Service
Email contact: [email protected]
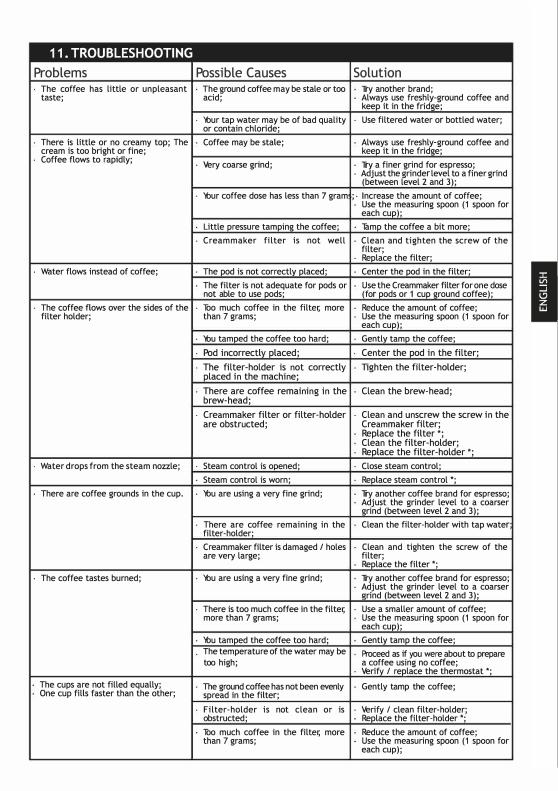
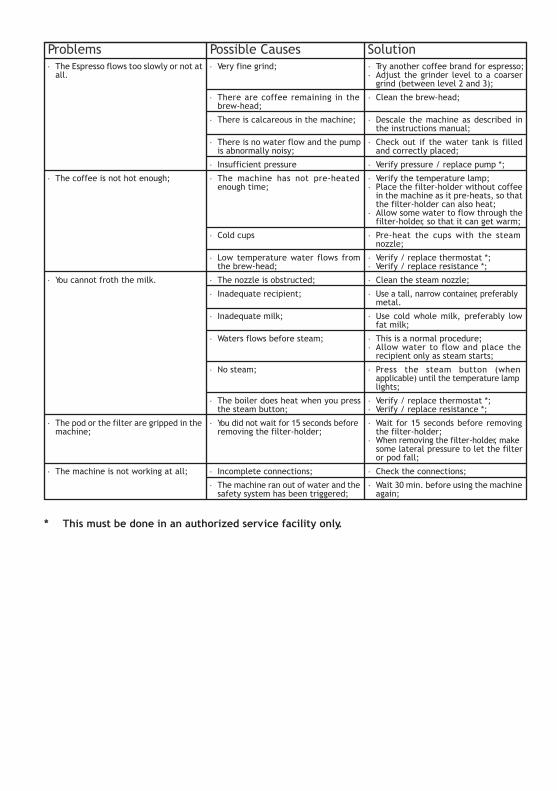
11. TROUBLESHOOTING
Problems Possible Causes Solution
The coffee has little or unpleasant The ground coffee may be stale or too Try another brand; taste; acid; Always use freshly-ground coffee and
keep it in the fridge;
'lóur tap water may be of bad quality Use filtered water or bottled water; or contain chloride;
There is little or no creamy top; The Coffee may be stale; Always use freshly-ground coffee and cream is too bright or fine; keep it in the fridge; Coffee flows to rapidly;
Very coarse grind; Try a finer grind for espresso; • Adjust the grinder level to a finer grind
(between level 2 and 3);
'lbur coffee dose has less than 7 gram ; • lncrease the amount of coffee;
• Water flows instead of coffee;
The coffee flows over the sides of the filter holder;
Water drops from the steam nozzle;
• There are coffee grounds in the cup.
• The coffee tastes burned;
The cups are not filled equally;
Use the measuring spoon (1 spoon for each cup);
Tamp the coffee a bit more;
Clean and tighten the screw of the filter; Replace the filter;
Center the pod in the filter;
Use the Creammaker filter for one dose (for pods or 1 cup ground coffee);
Reduce the amount of coffee; Use the measuring spoon (1 spoon for each cup);
Gentlv tamo the coffee;
Center the pod in the filter;
Tighten the filter-holder;
Clean the brew-head;
Clean and unscrew the screw in the Creammaker filter; Replace the filter •; Clean the filter-holder; Reolace the filter-holder •;
Close steam control;
Replace steam control •;
Try another coffee brand for espresso; Adjust the grinder level to a coarser grind (between level 2 and 3);
Clean the filter-holder with tap water;
Clean and tighten the screw of the filter; Replace the filter •;
Try another coffee brand for espresso; Adjust the grinder level to a coarser Qrind íbetween level 2 and 3);
Use a smaller amount of coffee; Use the measuring spoon (1 spoon for each cup);
Gently tamp the coffee;
Proceed as if you were about to prepare a coffee using no coffee; Verify / replace the thermostat ';
Gently tamp the coffee; One cup fills faster than the other;
Verify / clean filter-holder; Replace the filter-holder •;
Reduce the amount of coffee;
Little pressure tamping the coffee;
Creammaker fil ter is not well
The pod is not correctly placed;
The filter is not adequate for pods or not able to use pods;
Too much coffee in the filter, more than 7 grams;
'lbu tamoed the coffee too hard;
Pod incorrectly placed;
The filter-holder is not correctly placed in the machine;
There are coffee remaining in the brew-head;
Creammaker filter or filter-holder are obstructed;
Steam control is ooened;
Steam control is worn;
)bu are using a very fine grind;
There are coffee remaining in the fil ter-holder;
Creammaker filter is damaged / holes are very large;
'lóu are using a very fine grind;
There is too much coffee in the filter, more than 7 grams;
)bu tamped the coffee too hard; The temperature of the water may be too high;
The ground coffee has not been evenly spread in the filter;
Filter-holder is not clean or is obstructed;
Too much coffee in the filter, more than 7 grams; Use the measuring spoon (1 spoon for
each cup);